
Rule Builder Deep Dive
This section explains every part of the Rule Builder in detail.
This section explains every part of the Rule Builder in detail.
Use it as a reference when you’re not sure what a field means or how a setting will behave.
The Rule Builder always follows the same 3-step flow:
Step 1 – Lock Target → Step 2 – Access & Message → Step 3 – Exclude Pages
The right column holds two sticky cards, Summary and Preview, that stay in view while you work through the steps.
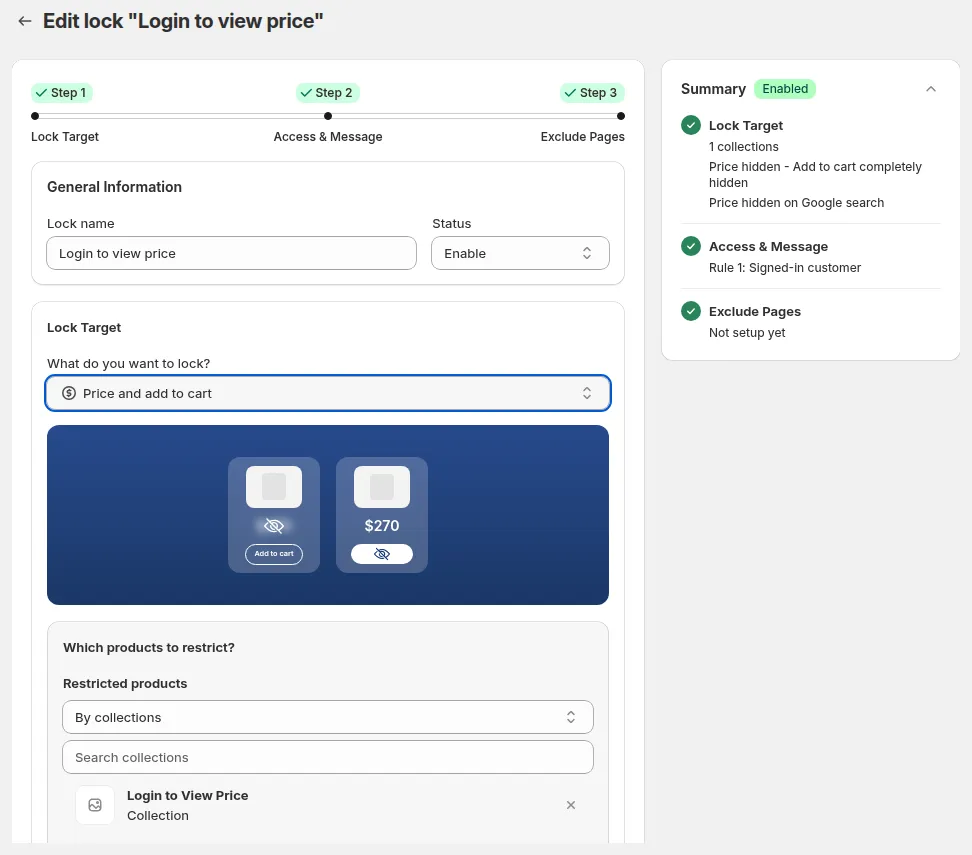
A saved rule: all three steps show a ✓ and the Summary card lists every choice.
Navigating the Rule Builder
Section titled “Navigating the Rule Builder”Stepper
Section titled “Stepper”- The stepper at the top shows Lock Target, Access & Message and Exclude Pages.
- The current step is a green pill. A completed step is a green pill with a ✓.
- Click the name of a completed step (✓) to go back to it. Everything you entered is kept. You can’t jump ahead to a step you haven’t completed yet: finish the current step and click Next.
- Use Next and Back at the bottom of each step. Step 3 has Save.
Summary card
Section titled “Summary card”The Summary card shows the rule’s status badge (Enabled / Disabled) and one line per step, with a check icon once the step is done:
- Lock Target: e.g. “Applies to all products / Price hidden - Add to cart visible but disabled”, “2 products” or “1 specific collections”.
- Access & Message: e.g. “Rule 1: Signed-in customer / Rule 2: Passcode”.
- Exclude Pages: e.g. “Excluded: Homepage, 0 Specific pages”.
A step you haven’t configured yet shows “Not setup yet”.
Preview card
Section titled “Preview card”In Step 2 and Step 3, once a rule has at least one condition set, the Preview card appears under Summary. Pick a message from its dropdown (e.g. Message Hide Price, Passcode, Access Denied Message) to see a live storefront mock that updates in real time. Click Customize message to edit it (see section 8, Lock message, below).
Contextual Save Bar
Section titled “Contextual Save Bar”On an existing lock, Shopify’s Contextual Save Bar appears at the top of the page as soon as you change anything, with Unsaved changes, Discard and Save. Click Save there at any step. On a new lock, the bar appears once you reach Step 3. You can also click Save at the bottom of Step 3.

Save from the Contextual Save Bar.
Step 1 – Lock Target
Section titled “Step 1 – Lock Target”In Step 1, you define the identity and scope of the lock:
- What you call this rule (for your own management).
- Which part of the store it applies to.
1. General Information
Section titled “1. General Information”Lock name
- Internal name shown in the Lock list. It is required; leaving it empty shows “Rule name is required”.
- Best practice: use a clear, descriptive pattern, e.g.:
Hide prices from guestsWholesale collection – only for wholesale tagLock entire site – B2B only
Status (Enable / Disable)
- Enable: rule is applied to your storefront.
- Disable: rule is saved but not enforced.
- Use Disable to temporarily turn off a lock without deleting it.
2. Target: what you lock
Section titled “2. Target: what you lock”In the Lock Target card, open What do you want to lock? and pick a target:
- Entire store
- Locks the whole storefront behind your access rules.
- Use for B2B-only or private stores.
- Price and add to cart
- Keeps products visible but hides the price, the Add to cart button, or both, for blocked visitors.
- Products
- Hides selected products completely, or locks only their product pages.
- Collections
- Hides selected collections, their product cards and product pages, and their menu links, for blocked visitors.
- Variants
- Hides variants that match an option value (e.g. all variants where “Size” equals “XL”).
- Pages, blogs and URLs
- Targets pages, blogs, or custom URLs.
- Typically used for wholesale info pages, partner portals, documentation, or landing pages.
- Sections, blocks, and snippets
- Hides theme sections, blocks or snippets, picked by name (Native Section/Block) or matched by a Custom CSS Selector.
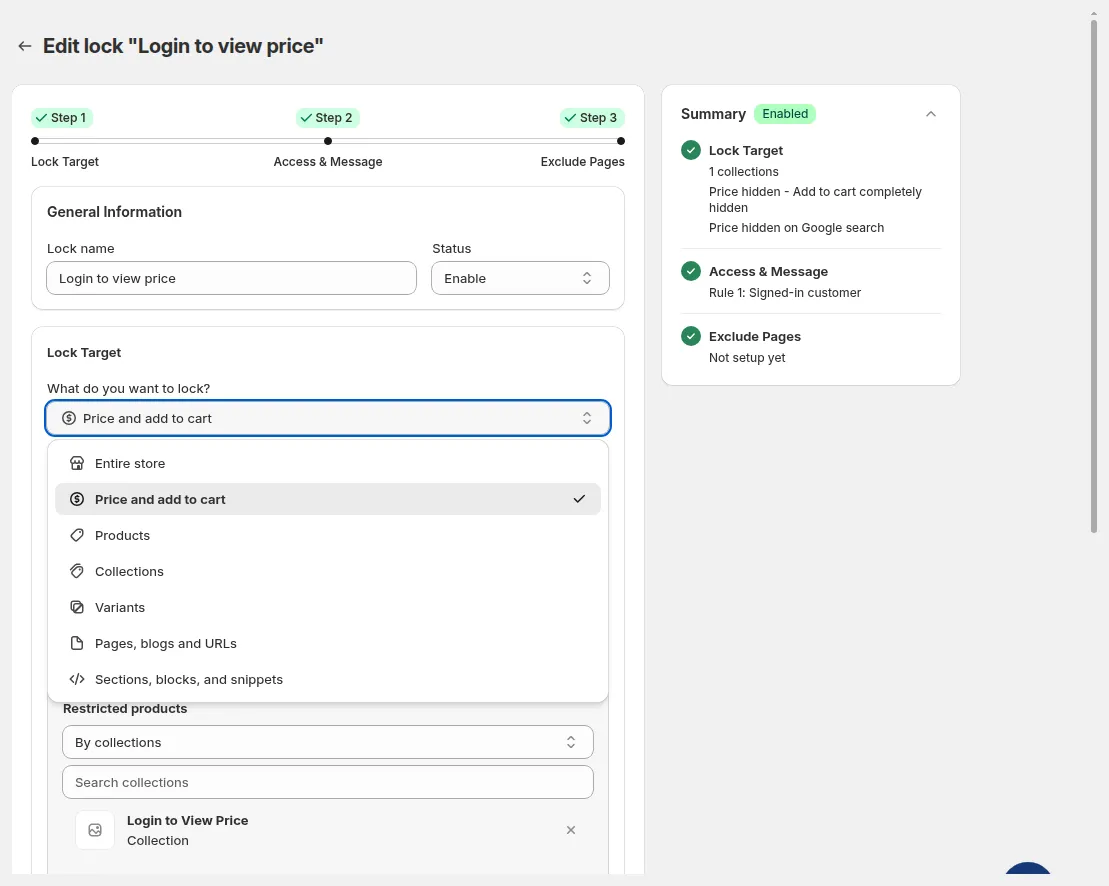
The 7 lock targets.
3. Scope selection
Section titled “3. Scope selection”After choosing a target, define its scope:
- Price and add to cart → Restricted products: All product, By tags, By collections, Specific products, or Specific variants.
- Products → Restricted products: All product, By tags, By collections, or Specific products (search, or pick in Select products).
- Collections → Which collections to restrict?: All or Specific (search, or pick in Select collections).
- Variants → Restricted variants → Variant options: the variant option and value to match (Search variant options). The card notes: “Locking variants does not support age verification, email subscriptions, or secret link access”.
- Pages, blogs and URLs → Select content type to lock: Page (All pages / Specific pages), Blog (All blogs / Specific blogs), or URL (type a path and click Add).
- Sections, blocks, and snippets → Select target to lock → Target selection mode:
- Native Section/Block: “Use Shopify theme sections/blocks with Liquid context.” Then pick in Name of section, block, or snippet.
- Custom CSS Selector: “Use .className or #elementId for third-party JS or custom elements.”
This ensures the lock is applied only where you intend.
4. Price-specific options (for Price and add to cart)
Section titled “4. Price-specific options (for Price and add to cart)”When the target is Price and add to cart, two extra groups appear:
- What do you want to hide?
- Hide price, then either Disable Add to cart (“Still visible – can’t be clicked.”) or Hide Add to cart (“Completely invisible.”).
- Keep price visible, hide Add to cart (“Price stays visible; only the button is removed.”).
- Search visibility → Hide price on Google search
- Keeps prices out of Google search results. Your store must be public, and Google can take up to 24 hours to re-index.
- Useful for protecting B2B or contract pricing.
With Specific variants selected, the What do you want to hide? and Search visibility options are not shown.
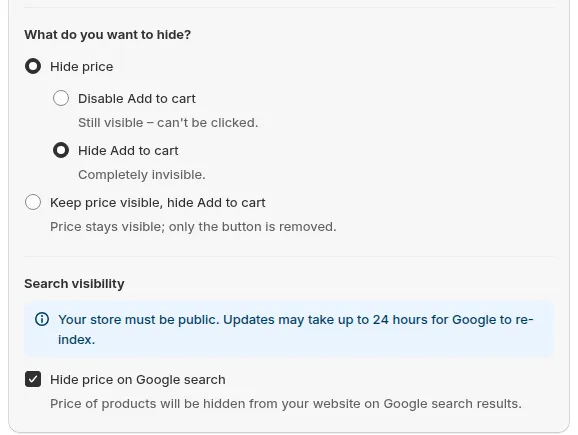
Price options for the Price and add to cart target.
5. Product and collection visibility options
Section titled “5. Product and collection visibility options”Products → Product Visibility Control:
- Fully Hide Product: “Completely removed from storefront (no trace in collections, search, or product page).”
- Only lock product page: “Product stays visible everywhere, but the product page shows “Access Denied.””
- Plus, under Search visibility, Hide price on Google search and Hide from navigation menu (ticked by default, for both modes).
Collections → Visibility settings (all ticked by default):
- Hide collection cards
- Hide product cards
- Hide product pages
- Hide from navigation menu
For details, see Hide Products & Collections.
Step 2 – Access & Message
Section titled “Step 2 – Access & Message”In Step 2, you define who can unlock or see the content you targeted in Step 1.
You do this by adding conditions to rules. Each condition is like a test:
“If this statement is true for the visitor, then they are allowed.”
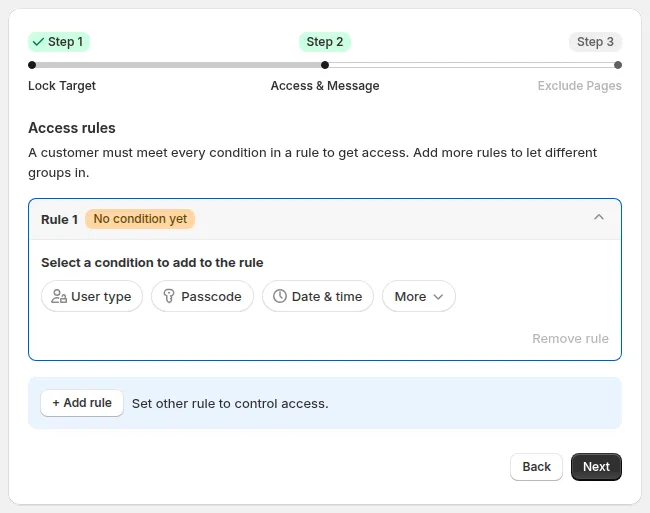
Pick a condition chip to add the first condition to Rule 1.
6. Main condition types
Section titled “6. Main condition types”Pick a condition chip under Select a condition to add to the rule, then choose the option in Select access rule. For User type, Email, Location and Other condition, you can tick Reverse access rule to invert the condition.
User type
- Everyone - No restrictions: the app notes: “When this condition is selected, it will take the highest priority.”
- Signed-in customers - Must be logged in: used for “Hide prices from guests” and “Lock page for logged-in users only”.
- Tagged customers – Must have specific tags: Shopify customer tags like
wholesale,b2b-approved,silver,gold. Core of most B2B & segmentation flows. - Specific customers – Must match exact email: grants access only to selected customer accounts.
- Request access – visitor request, you approve
- Customer must be in this company name / Customer must be in this company location / B2B customer – Shopify B2B only: Shopify B2B conditions.
Passcode
- Passcode - Must enter the correct passcode. Good for invite-only content without creating accounts.
- Add one or more passcodes (leave the field empty and click Add passcode to generate one, or use Import; Clear appears once a passcode is added), and set Passcode case-sensitive.
- Under Extra setting, choose Enter passcode once to access all pages, Enter passcode once to access each pages, or Enter passcode each time to access each pages.
Date & time
- After date/time → Visible from or Before date/time → Visible until. Time follows your Shopify store’s time zone.
More
- Email: Email domain - Must use an allowed email domain: choose a Condition (default Contains) and add Values.
- Location: Specific market – Only for selected Shopify markets, IP address – Only for specific IP addresses, Location – Only for selected regions, or Location – Only for selected countries.
- Other condition: URL parameter – For UTM, affiliate, Secret link – Must access via a special link, Age verified – Must confirm age, and Custom code (Liquid) – For advanced setup (lets a developer write Liquid logic, e.g. on metafield values).
For every condition, see Control Access.
7. Combining conditions with AND / OR
Section titled “7. Combining conditions with AND / OR”“A customer must meet every condition in a rule to get access. Add more rules to let different groups in.”
- AND = all conditions inside one rule must be true
- An AND pill joins the conditions, and the rule shows 2 conditions - all must match.
- Example: Signed-in customers AND Tagged customers
wholesale→ only logged-in wholesale customers get access.
- OR = any rule can be true
- Click + Add rule to add another rule. An OR pill joins the rules.
- Example: Rule 1 Tagged customers
wholesaleOR Rule 2 Passcode → either approved wholesale customers or passcode holders get access.
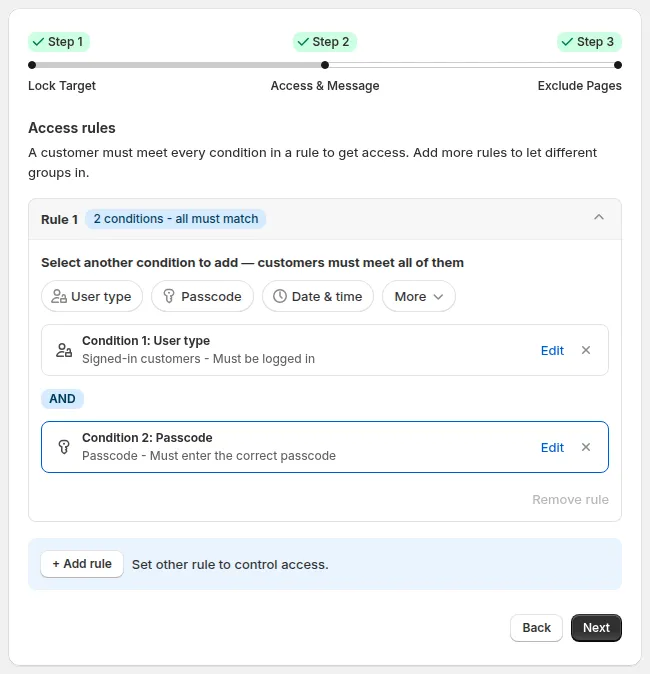
AND inside a rule, OR between rules.
You can stack several rules for a single lock, for instance:
- Rule 1: allow
wholesale - Rule 2: allow
partner - Rule 3: allow passcode holders
- Everyone else: blocked → sees lock message
If no rule has a condition yet, clicking Next shows “Add at least one condition to this rule before you continue.” An extra rule left empty next to rules that have conditions doesn’t block Next and isn’t listed in the Summary. To remove a rule, click Remove rule.
This flexibility removes the need for multiple overlapping locks that are hard to manage.
8. Lock message (Preview → Customize message)
Section titled “8. Lock message (Preview → Customize message)”When a visitor doesn’t meet your rules, BSS B2B Lock shows a lock message instead of the protected content. You edit it from the Preview card, not from a step:
-
In the Preview card, pick the message in the dropdown.
-
Click Customize message to open Preview & customize message.
-
Each message has its own tab at the top of the modal, and the editing options depend on the message. For example:
- A page lock message (e.g. Login View Pages) has Message type, Message content (Custom message, or click Edit with editor) and Custom CSS.
- Message Hide Price has Edit / Edit as HTML, Templates, Message (Text content, Text format, Text color), Redirect settings, Advanced customization and Custom CSS.
Use the desktop / mobile toggle in the Preview panel on the right to check both layouts.
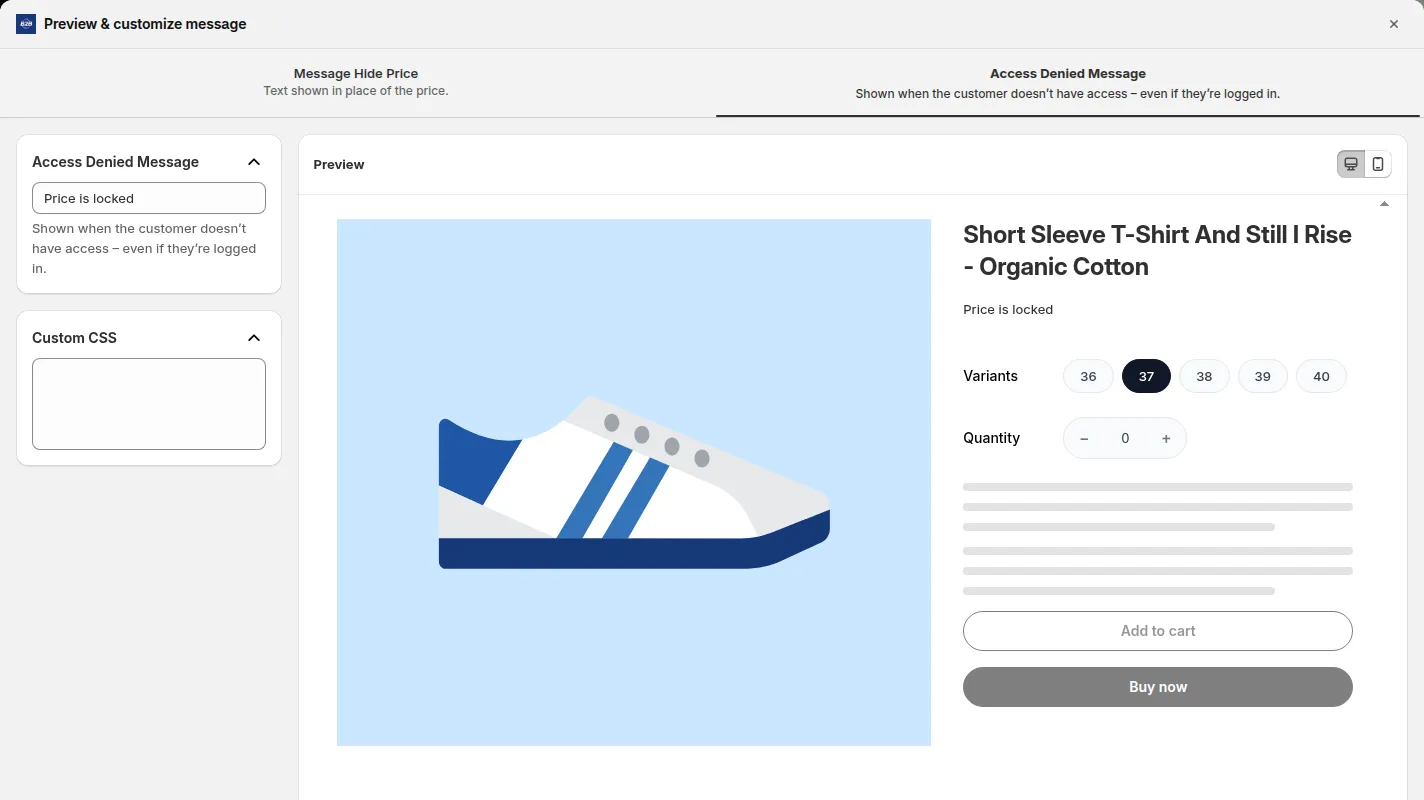
Edit the lock message in Preview & customize message.
Good lock messages guide the visitor; they don’t just block them:
- Headline: e.g. “Wholesale access only”, “Login to view prices”.
- Body text: e.g. “This section is reserved for approved B2B customers. Please log in or request an account.”
- Links: “Login”, “Create account”, “Request access”, “Contact us”, pointing to Shopify login, registration, or a contact/registration page.
For B2B-only stores, always make sure the lock screen gives a clear path to becoming an approved customer (even if it’s via manual contact).
9. Tips for designing clean rules
Section titled “9. Tips for designing clean rules”- Start with the simplest rule that meets your need (e.g. just login, or just one tag).
- Add complexity only when you really need it (e.g. combining regions or tags).
- Be consistent with tags (e.g., always use
wholesaleinstead of mixingwholesale,wholesale_customer, etc.). - Keep rule names aligned with conditions, so future you (or your colleague) can understand them at a glance.
Step 3 – Exclude Pages
Section titled “Step 3 – Exclude Pages”Step 3 lets you fine-tune edge cases: which content stays unlocked, and, for page locks, SEO and page-display options.
10. Exclude from lock rules
Section titled “10. Exclude from lock rules”When you lock a broad target (like the entire store), tick what should not be locked:
- Home page
- Customer areas (login, register, and account pages)
- Policy pages
- Specific pages (type a URL and click Add)
- Selected products (keep some products shoppable even while the lock is on), not shown for every target, e.g. not for Pages, blogs and URLs
This lets you design more nuanced experiences without creating many separate locks.
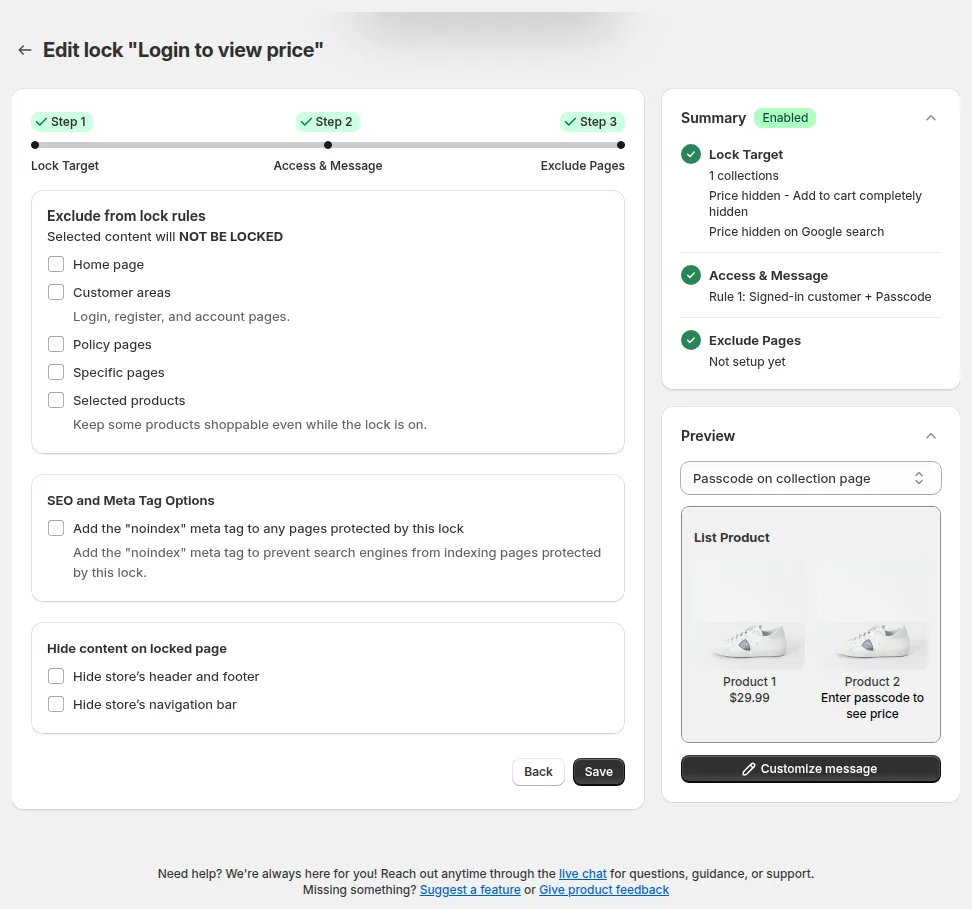
Step 3: choose what stays unlocked, then Save.
11. SEO and page display (page locks)
Section titled “11. SEO and page display (page locks)”For locks that replace a whole page, such as Entire store or Pages, blogs and URLs, Step 3 also shows:
- SEO and Meta Tag Options → Add the “noindex” meta tag to any pages protected by this lock.
- Hide content on locked page → Hide store’s header and footer and Hide store’s navigation bar.
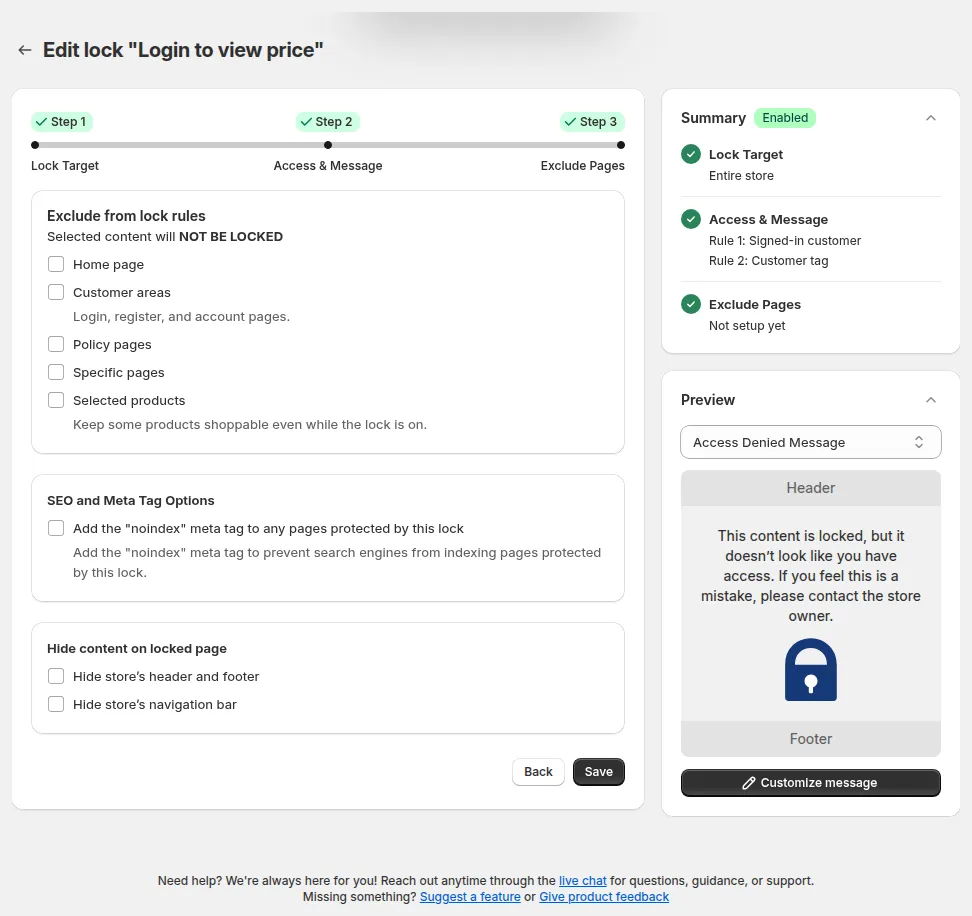
Extra Step 3 options for page locks.
12. Save
Section titled “12. Save”Click Save (in Step 3 or in the Contextual Save Bar). BSS B2B Lock shows “Saved lock settings”, syncs your theme in the background, and the title changes to Edit lock “<lock name>”.
For details, see Exclude Pages & Lock Message.
Putting it all together
Section titled “Putting it all together”The Rule Builder is designed so that:
- Step 1 answers: “What am I protecting?”
- Step 2 answers: “Who is allowed to see it?”, and the Preview card answers “What does everyone else see?”
- Step 3 answers: “Are there exceptions?”
Once you’re comfortable with each field in these three steps, you can confidently design complex, but maintainable, B2B and access-control scenarios for your Shopify store.
Still Need Help?
Section titled “Still Need Help?”If you have questions or need assistance configuring BSS B2B Lock, our dedicated support team is here to help.
- In-App Assistance: Click Need help? or use the in-app chat button within BSS B2B Lock.
- Email Support: Contact us at [email protected] with your store URL and specific rule details.