Checkout Lock
Checkout Lock gives you full control over who can complete a purchase on your store, and how they pay.
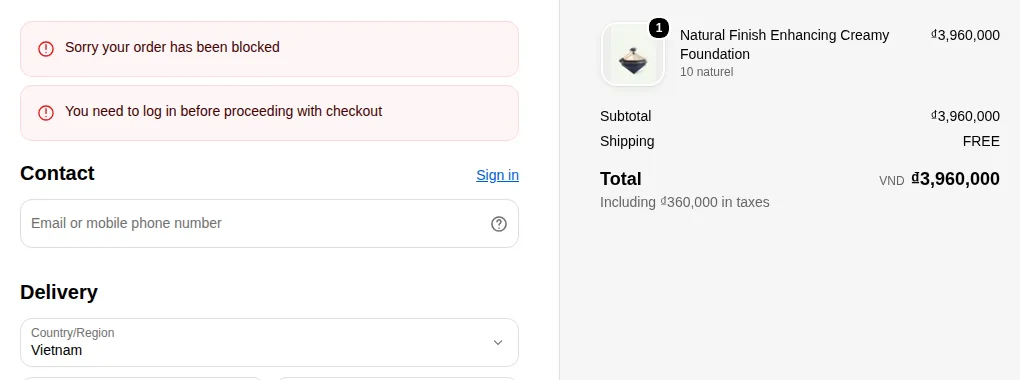
What your customers see on the storefront.
You can block checkout for certain buyers, hide payment methods such as Cash on Delivery (COD), and hide specific shipping methods.
This feature needs a BSS B2B Lock paid plan (or an active trial). It is not part of the Free plan. Availability of individual rule types may vary as new options are released.
On This Page
Section titled “On This Page”- Eligibility Requirements
- Understanding Checkout Lock
- Availability & Limitations
- Adding & Configuring Checkout Lock
- Managing Existing Rules
- Common Issues & Fixes
- Still Need Help?
Eligibility Requirements
Section titled “Eligibility Requirements”Make sure your store meets all of the following before you begin:
• You are using BSS B2B Lock installed on your Shopify store.
• Your store uses Shopify’s standard checkout, not a fully custom headless checkout.
• You are on a BSS B2B Lock paid plan or in your trial (Checkout Lock is not available on the Free plan).
• You have Admin-level access to your Shopify store.
• Your store is either B2B-only or a hybrid B2B/B2C setup.
Understanding Checkout Lock
Section titled “Understanding Checkout Lock”What It Is
Section titled “What It Is”Checkout Lock is a rule engine. Each rule has two parts: a condition (who or what triggers it) and an action (block checkout or hide a payment method). Rules activate the moment a matching buyer reaches your checkout.
What You Can Do
Section titled “What You Can Do”• Require customers to log in before they can complete a purchase.
• Block checkout for buyers with a specific customer tag (e.g. ‘suspended’, ‘pending-approval’).
• Block checkout when a product with a specific tag is in the cart.
• Hide payment options like COD or credit card for certain buyer segments.
• Block checkout by product vendor or by the shipping province the customer enters at checkout.
• Show customers a custom error message explaining why they were blocked.
Where It Applies
Section titled “Where It Applies”Rules run at the Shopify checkout step, on your live storefront. A Preview panel inside the app lets you simulate exactly what a buyer will see, before you go live.
Availability & Limitations
Section titled “Availability & Limitations”| Rule Type | Status | Plans | Notes |
|---|---|---|---|
| Checkout Lock | ✅ Live | Paid plan or trial | Blocks checkout when condition is met |
| Hide Payment & Express Checkout Options | ✅ Live | Paid plan or trial | Hides selected payment methods (COD, credit card, etc.) and the express checkout button conditionally |
| Hide Shipping Methods | ✅ Live | Paid plan or trial | Hides shipping methods conditionally: see Hide Shipping Method |
| Note: With more than one condition, choose Match conditions: All (all conditions must be met) or Any (one is enough). |
|---|
Additional limitations to keep in mind:
• Rules only apply to Shopify’s standard checkout. Headless or custom checkouts are not supported.
• Error messages support multiple languages: use the Translation option inside the rule editor.
Adding & Configuring Checkout Lock
Section titled “Adding & Configuring Checkout Lock”1. Select a Rule Type
Section titled “1. Select a Rule Type”-
Go to your Shopify Admin → Apps → BSS B2B Lock
-
Click Checkout locks in the left navigation.
-
Click the Add checkout rule button in the top-right corner.
-
In the Select rule type modal, choose one of the options below. The options are listed in a single column.
-
Click Continue. If your trial has ended and you have no paid plan, the button reads Subscribe to continue and takes you to the pricing page.
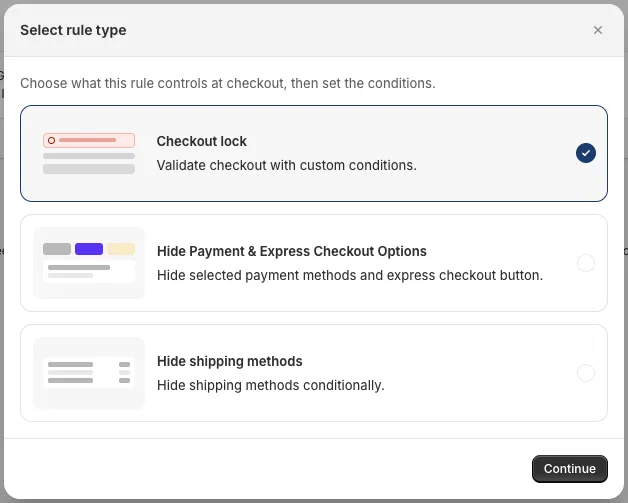
Figure 1: Select rule type modal: choose Checkout lock, Hide Payment & Express Checkout Options, or Hide shipping methods, then click Continue.
| Rule Type | Use It When… |
|---|---|
| Checkout Lock | You want to stop the buyer from completing their order entirely. |
| Hide Payment & Express Checkout Options | You want to remove a payment option (e.g. COD) or the express checkout button for certain buyers. |
| Hide Shipping Methods | You want to hide a shipping method for certain buyers. |
2. Configure the Rule
Section titled “2. Configure the Rule”Fill in all fields on the rule editor page. The Preview panel on the right updates live as you make changes.
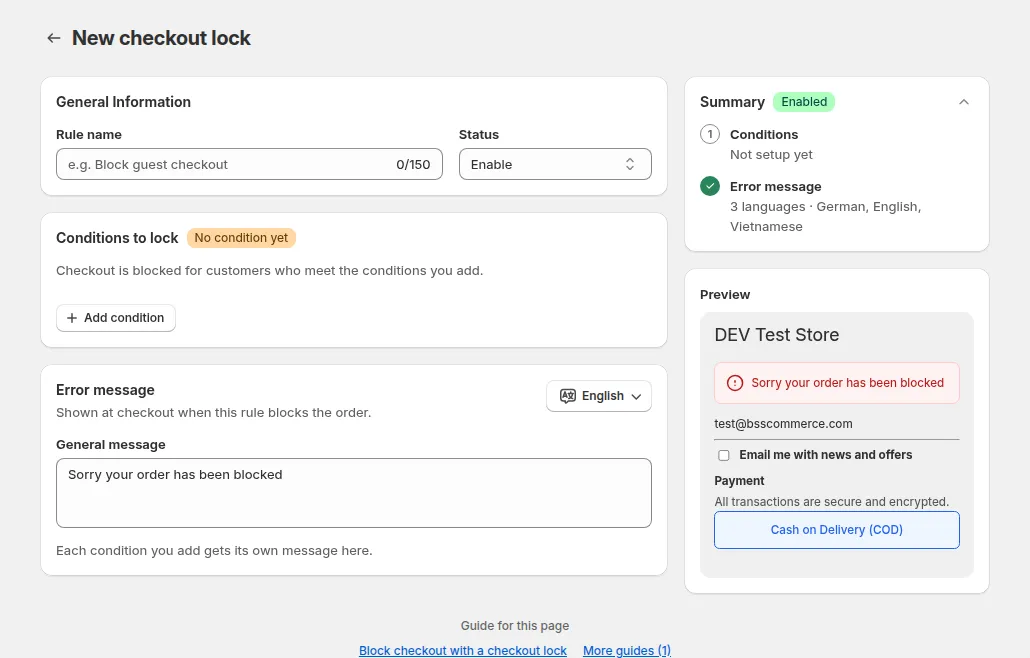
Figure 2: Rule editor page
| Field | What to Do |
|---|---|
| Rule Name | Enter a clear, descriptive name, e.g. ‘Block Guest Checkout’ or ‘Hide COD for Untagged Buyers’. |
| Status | A dropdown next to Rule Name. Choose Enable to activate immediately, or Disable to save as a draft. |
| Conditions to lock | Left blank for now; you will add conditions in Step 3. |
| Error message | Write the general message blocked buyers will see, e.g. ‘Please log in to complete your purchase.’ Keep it clear and helpful. |
| Translation | Use the language button above the error message to add it in other languages. Your store’s current default language is selected for you, and it is listed separately from the Default entry. |
The Error message card shows a message row for the General message plus one row for each condition you have actually added to the rule — it no longer lists every possible condition type up front. If you leave a condition’s own message empty, buyers who match it see the General message instead.
3. Add Conditions
Section titled “3. Add Conditions”-
Click + Add condition inside the ‘Conditions to lock’ section.
-
Browse conditions by tab: Popular, Customer, Cart, Product, Address, and more under More views.
-
Or use the Search bar to find a condition quickly.
-
Select a condition and fill in any required values (e.g. a tag name or date range).
-
Repeat to add more conditions if needed.
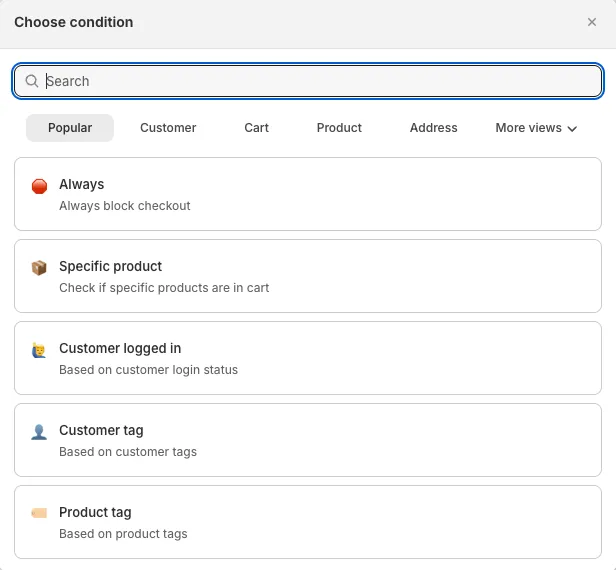
Figure 3: Choose condition modal. Browse by tab or search. The Popular tab shown here lists Always, Specific product, Customer logged in, Customer tag and Product tag. The Cart tab lists Subtotal amount, Cart line item count and Cart total.
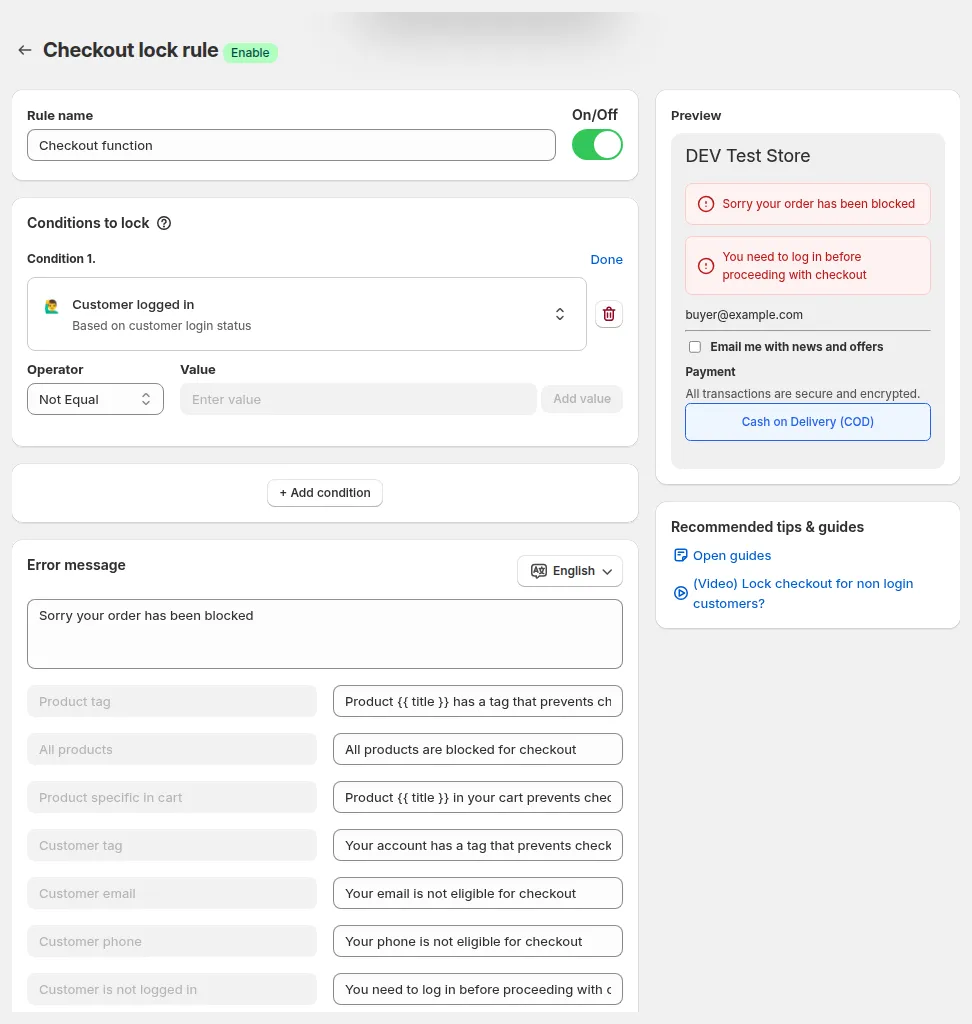
Each condition has its own default message, shown under your main error message. For Customer logged in with Not Equal, buyers see "You need to log in before proceeding with checkout".
| Condition | Tab | Best Used For |
|---|---|---|
| Customer logged in | Customer / Popular | Blocking guests: use operator Not Equal (buyers who are not logged in are blocked). Equal blocks logged-in customers instead. |
| Customer tag | Customer / Popular | Restricting specific buyer segments (e.g. ‘wholesale’, ‘vip’, ‘suspended’). |
| Product tag | Product / Popular | Blocking checkout when a tagged product is in the cart. |
| Specific product | Cart / Popular | Blocking checkout when specific products are in the cart. |
| Always | Popular | Always block checkout, for example while you pause orders. |
| Product vendor | Product | Blocking checkout when the cart has a product from a vendor you name (e.g. Winery A). |
| Shipping province | Address | Blocking checkout by the province in the shipping address the buyer enters at checkout (not by IP). Enter the 2-letter code Shopify shows for that address, e.g. MI. |
To find a condition fast, type part of its name in Search. For example, vendor finds Product vendor and province finds Shipping province.
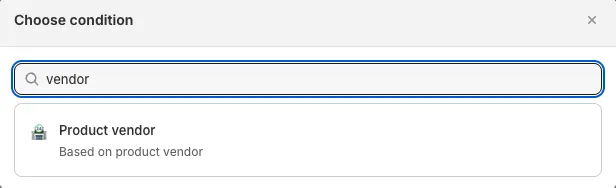
Searching for vendor lists Product vendor (Based on product vendor).
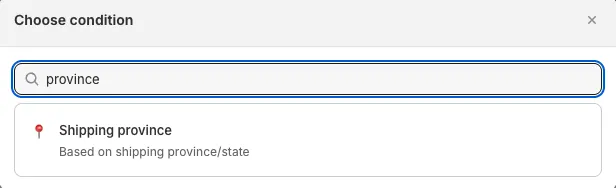
Searching for province lists Shipping province (Based on shipping province/state).
Date range, Time range, Market, Shipping country, Customer order count and Discount code are marked Coming Soon and can’t be used yet.
| Note: Using multiple conditions: set Match conditions to All when every condition must be true, or Any when one is enough (for example ‘block guests OR block customers with tag X’). |
|---|
4. Save & Verify
Section titled “4. Save & Verify”- Click Save in the top bar.
- Confirm the rule appears in your Checkout locks list with the correct Status.
- Set the Status dropdown to Enable if you want the rule to go live immediately.
- Open your storefront in a private/incognito browser window.
- Add a product to the cart and proceed to checkout as the type of buyer your rule targets.
- Verify the correct error message appears and the buyer cannot proceed.
Managing Existing Rules
Section titled “Managing Existing Rules”The Checkout lock list works like the Lock list:
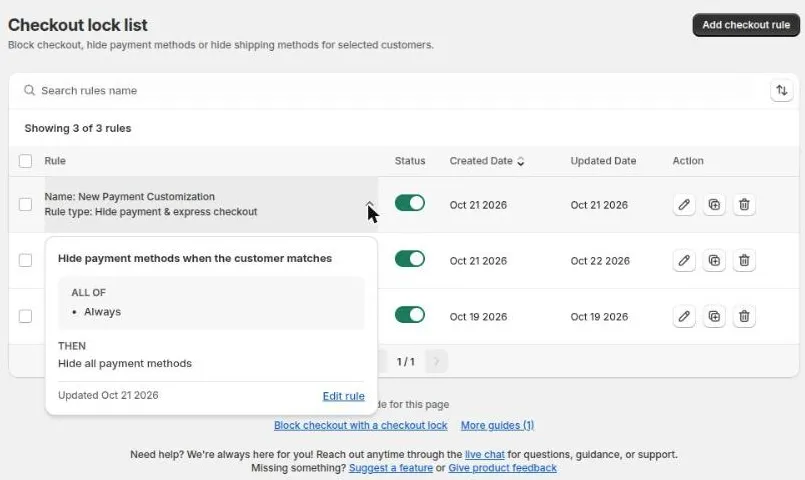
• Find a rule: Use the search box (Search rules name) and sort by Name or Created. The Showing x of y rules counter shows how many rules match.
• Preview a rule: Open a rule’s summary from its row to read its conditions (ALL OF / ANY OF) and its action (THEN) without opening the editor.
• Edit a rule: Click the Edit rule icon in the Action column.
• Duplicate a rule: Click the Duplicate rule icon.
• Delete a rule: Click the Delete rule icon. This action cannot be undone.
• Enable or disable: Open the rule and use the Status dropdown at the top.
• Localize error messages: Open the rule and use the language button above the error message to add the message in each language you need.
| Note: Disabling a rule does not delete it. The rule is saved and can be re-enabled at any time without re-configuring it from scratch. |
|---|
Common Issues & Fixes
Section titled “Common Issues & Fixes”| What You See | Why It Happens | What to Do |
|---|---|---|
| Rule is saved but buyers are not being blocked. | The Status dropdown is set to Disable. | Open the rule and set Status to Enable. |
| All buyers are blocked, including the ones who should not be. | The condition is too broad, e.g. ‘Always’ with no customer filter. | Add a customer-level condition (e.g. Customer tag) to narrow who is targeted. |
| Error message is not showing at checkout. | The Error message field may be empty, or the rule’s Status is Disable. | Open the rule, check the message field, and ensure Status is Enable. |
| COD or a payment option is still visible to buyers. | The rule type may be ‘Checkout Lock’ instead of ‘Hide Payment & Express Checkout Options’. | Create a new rule and select ‘Hide Payment & Express Checkout Options’ as the rule type. |
| I cannot find the condition I need. | The condition may be under a different tab, or not yet available. | Search by keyword in the Choose condition modal. If not found, contact support. |
Still Need Help?
Section titled “Still Need Help?”The fastest way to get help is through the in-app chat. Our team can set up the rule for you.
• Click Chat with us in the Need help? panel on the rule editor page.
• Or email [email protected] with the details below.
When contacting support, include:
• Your shop URL (e.g. yourstore.myshopify.com)
• The name of the rule that is not working
• What you expected to happen vs. what actually happened
• A screenshot or screen recording if possible
Try This First Set Status to Disable, wait 10 seconds, then set it back to Enable. Test in a private/incognito browser window to avoid cached sessions. Make sure the buyer you are testing with actually matches the condition you set. |
|---|