
Understand and Configure BSS B2B Lock with the 3-Step Model
BSS B2B Lock helps you control who can view specific storefront content, pricing, products, or pages. It uses a simple 3-step model so you can set up access rules in a clear and predictable way.
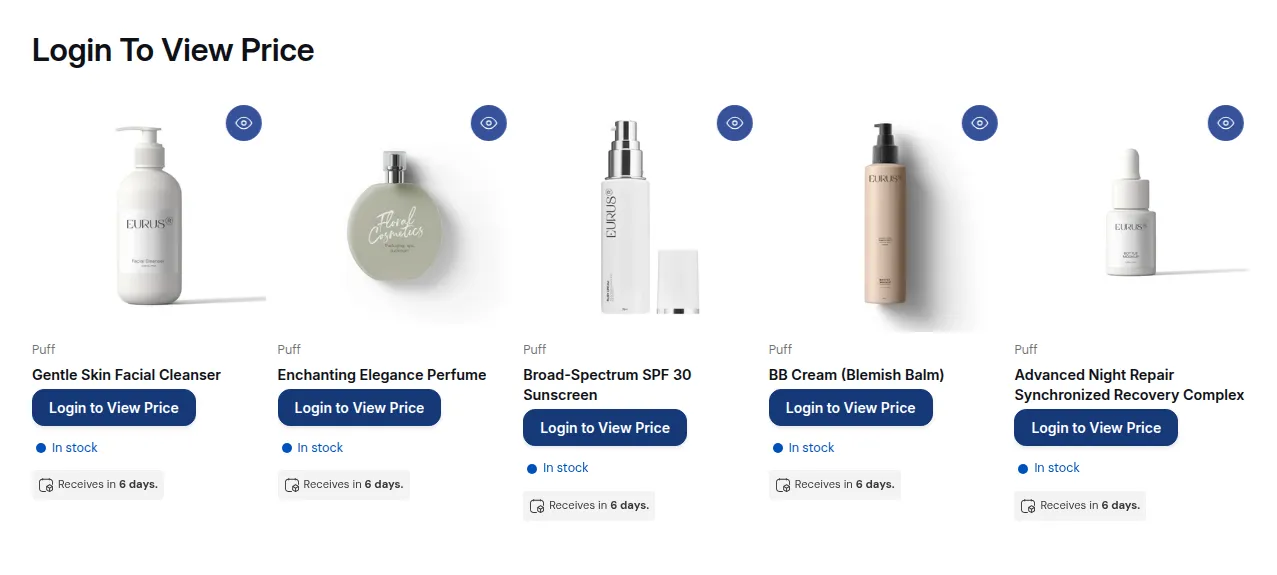
What your customers see on the storefront.
Feature availability may vary by plan, theme structure, and the type of lock you want to create.
If you only want to hide prices, do not lock the entire store.
Eligibility requirements
Section titled “Eligibility requirements”- You should know which content you want to protect.
- You should know which visitors should be allowed or blocked.
- If you use login-based access, customer accounts should already be enabled.
- If you use tag-based access, the correct customer tags should already exist in Shopify.
- If you use passcode or secret link access, you should prepare those values before setup.
- If you use page section or block hiding, your theme should support the selected target.
- If you need help, contact [email protected].
Understanding the 3-step model
Section titled “Understanding the 3-step model”What it is
Section titled “What it is”BSS B2B Lock works through 3 simple setup steps, shown as a stepper at the top of the lock editor:
- Step 1 – Lock Target: choose what content to protect
- Step 2 – Access & Message: choose who can access it, and check the message blocked visitors see in the Preview card
- Step 3 – Exclude Pages: keep selected pages or products open, and (for page locks) set SEO and locked-page display options
The current step is a green pill and a completed step shows a ✓. You can click the name of a completed step to go back to it; the data you entered is kept. You can’t jump ahead to a step you haven’t completed yet: finish the current step and click Next. The right column holds two sticky cards:
- Summary – the rule status (Enabled / Disabled) and what each step is set to. A step you haven’t configured shows “Not setup yet”.
- Preview – appears once you add a condition. It shows a live storefront mock of the lock message and a Customize message button.
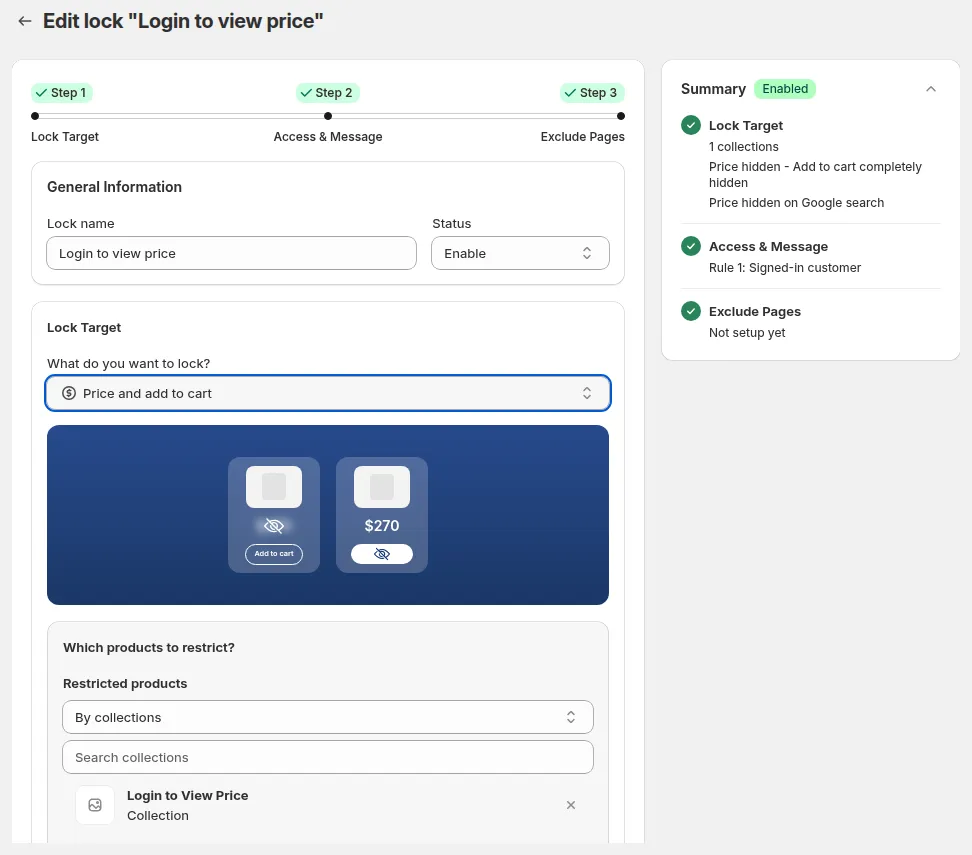
The stepper (Lock Target / Access & Message / Exclude Pages) and the Summary card.
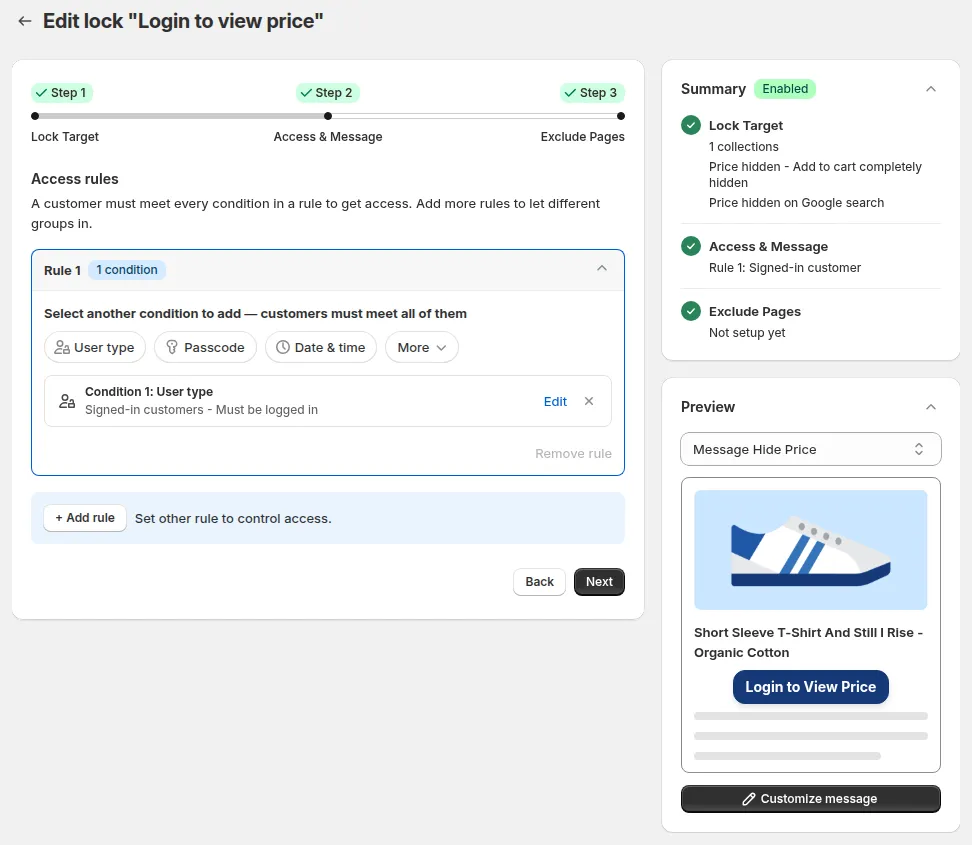
Step 2 – Access & Message: the Summary card updates to "Rule 1: Signed-in customer" and the Preview card shows the lock message.
This model helps you set up a lock in the right order, so content targeting, access control, and page-level refinements stay clear and easy to manage.
What you can do
Section titled “What you can do”With the 3-step model, you can:
- Lock the entire store
- Hide prices and Add to Cart
- Hide products
- Hide collections
- Hide variants
- Lock pages, blogs, and custom URLs
- Hide sections or blocks on a page
- Control access by login status, customer tags, passcode, secret link, and other conditions
- Show custom messages and actions to blocked visitors
Where it applies
Section titled “Where it applies”You can use this model for common storefront access use cases such as:
- Showing prices only to approved customers
- Hiding wholesale products from general visitors
- Locking private pages for partners or distributors
- Creating passcode-protected campaigns
- Hiding parts of a page from visitors who do not meet your rules
Availability & limitations
Section titled “Availability & limitations”| Area | Availability | Notes |
|---|---|---|
| Lock Entire Store | Usually available | Best for private storefronts |
| Hide Price & Add to Cart | Usually available | Good for browse-only public access |
| Hide Products / Collections / Variants | Usually available | Scope depends on your selected target |
| Pages / Blogs / URLs lock | Usually available | Good for gated content outside product pages |
| Section / Block hiding | Depends on theme/setup | Theme structure may affect results |
| Login-based access | Usually available | Requires customer accounts |
| Tag-based access | Usually available | Tags must exist and be applied correctly |
| Passcode access | Usually available | Good for simple gated experiences |
| Secret link access | Usually available | Good for invite-only access |
| Advanced conditions | Depends on plan/setup | Some options may not appear in all stores |
Limitations
Section titled “Limitations”- Some settings may not be available on all plans or setups.
- Theme structure can affect how section or block hiding works.
- If multiple rules affect the same content, results may be harder to predict.
- A broad lock can accidentally hide content that should stay public.
- Login-based access will not work as expected if customer accounts are not enabled.
- Tag-based access will not work if customer tags are missing or incorrect.
Adding/configuring
Section titled “Adding/configuring”To open the lock editor:
- Go to BSS B2B Lock → Locks. The Lock list opens.
- Click Add lock rule. The Start with a preset modal opens.
- Select a preset (for example Require login to view prices) or Create my own lock.
- Click Continue.
Step 1: Lock Target – choose what to lock
Section titled “Step 1: Lock Target – choose what to lock”- In the General Information card:
- Enter a Lock name. The name is required; if you leave it empty you see “Rule name is required”.
- Set Status to Enable or Disable.
- In the Lock Target card, open What do you want to lock? and select one of these targets:
- Entire store
- Price and add to cart
- Products
- Collections
- Variants
- Pages, blogs and URLs
- Sections, blocks, and snippets
- Complete the settings for the selected target (for example Which products to restrict? and What do you want to hide? for Price and add to cart).
- Click Next.
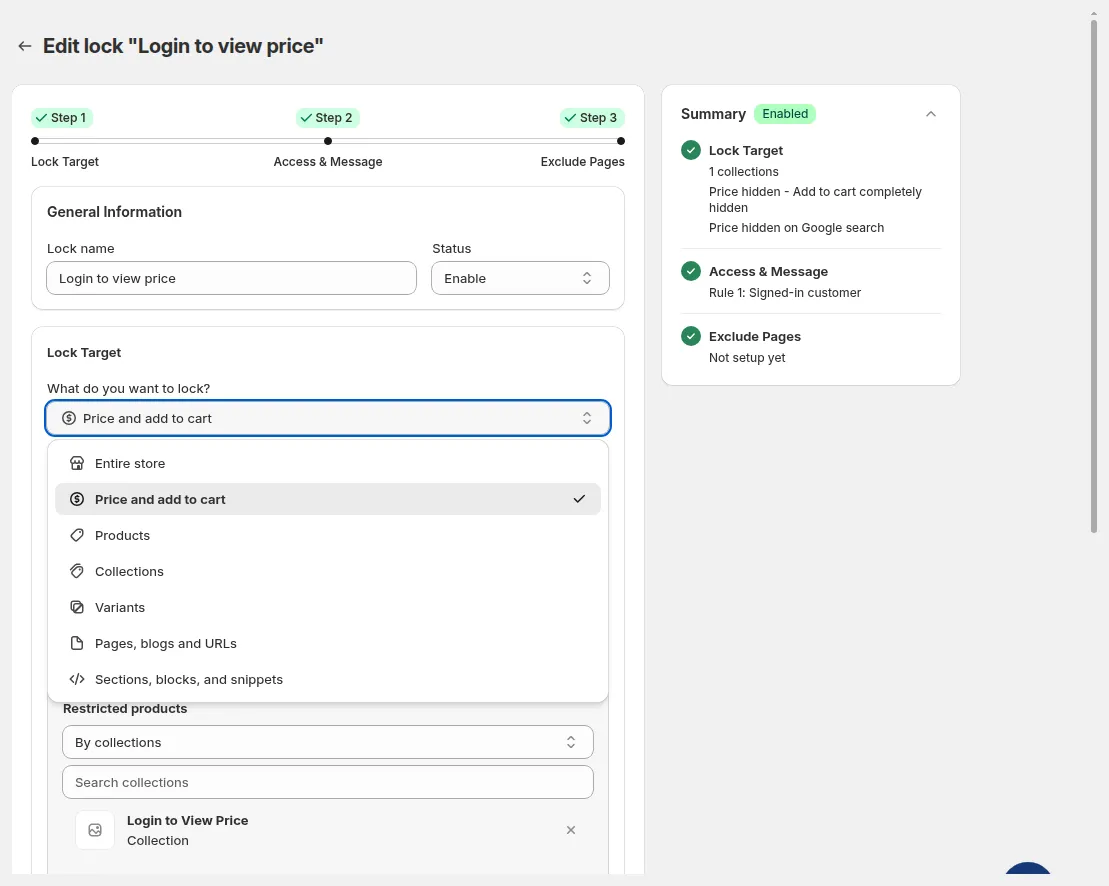
Select a target in What do you want to lock?
Notes
- Use Entire store when your storefront should be private.
- Use Price and add to cart when visitors can browse but should not see prices or buy.
- Use Products when some visitors should not know the products exist.
- Use Collections when an entire catalog group should be hidden.
- Use Variants when the product stays visible but selected options should be hidden.
- Use Pages, blogs and URLs for gated content outside the product catalog.
- Use Sections, blocks, and snippets for more detailed control inside a page.
Caution
- Do not choose a broad target if you only need to hide one part of the storefront.
- If some pages should stay public, plan exclusions before you save the rule.
Step 2: Access & Message – choose who can access it
Section titled “Step 2: Access & Message – choose who can access it”In Step 2, you decide which visitors are allowed to unlock or view the content you selected in Step 1.
Step 2 answers two questions:
- Who should be allowed to access this content?
- What should blocked visitors see?
How rules and conditions work
The Access rules section works with rules and conditions:
- Conditions inside the same Rule are joined by AND. A customer must meet every condition in that rule. The rule shows an AND pill and a badge such as “2 conditions - all must match”.
- Separate rules are joined by OR. A customer who meets any one rule gets access. An OR pill appears between rules.
- A rule can’t be empty. If you click Next with an empty rule, you see “Add at least one condition to this rule before you continue.”
Add conditions
- In the Rule 1 card, click a condition chip under Select a condition to add to the rule:
- User type
- Passcode
- Date & time
- More → Email, Location or Other condition
- In Select access rule, choose the option you need. Tick Reverse access rule to invert the condition.
- Click Done.
- To let a different group in, click + Add rule and add conditions to the new rule. To delete a rule, click Remove rule.
- Click Next.
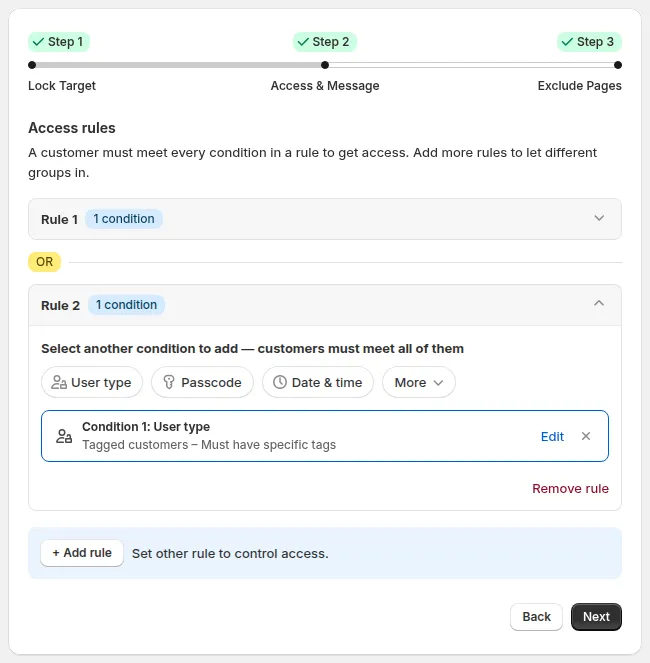
Separate rules are joined by OR; the Summary card lists each rule.
Common access conditions
- User type – Everyone, Signed-in customers, Tagged customers, Specific customers, Request access, Customer must be in this company name, Customer must be in this company location, and B2B customer – Shopify B2B only.
- Passcode – visitors must enter the correct passcode. You can add several passcodes, auto-generate one, or import a list.
- Date & time – the content is visible from or until a date and time, based on your Shopify store’s time zone.
- Other condition – URL parameter (for UTM or affiliate links) and Custom code (Liquid) for advanced setups.
How it works
- Use Signed-in customers when access should depend on login status.
- Use Tagged customers when access should depend on buyer groups such as wholesale or VIP.
- Use Passcode when you want simple protected access without requiring an account.
- Use Secret link when access should depend on a private URL.
- Use Specific customers when only selected customer accounts should be allowed.
- Put conditions in the same rule when all of them must be true (AND).
- Add a separate rule when any one group should be allowed (OR).
Lock message
Once a rule has a condition, the Preview card appears in the right column. Use it to check and edit the message shown to blocked visitors:
- Select the message in the Preview card dropdown (for example Message Hide Price, Passcode or Access Denied Message). The storefront mock updates in real time.
- Click Customize message. The Preview & customize message modal opens.
- Edit the text content (click Edit with editor) and, if needed, Custom CSS. Check the desktop and mobile preview on the right.
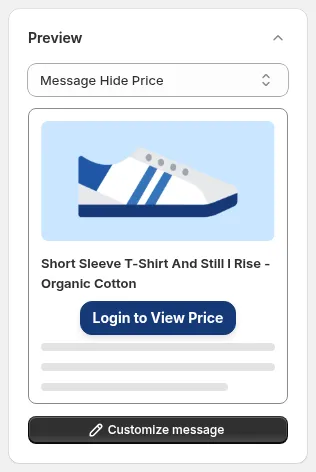
Edit the lock message from the Preview card → Customize message.
Use this message to explain:
- why the content is locked
- who the content is for
- what the visitor should do next
For example:
- Login to view prices
- Wholesale access only
- Enter passcode to continue
Notes
- Login-based access requires customer accounts to be enabled.
- Tag-based access works best when customer tags are already organized correctly.
- Keep the lock message short and action-focused.
- Test complex conditions before going live.
Caution
- Missing tags can block approved buyers by mistake.
- Overlapping conditions can make the final result harder to predict.
- If the message is unclear, visitors may not know what to do next.
Step 3: Exclude Pages – choose what stays open
Section titled “Step 3: Exclude Pages – choose what stays open”In Step 3, you choose which content stays open even though the lock is active, and you adjust page-level options for page locks.
By this point, you have already told BSS B2B Lock:
- what to protect in Step 1
- who can access it in Step 2
- what blocked visitors should see (in the Preview card)
Step 3 answers this question:
- Are there any pages, products, or display settings that should behave differently under this lock?
Available options in Step 3
- Exclude from lock rules – shown for every lock.
- SEO and Meta Tag Options and Hide content on locked page – shown for page-type locks such as Entire store.
Exclude from lock rules
Use exclusions when some areas should stay visible even though the lock is active. Selected content will not be locked.
Tick the content that should stay open:
- Home page
- Customer areas (login, register, and account pages)
- Policy pages
- Specific pages (enter a URL and click Add)
- Selected products (keep some products shoppable while the lock is on)
This is useful when you want a broad lock but still need a few public areas to remain open.
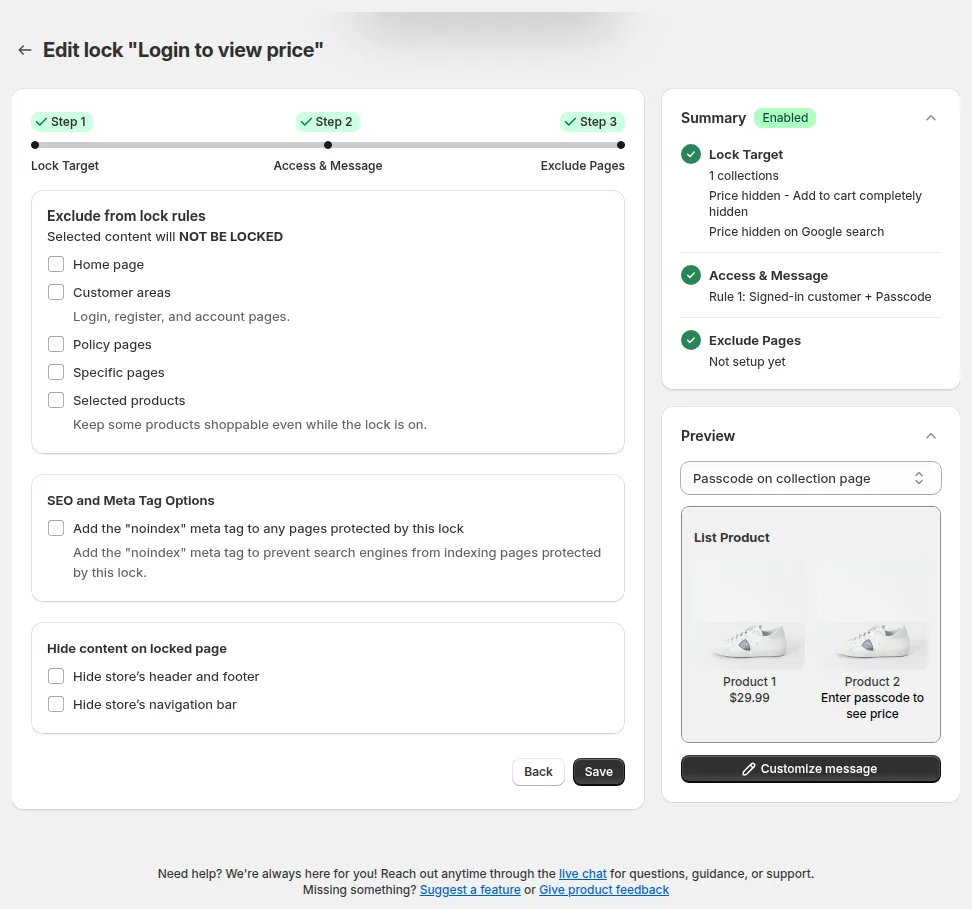
Step 3 – Exclude Pages. The Summary card shows what is excluded.
SEO and Meta Tag Options
Tick Add the “noindex” meta tag to any pages protected by this lock.
This helps prevent search engines from indexing locked pages.
Use this option when protected content should not appear in search results.
Hide content on locked page
For page-type locks, you can also hide layout elements on the locked page:
- Hide store’s header and footer
- Hide store’s navigation bar
This can create a cleaner locked experience and reduce unwanted browsing paths for blocked visitors.
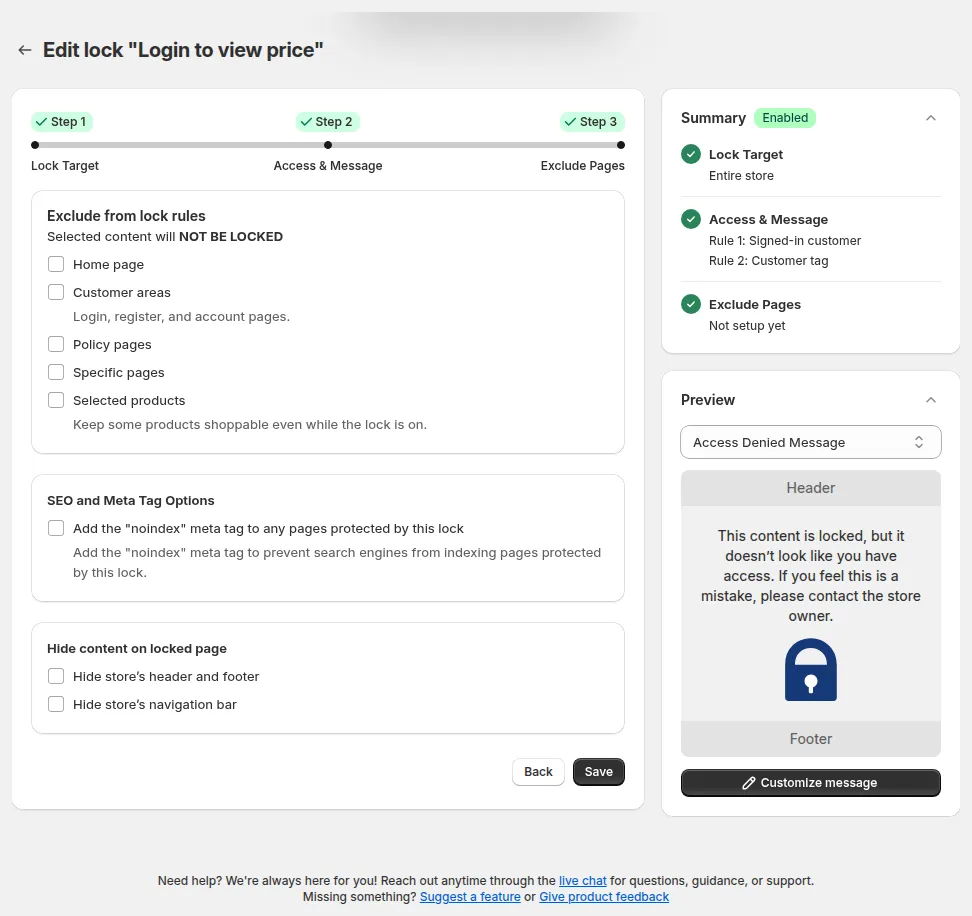
For an Entire store lock, Step 3 also shows SEO and Meta Tag Options and Hide content on locked page.
Save the lock
Click Save at the bottom of Step 3. You can also click Save in the Shopify Contextual Save Bar (“Unsaved changes”) at any step. You see the toast “Saved lock settings”, and the title changes to Edit lock.
Notes
- Exclusions are especially useful when the target in Step 1 is broad.
Caution
- Too many exclusions can weaken the lock logic.
- Adding noindex affects search visibility for protected pages.
- Hiding header, footer, or navigation can change how blocked visitors move through your store.
Still Need Help?
Section titled “Still Need Help?”If you have questions or need assistance configuring BSS B2B Lock, our dedicated support team is here to help.
- In-App Assistance: Click Need help? or use the in-app chat button within BSS B2B Lock.
- Email Support: Contact us at [email protected] with your store URL and specific rule details.