
Countdown Lock
Clock Countdown replaces a static lock message with a live ticking timer: showing customers exactly how long until content becomes available, down to the second.
Build Urgency and Anticipation with a Live Countdown Timer
Works with Date & Time lock conditions in the BSS B2B Lock app. Compatible with B2B-only and hybrid store setups. All visual options are fully customizable.
On This Page
Section titled “On This Page”- Eligibility Requirements
- Understanding Clock Countdown
- When to Use, and When NOT to Use
- Availability & Limitations
- Setting Up Clock Countdown
- Real-World Examples
- Timer Format Reference
- Common Issues & Fixes
- Still Need Help?
Eligibility Requirements
Section titled “Eligibility Requirements”Confirm all of the following before setting up Clock Countdown:
• BSS B2B Lock app is installed on your Shopify store.
• Your store uses Shopify’s standard online storefront.
• You have Admin-level access to your Shopify store.
• You are using a Date & Time lock condition set to After date/time → Visible from. Clock Countdown only works with this option.
• Compatible with both B2B-only and hybrid B2B/B2C store setups.
Understanding Clock Countdown
Section titled “Understanding Clock Countdown”What It Is
Section titled “What It Is”Clock Countdown is a visual add-on for Date & Time lock rules that replaces your static lock message with a live ticking timer counting down to the date and time your content unlocks.
The timer updates every second: no page refresh needed. When it reaches zero, the locked content unlocks automatically.
What You Can Do
Section titled “What You Can Do”• Show a live countdown to a product launch or sale start (‘New collection launches in 2d 5h 30m’).
• Customize all text, fonts, colors, and layout for desktop and mobile separately.
• Use the {timer} placeholder to position the timer anywhere in your message.
• Add Custom CSS for pixel-perfect control over the timer’s appearance.
Where It Applies
Section titled “Where It Applies”The countdown appears on any page covered by your lock: entire store, products, collections, or pages. Visible to all visitors, even those who cannot access the locked content
When to Use, and When NOT to Use
Section titled “When to Use, and When NOT to Use”| ✅ Use Clock Countdown When… | ❌ Do NOT Use When… |
|---|---|
| Product launches: build anticipation | Permanent locks: use a passcode or login rule |
| Flash sales: show when the sale starts | Manual approval needed: use Access Management |
| Pre-orders: show when order window opens | Content stays locked indefinitely after a date |
| VIP early access: time-limited previews | Tag-based lock: use Tag/Specific Customers rule |
| Events: control when registration opens | You do not want a visible countdown timer shown |
| You want a countdown to when content closes (Before date/time → Visible until has no countdown) |
Availability & Limitations
Section titled “Availability & Limitations”| Feature | Status | Notes |
|---|---|---|
| Clock Countdown timer | ✅ Live | Date & Time condition with After date/time → Visible from only |
| {timer} placeholder | ✅ Live | Required: must be included in message text |
| Message customization | ✅ Live | Free-form text + {timer} anywhere |
| Layout settings | ✅ Live | Desktop & mobile width, alignment, orientation |
| Design settings | ✅ Live | Font, text color, timer color, background color |
| Custom CSS | ✅ Available | Advanced users: overrides default styles |
| Before date/time → Visible until | ❌ Not available | The Use clock countdown checkbox is not shown for this option |
| Timer timezone | ℹ️ Note | Uses your Shopify store’s timezone: set in Store details |
| ⚠️ Note: Clock Countdown only works with the Date & Time condition set to After date/time → Visible from. It is not available for Before date/time → Visible until, or for passcode, login, customer tag and other rule types. |
|---|
| ⚠️ Note: The countdown timer uses your Shopify store’s timezone. If your timer appears off by hours, go to Shopify Admin → Settings → Store details and verify your timezone. |
|---|
Setting Up Clock Countdown
Section titled “Setting Up Clock Countdown”1. Create a Lock with a Date & Time Rule
Section titled “1. Create a Lock with a Date & Time Rule”-
Go to Shopify Admin → Apps → BSS B2B Lock.
-
Click Locks in the left navigation.
-
Click Add lock rule, select Create my own lock in the Start with a preset modal and click Continue (or open an existing lock to edit).
-
In Step 1 – Lock Target, enter a Lock name, choose what to lock under What do you want to lock?, and click Next.
-
In Step 2 – Access & Message, click the Date & time chip in the Rule 1 card.
-
Open the Select access rule dropdown and choose the direction:
| Option | Meaning | Clock countdown | Best For |
|---|---|---|---|
| After date/time → Visible from | Content UNLOCKS at the date and time. | ✅ Available | Product launches, pre-order opens, sale starts |
| Before date/time → Visible until | Content LOCKS at the date and time. | ❌ Not available | Hiding content after an offer ends |
To use Clock Countdown, choose After date/time → Visible from.
- Select a date on the calendar and choose the target time.
| ⚠️ Note: Time is based on your Shopify store’s timezone. Check Store details if the timer appears incorrect. |
|---|
2. Enable Clock Countdown
Section titled “2. Enable Clock Countdown”- Below the calendar in the Date & time condition card, tick Use clock countdown. This checkbox appears only when After date/time → Visible from is selected.
- The Preview card on the right switches to Clock countdown and shows the live timer (for example “This page will unlock in: 00h:14m:53s”).
- To edit the countdown text, layout and design, click Customize message on the Preview card. The Preview & customize message modal opens with a live Preview on the right.
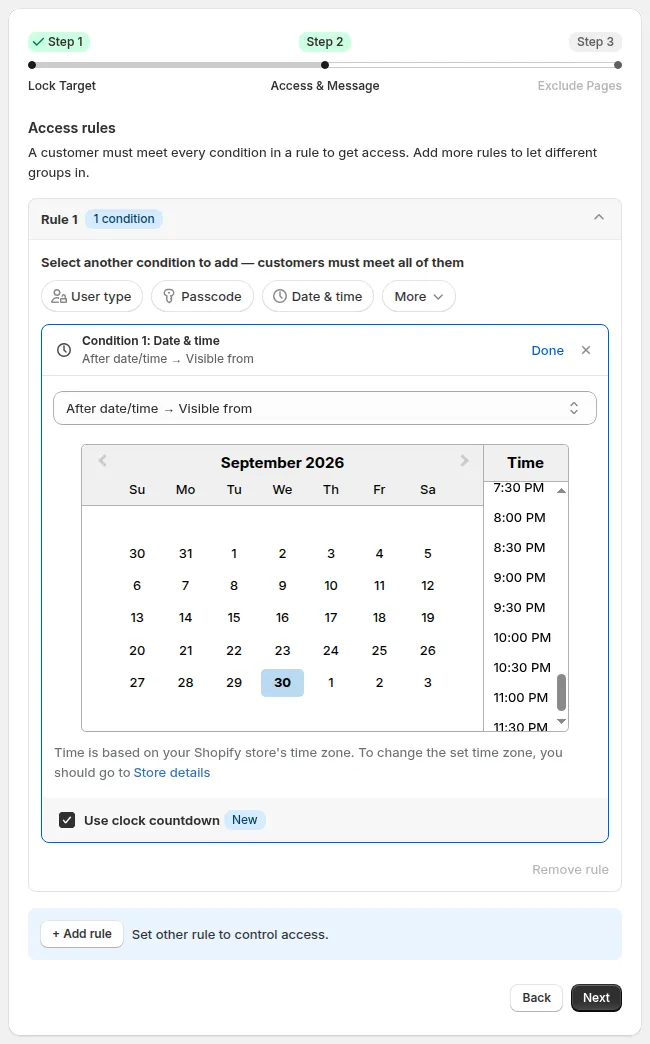
Figure 1: Select After date/time → Visible from, then tick Use clock countdown. The Preview card switches to Clock countdown.
-
Write Your Countdown Message
Section titled “Write Your Countdown Message”
Write your message text in the Message section. Use the {timer} placeholder to insert the live countdown.
- Click in the message text field.
- Type your message: for example: ‘This page will unlock in: {timer}’
- Click the + Timer button to insert the {timer} placeholder at the cursor position if needed.
- Check the Preview on the right to see how your message looks.
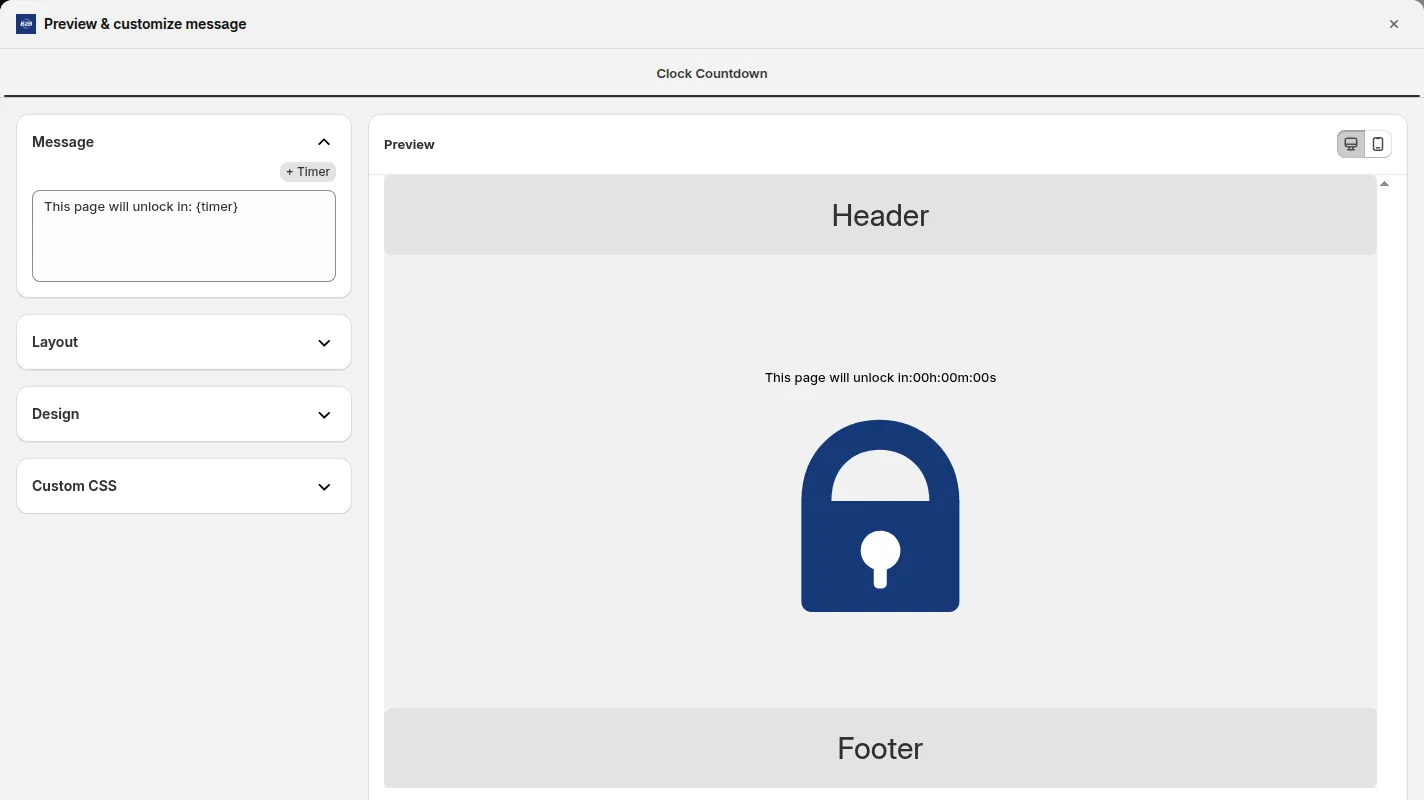
Figure 2: Message section: text field with '{timer}' placeholder. Preview shows 'This page will unlock in: 00h 00m 00s' with a lock icon.
4. Customize Layout
Section titled “4. Customize Layout”Expand the Layout section to control positioning and size on desktop and mobile.
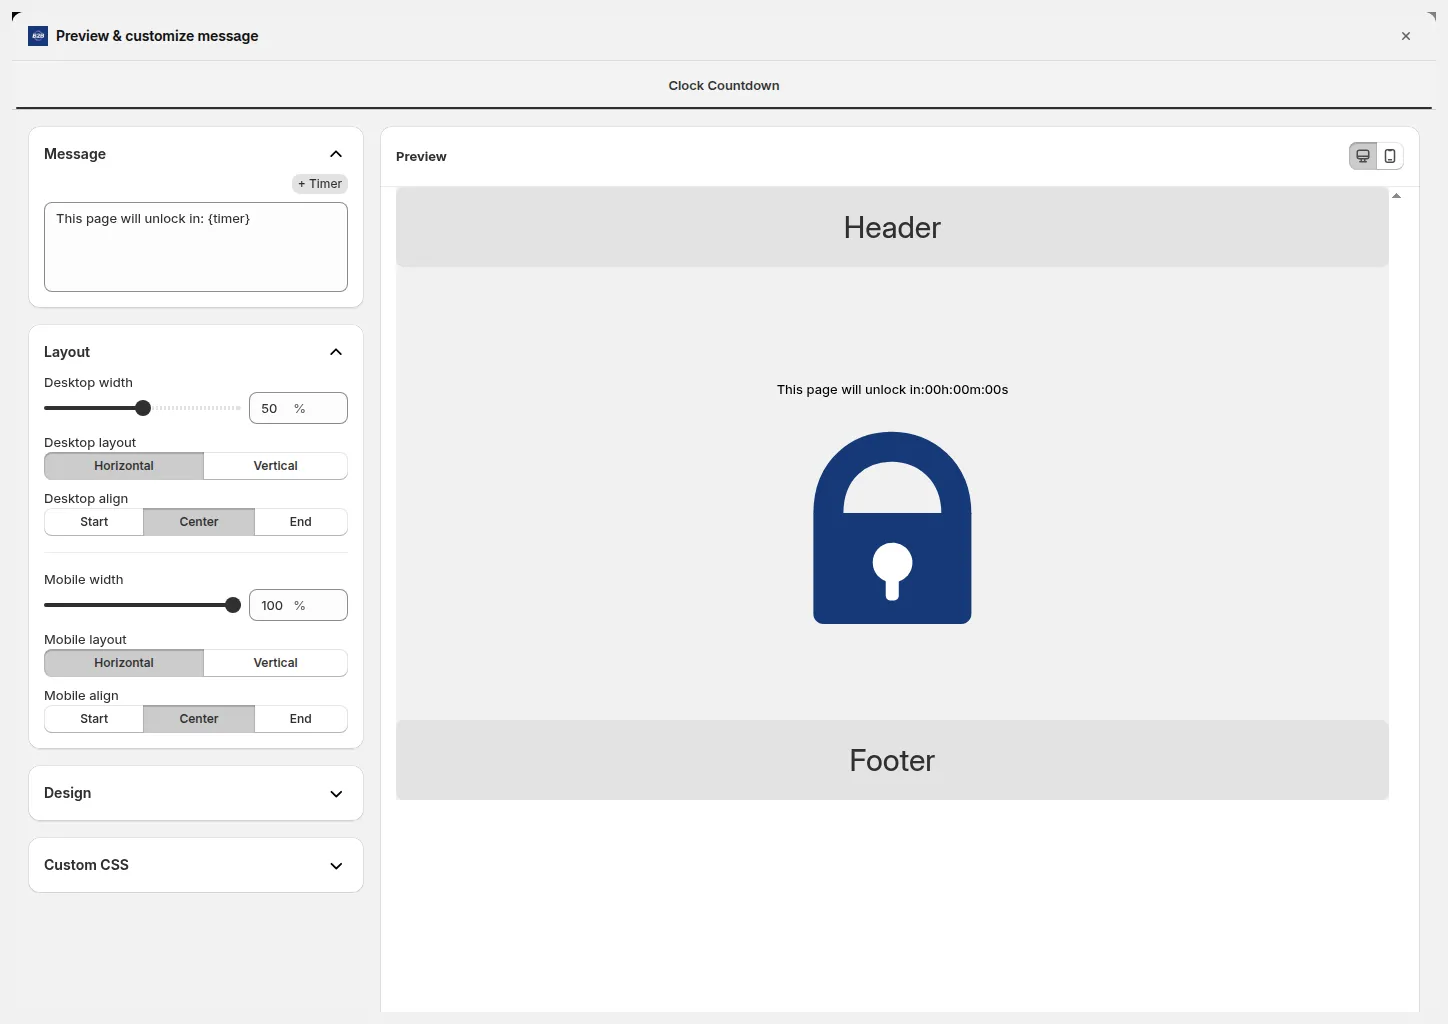
Figure 3: Layout section: adjust the width, layout and alignment of the countdown separately for desktop and mobile. The Preview updates in real time.
| Setting | Options | Recommended |
|---|---|---|
| Desktop width | 0–100% (slider) | 50% for a centered, focused timer block |
| Desktop layout | Horizontal / Vertical | Horizontal for short messages; Vertical for multi-line |
| Desktop align | Start / Center / End | Center for most layouts |
| Mobile width | 0–100% (slider) | 100%: fills the screen width on mobile |
| Mobile layout | Horizontal / Vertical | Vertical works best on narrow screens |
| Mobile align | Start / Center / End | Center for consistency with desktop |
- Customize Design (Colors & Fonts)
Expand the Design section to control the visual appearance of your countdown timer.
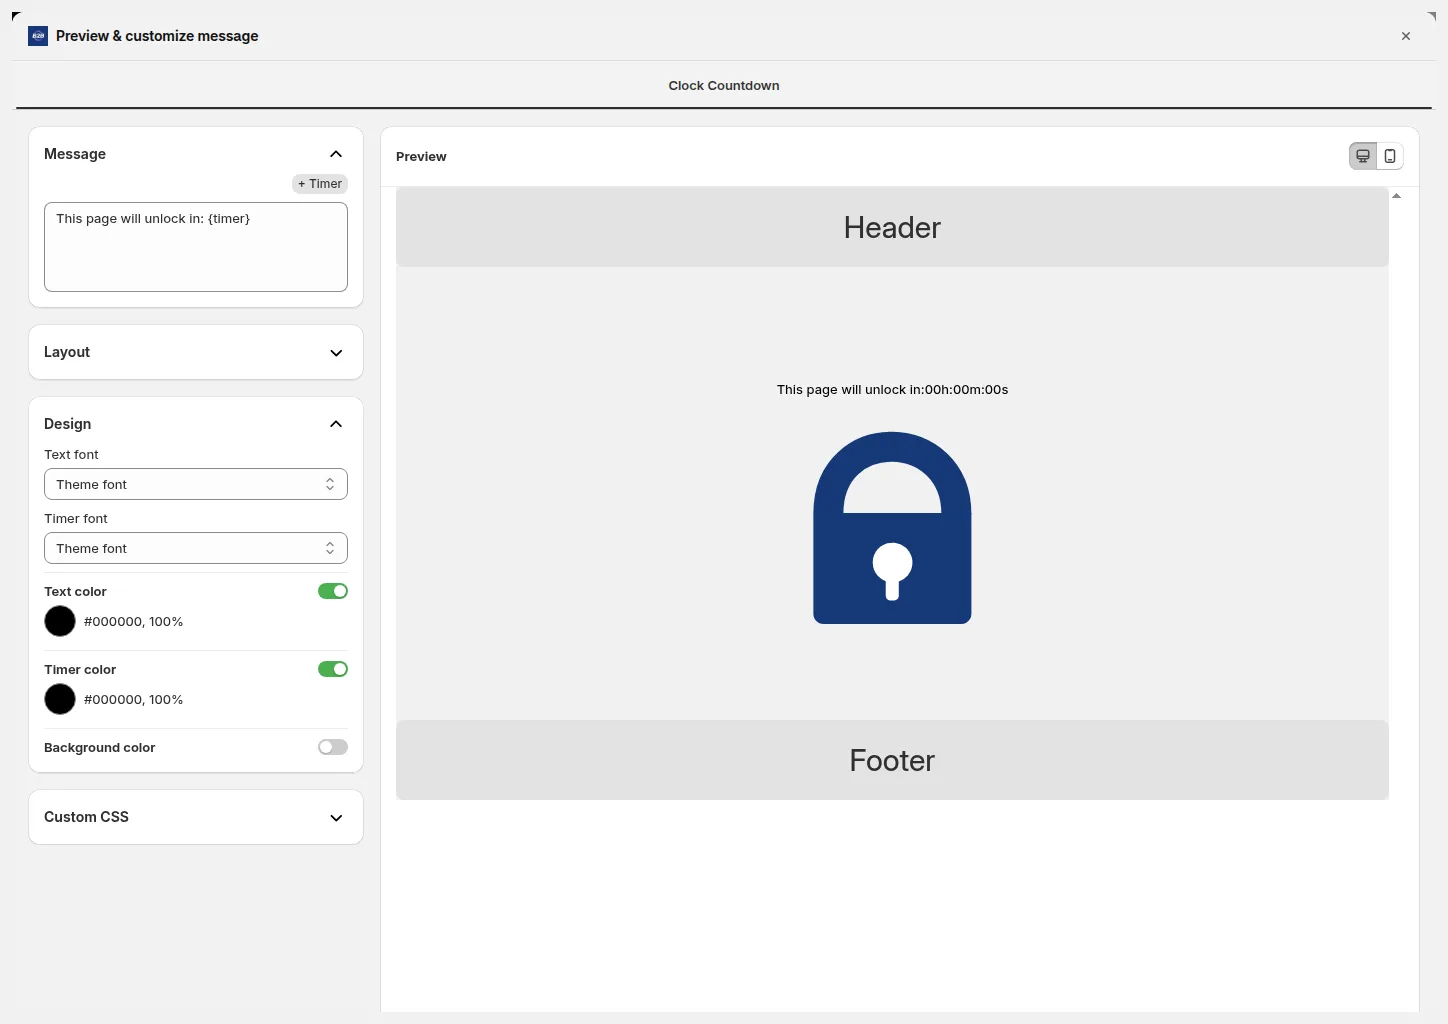
Figure 4: Design section: choose the fonts and colors you want for the message text and the timer.
| Setting | What It Controls | Tips |
|---|---|---|
| Text font | Font used for your message text | Use ‘Theme font’ to match your store design automatically |
| Timer font | Font used for the countdown digits | Consider a bold/monospace font for easy readability |
| Text color | Color of the message text | Toggle On to activate and pick a color |
| Timer color | Color of the timer digits | Use your brand’s accent color or red for urgency |
| Background color | Background behind the countdown block | Toggle Off to use transparent; toggle On to add a colored block |
| Custom CSS | Override default styles with your own CSS | Advanced users only |
6. Save & Test
Section titled “6. Save & Test”- Click Save inside the Preview & customize message modal.
- Click Save in the Contextual Save Bar at the top of the page (or go to Step 3 – Exclude Pages and click Save there).
- Open your storefront in a private/incognito browser window.
- Navigate to a page or product covered by the lock.
- Verify the countdown timer appears and is counting down in real time.
- Wait for the timer to reach zero and confirm the content unlocks automatically.
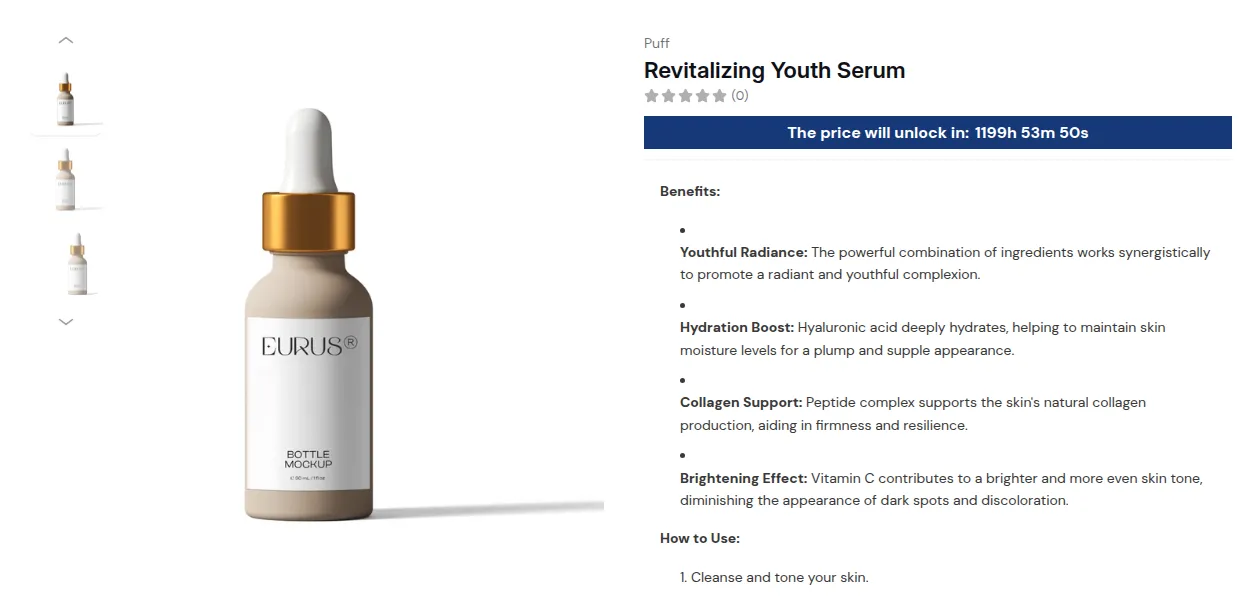
Figure 5: Product page: 'The price will unlock in: ...' replaces the price, and the buy buttons are hidden until the timer expires.
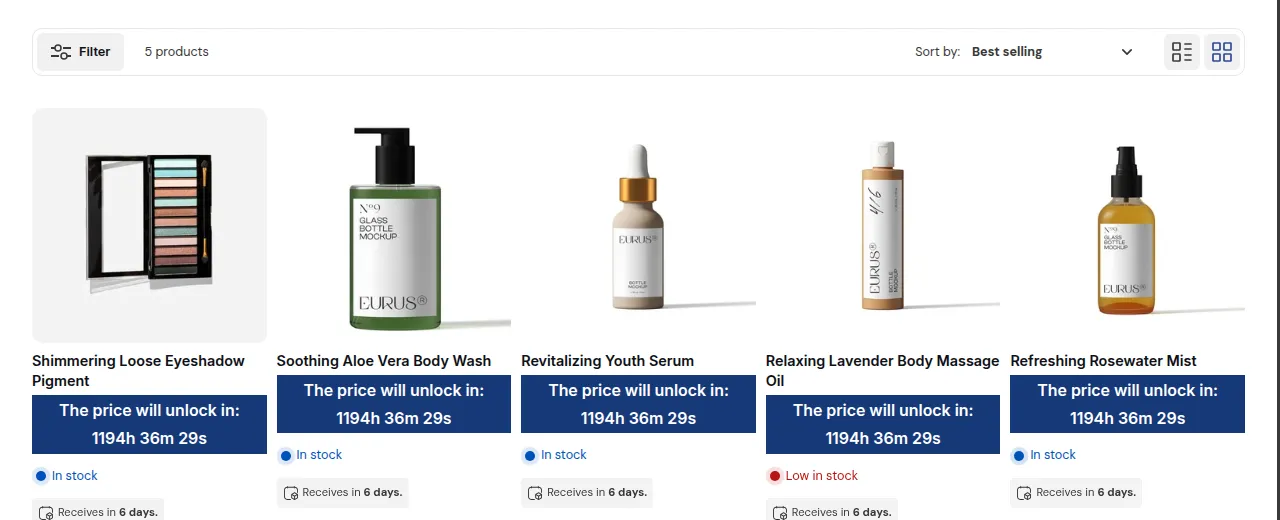
Collection page: each locked product shows the countdown instead of its price.
Real-World Examples
Section titled “Real-World Examples”Timer Format Reference
Section titled “Timer Format Reference”The {timer} placeholder auto-formats based on remaining time: no configuration needed:
| Time Remaining | Display Format | Example |
|---|---|---|
| More than 1 day | Xd Xh Xm Xs | 2d 5h 30m 15s |
| Less than 1 day | Xh Xm Xs | 5h 30m 15s |
| Less than 1 hour | Xm Xs | 30m 15s |
| Less than 1 minute | Xs | 45s |
| ⚠️ Note: The timer updates every second automatically. No page refresh is needed. When it reaches zero, the content unlocks immediately. |
|---|
Common Issues & Fixes
Section titled “Common Issues & Fixes”| What You See | Why It Happens | What to Do |
|---|---|---|
| No timer visible on the storefront. | The condition is not After date/time → Visible from, Use clock countdown is not ticked, or {timer} is missing from the message. | Edit the lock → Step 2 → in the Date & time condition, choose After date/time → Visible from and tick Use clock countdown. Then open Customize message and confirm {timer} is in the text. |
| The Use clock countdown checkbox is missing. | The condition is set to Before date/time → Visible until. | Switch the condition to After date/time → Visible from. Clock Countdown is not available for Visible until. |
| Timer shows wrong time or timezone. | Shopify store timezone is set incorrectly. | Go to Shopify Admin → Settings → Store details → update your timezone. |
| Timer counts up instead of down. | The target date is in the past. | Edit the lock → update the Date & Time to a future date/time. |
| Content does not unlock when timer hits zero. | The lock has another access condition blocking it. | Review the Summary card. Remove any additional conditions that may prevent unlocking. |
| Timer layout looks wrong on mobile. | Mobile width is set too narrow. | Re-open Customize message → Layout → set Mobile width to 100%. |
| Custom CSS is not applying. | CSS may have a syntax error, or it is overriding the wrong selector. | Double-check your CSS syntax. Try a simple test rule first. |
| Timer message shows the raw placeholder ‘{timer}’. | The message was saved without the live preview loading. | Re-open Customize message, verify {timer} is in the text, and click Save. |
Still Need Help?
Section titled “Still Need Help?”Contact support via the app or at [email protected]
• Click Chat support in the help panel visible on the lock editor page.
• Or email [email protected] with the details below.
When contacting support, include:
• Your shop URL (e.g. yourstore.myshopify.com)
• The rule name using the countdown
• A screenshot of the Preview & customize message modal
• The date and time you are targeting