
Age Verification
Age Verification displays a popup before visitors can access your store: requiring them to confirm they meet a minimum age requirement.
Protect Your Store with an Age Verification Popup
You can customize the minimum age, button text, colors, and redirect behavior to match your brand and legal requirements.
This feature works with the BSS B2B Lock app and is compatible with B2B-only and hybrid stores. Availability of advanced options (such as Require Date of Birth) may vary: some features are still coming soon.
On This Page
Section titled “On This Page”- Eligibility Requirements
- Understanding Age Verification
- Availability & Limitations
- Setting Up Age Verification
- Real-World Examples
- Managing Existing Locks
- Common Issues & Fixes
- Still Need Help?
Eligibility Requirements
Section titled “Eligibility Requirements”Before setting up Age Verification, confirm the following:
• The BSS B2B Lock app is installed on your Shopify store.
• Your store uses Shopify’s standard online storefront (not a headless or custom frontend).
• You have Admin access to your Shopify store.
• Your store sells age-restricted products or content that legally requires age gating.
• Compatible with B2B-only stores and hybrid B2B/B2C setups
Understanding Age Verification
Section titled “Understanding Age Verification”What It Is
Section titled “What It Is”Age Verification adds a gating popup to your store. Before any visitor can see your content, they must click a confirmation button. If they decline, they are redirected to a URL you specify. The popup appearance, text, and behavior are all fully configurable.
What You Can Do
Section titled “What You Can Do”• Gate your entire store, specific product pages, or specific collections: your choice.
• Set any minimum age: 18, 21, or any custom value.
• Customize all popup text: heading, description, confirm button, and exit button.
• Use the {age} placeholder in the description to automatically insert the age you set.
• Customize colors for the background, title, and both buttons.
• Set a redirect URL so declined visitors land on a specific page instead of the homepage.
Where It Applies
Section titled “Where It Applies”The popup appears on your live storefront, overlaying the page with a blurred background. It activates on every page included in the lock, and once a visitor confirms, the popup does not appear again during that session.
Availability & Limitations
Section titled “Availability & Limitations”| Feature | Status | Notes |
|---|---|---|
| Age Verification popup | ✅ Live | Works on entire store, products, or collections |
| Minimum Required Age | ✅ Live | Set any numeric age: e.g. 18, 21 |
| Appearance customization | ✅ Live | Colors, background, button styles |
| Modal Content (text) | ✅ Live | Heading, description with {age}, button labels |
| Redirect URL on Exit | ✅ Live | Redirect declined visitors to any URL |
| Upload background image | �� Coming Soon | Image upload for popup background not yet available |
| Require Date of Birth | �� Coming Soon | DOB input field, not available yet |
| Custom CSS | ✅ Available | For advanced users who want to override default styles |
| �� Coming Soon: Require Date of Birth is not yet available. The toggle appears in the app but cannot be activated. Wait for the Coming Soon release. |
|---|
Setting Up Age Verification
Section titled “Setting Up Age Verification”1. Create a Lock & Select Content to Restrict
Section titled “1. Create a Lock & Select Content to Restrict”-
Go to your Shopify Admin → Apps → BSS B2B Lock.
-
Click Locks in the left navigation.
-
Click Add lock rule. In the Start with a preset modal, select Create my own lock and click Continue.
-
In Step 1 – Lock Target, enter a Lock name (e.g. ‘Age Gate: Entire Store’) in the General Information card.
-
In the Lock Target card, open What do you want to lock? and choose what to restrict:
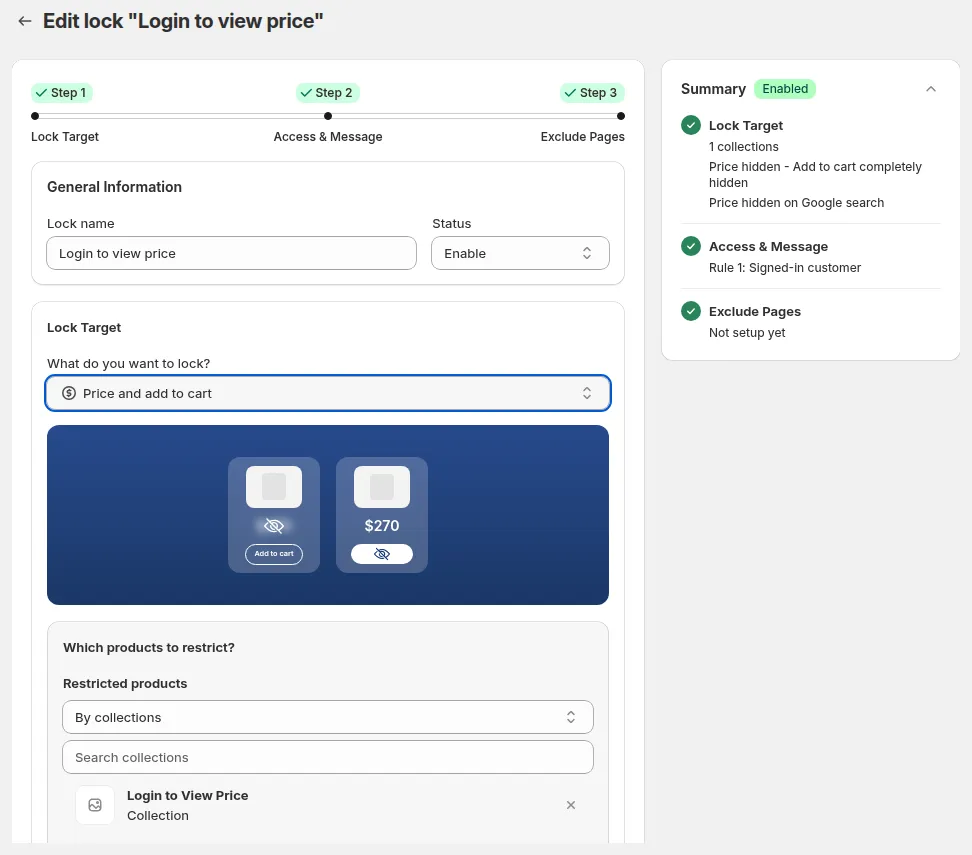
Figure 1: Step 1 – Lock Target: enter a Lock name, then choose what to lock. The Summary card on the right updates live.
| Lock Target | What It Does |
|---|---|
| Entire store | Shows the age popup on every page of your store. |
| Products | Restricts access to specific product pages only. |
| Collections | Restricts access to specific collection pages only. |
| ⚠️ Note: The Variants and Price and add to cart targets do not offer age verification. For Variants, the app shows the warning “Locking variants does not support age verification, email subscriptions, or secret link access”. |
|---|
- Click Next to go to Step 2 – Access & Message.
2. Select ‘Age Verified’ as the Access Rule
Section titled “2. Select ‘Age Verified’ as the Access Rule”In Step 2 – Access & Message, you add the condition that triggers your age popup.
- In the Rule 1 card, under Select a condition to add to the rule, look at the condition chips (User type, Passcode, Date & time, More).
- Click More → Other condition.
- Open Select access rule and choose Age verified – Must confirm age.
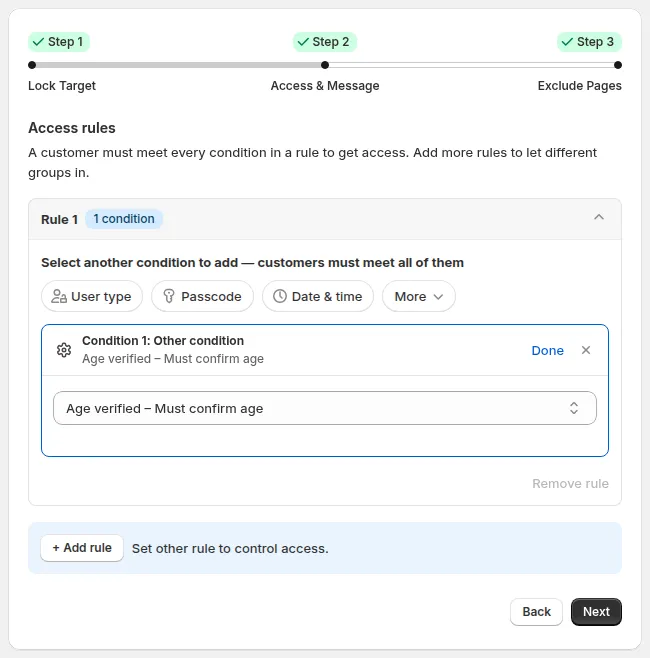
Figure 2: Step 2 – Access & Message: More → Other condition → Age verified – Must confirm age.
| ⚠️ Note: Age Verification runs after Secret Link and Passcode but before Date & Time and Tag/Specific Customers rules. |
|---|
-
Click Done to confirm the condition.
-
In the Preview card on the right (under Summary), click Customize message to open the Preview & customize message modal for Age Verification.
3. Set the Minimum Required Age
Section titled “3. Set the Minimum Required Age”You are now in the Preview & customize message modal for Age Verification. Changes you make here update the Preview panel in real time.
- Expand the General Configuration section.
- Set the Minimum Required Age: enter a number (e.g. 18 or 21).
- Check the Preview on the right: the description text updates to show the correct age automatically.
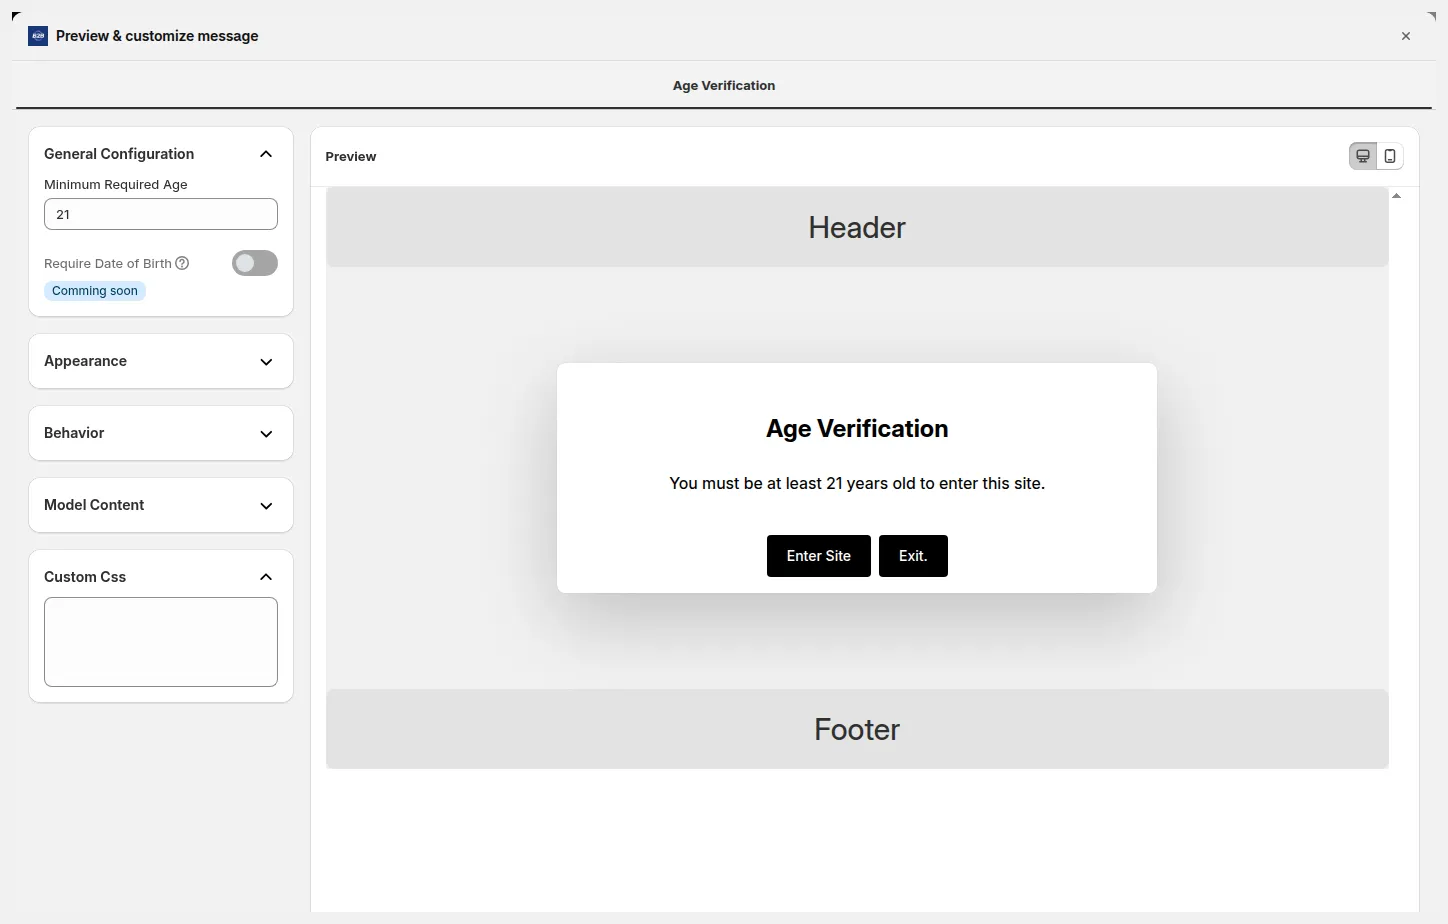
Figure 3: General Configuration: set Minimum Required Age (shown as 21). The live Preview shows the popup with the age inserted in the description. 'Require Date of Birth' is labeled Coming Soon.
| �� Coming Soon: The ‘Require Date of Birth’ toggle is visible but labeled Coming Soon. Do not attempt to enable it: it is not functional yet. |
|---|
- Customize Appearance & Behavior
Expand the Appearance and Behavior sections to customize how your popup looks and what happens when a visitor clicks Exit.
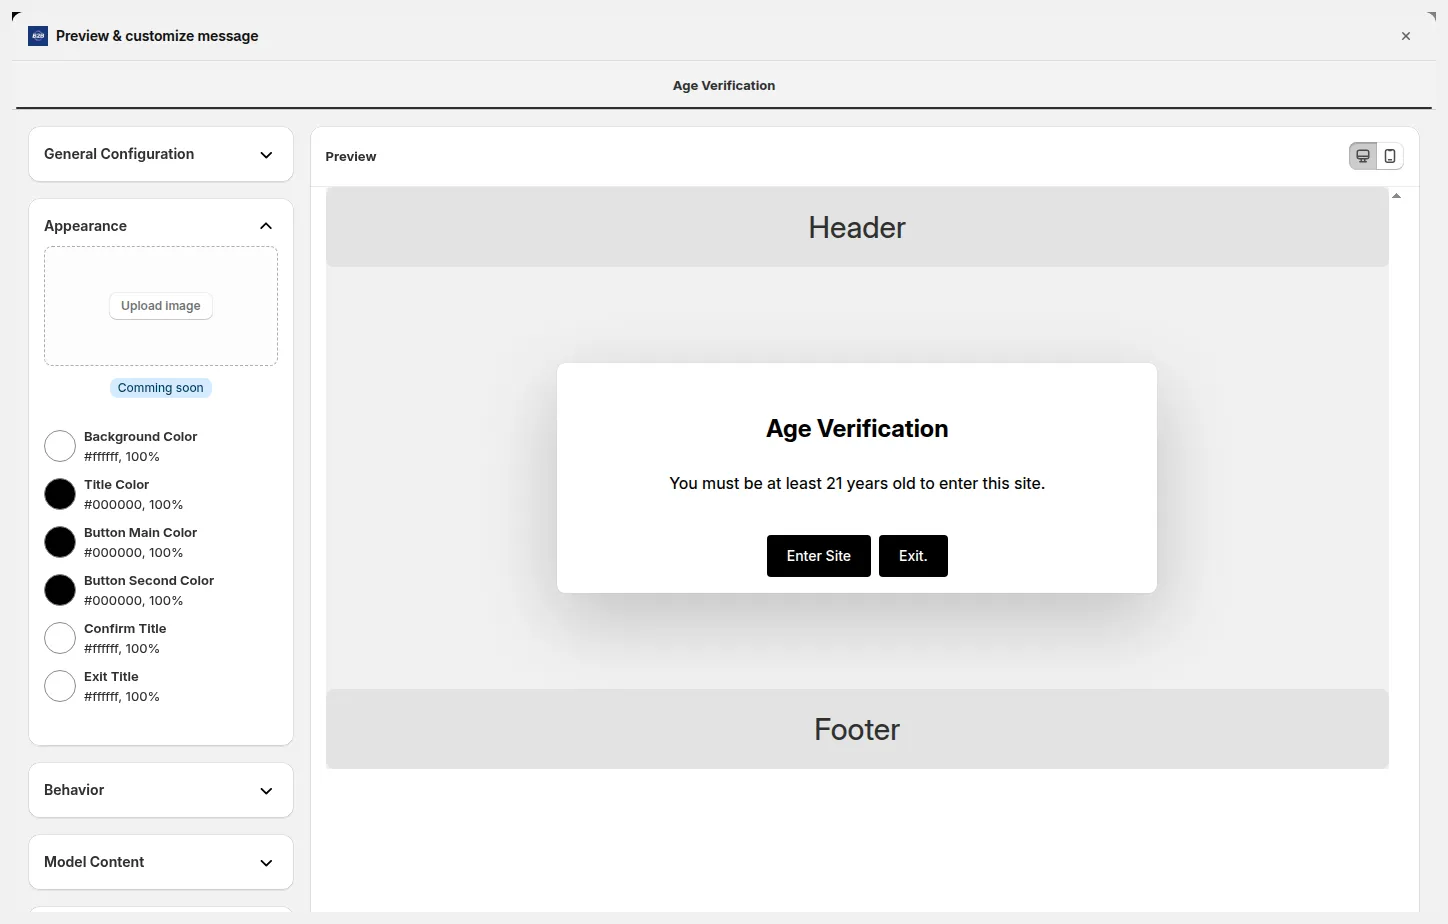
Figure 4: Appearance section: customize the colors of the popup, its text and its buttons. Behavior section: choose the page the Exit button sends visitors to.
| Setting Field | Description & Tips |
|---|---|
| Background Color | The background color of the popup card (default: white #ffffff). |
| Title Color | Color of the popup heading text (default: black #000000). |
| Button Main Color | Background color of the ‘Enter Site’ (confirm) button. |
| Button Second Color | Background color of the ‘Exit’ button. |
| Confirm Title | Text color on the confirm button (default: white #ffffff). |
| Exit Title | Text color on the exit button (default: white #ffffff). |
| Redirect URL (On Exit) | URL visitors are sent to when they click Exit. Default: /index. Recommended: create a dedicated age restriction explanation page. |
| ⚠️ Note: Upload image (background image for the popup) is labeled Coming Soon and cannot be used yet. |
|---|
- Customize Modal Content (Popup Text)
Expand the Model Content section to edit every piece of text shown inside the popup.
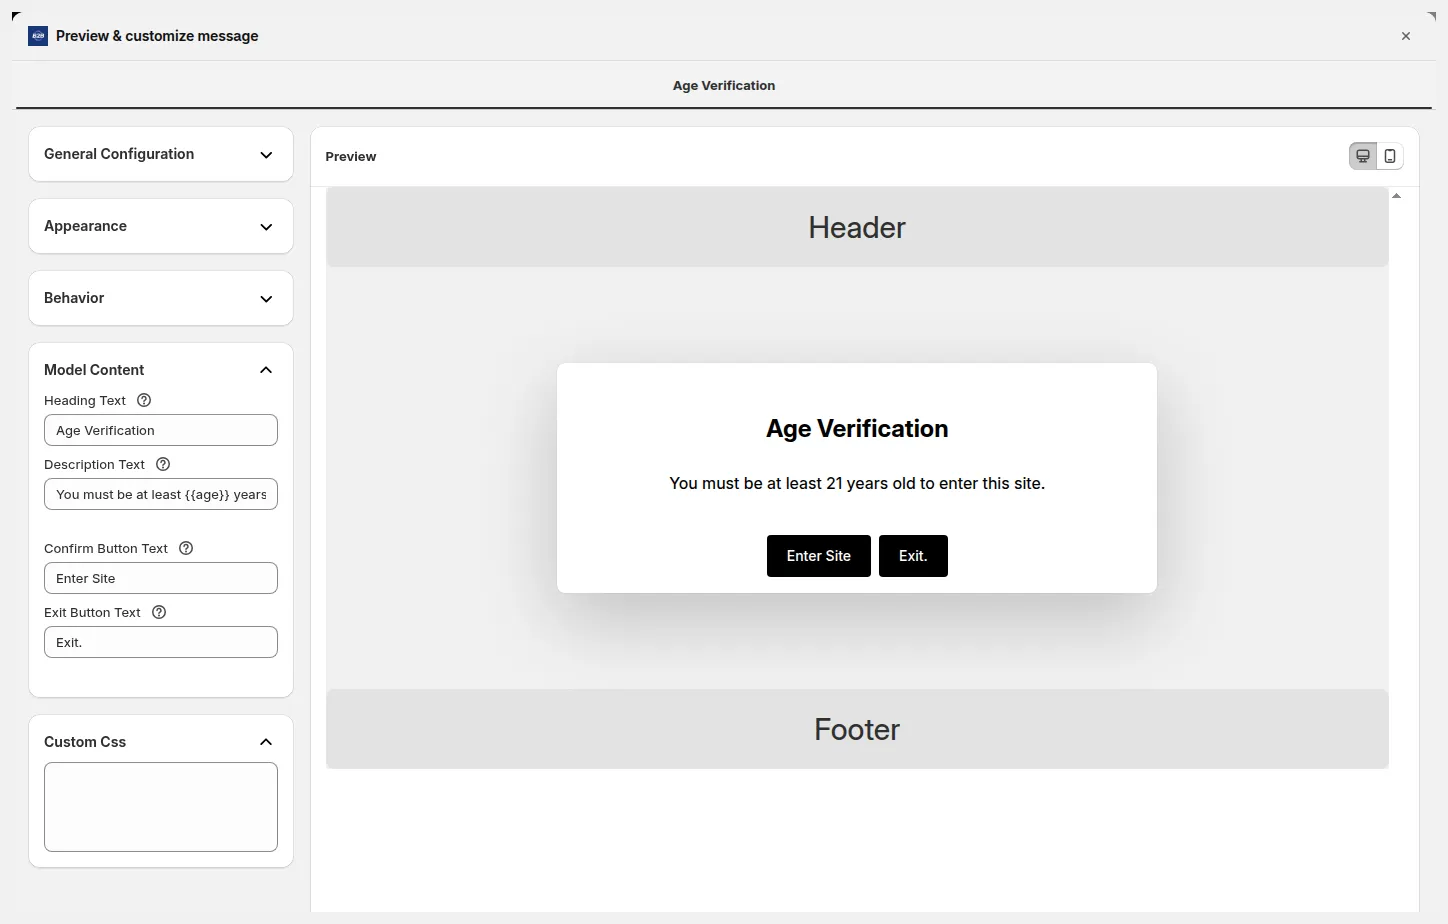
Figure 5: Model Content section: customize the text shown in the popup.
| Setting Field | Description & Tips |
|---|---|
| Heading Text | The main title of the popup (e.g. ‘Age Verification’). |
| Description Text | The explanation shown to visitors. Use {age} to auto-insert the minimum age you set: e.g. ‘You must be at least {age} years old to enter this site.’ |
| Confirm Button Text | Label on the confirm/enter button (e.g. ‘Enter Site’, ‘I am 18 or older’). |
| Exit Button Text | Label on the exit/decline button (e.g. ‘Exit’, ‘I am under age’). |
| Custom CSS | Optional: paste custom CSS to override the default popup styles. For advanced users only. |
6. Save & Test
Section titled “6. Save & Test”- Close the modal and click Save in the Contextual Save Bar at the top of the page (or go to Step 3 – Exclude Pages and click Save there).
- Open your storefront in a private/incognito browser window.
- Navigate to a page covered by the lock.
- Verify the popup appears centered on screen with a blurred background.
- Confirm the heading, description, and button text match your configuration.
- Click Enter Site: confirm you gain access and the popup does not reappear in the same session.
- Click Exit (on a fresh session): confirm you are redirected to the URL you configured.
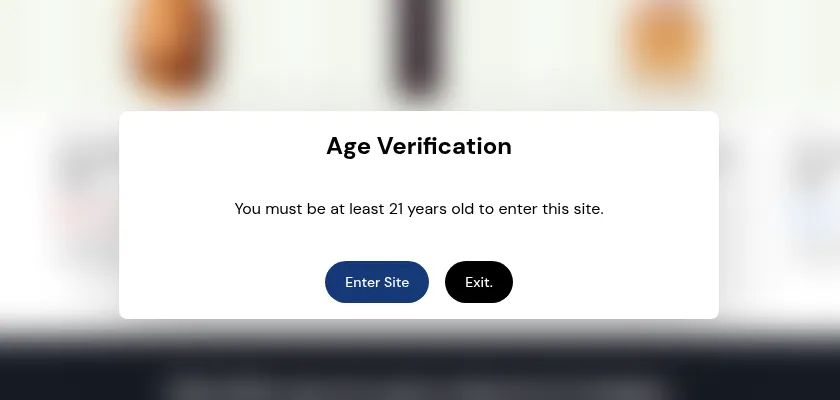
Figure 6: Live storefront: Age Verification popup centered on screen with blurred background, showing 'Enter Site' and 'Exit' buttons.
Real-World Examples
Section titled “Real-World Examples”Managing Existing Locks
Section titled “Managing Existing Locks”From the Locks list in the app:
• Edit a lock: Click the lock name or the edit icon to re-open the configuration.
• Enable or disable: Use the Status toggle on the Lock list, then click Save in the Contextual Save Bar. Inside the lock editor, set Status to Enable or Disable in the General Information card.
• Delete a lock: Click the delete/trash icon. This cannot be undone.
• Update age or text: Re-open the lock, click Customize message on the Preview card, make changes, and click Save.
Common Issues & Fixes
Section titled “Common Issues & Fixes”| What You See | Why It Happens | What to Do |
|---|---|---|
| Popup is not appearing on the storefront. | The lock is disabled, or the wrong content was selected. | Open the lock, confirm On/Off is On, and verify the correct pages are covered. |
| The age number is wrong in the description. | {age} placeholder is working correctly: the wrong age was entered. | Re-open the lock → Customize message → General Configuration, and update the Minimum Required Age. |
| Exit button is not redirecting correctly. | The Redirect URL (On Exit) field is empty or has an incorrect URL. | Open the lock → Preview card → Customize message → Behavior section → update the Redirect URL. |
| Popup reappears even after confirming. | Session was cleared or visitor used a different browser/device. | This is expected behavior: confirmation is session-based. |
| ‘Require Date of Birth’ toggle does nothing. | This feature is not yet available. | Wait for the Coming Soon release. The toggle will become functional when ready. |
| Colors or text are not updating in the Preview. | Changes may not have been saved. | Click Save and refresh. Check that the Preview is visible before saving. |
| Popup appears on pages I did not intend. | Lock Target was set to ‘Entire store’ instead of specific pages. | Edit the lock, change the Lock Target to the correct content type. |
Still Need Help?
Section titled “Still Need Help?”Click Chat support in the app or email [email protected]. Our team can configure the lock for you.
• Click Chat support in the Need help? panel visible in the lock editor.
• Or email [email protected] with the details below.
When contacting support, include:
• Your shop URL (e.g. yourstore.myshopify.com)
• The name of the lock with the issue
• What you expected vs. what actually happened
• A screenshot or screen recording if possible