Full Setup Guide
This section explains how to fully set up and fine-tune the Quick Order experience.
It assumes you have already installed the app and completed the basic Quick Start steps.
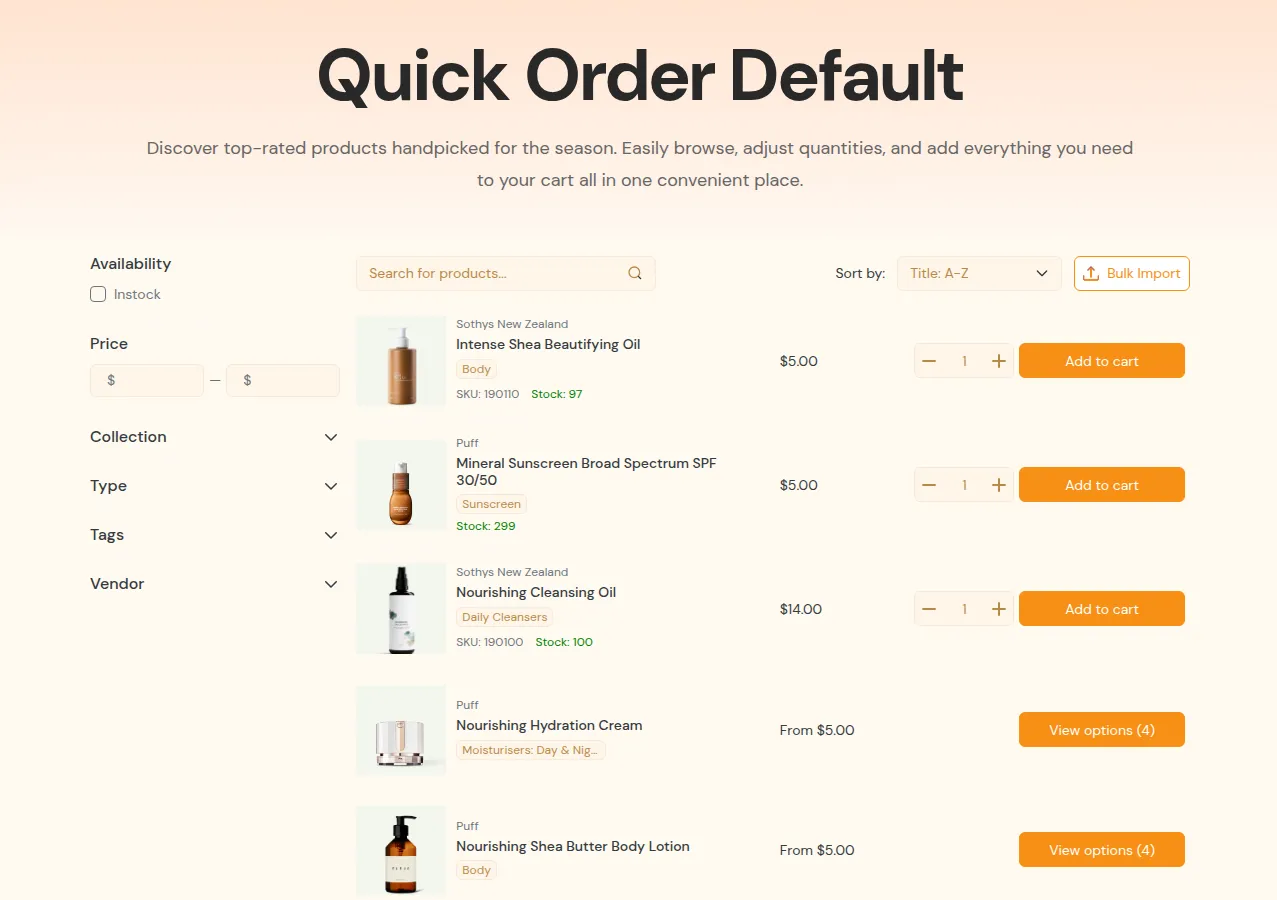
What your customers see on the storefront.
Main steps:
- Enable app block/theme extension
- Create and publish Quick Order pages
- Create Universal Page
- Add Quick Order pages and Universal page to your online store
1. Enable app block/themes extension
Section titled “1. Enable app block/themes extension”If the app is not yet connected to your theme, Quick Order content will not appear on the storefront, even if pages are created.
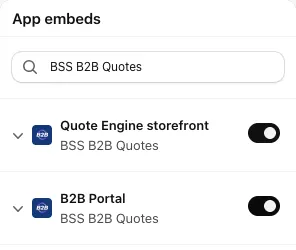
Check app embed status:
- In Shopify Admin, open the app.
- On the home page, check for the app embed status under Needs your attention
- If you see a message like “App is not set up on your store”, click the “Enable app” button.
- The Theme Editor opens with the app embed panel.
- Turn the app embed switch ON.
- Click Save in the Theme Editor, then return to the app and confirm the notice is gone.
This step allows the app to display Quick Order components on your live website.
2. Create and publish Quick Order pages
Section titled “2. Create and publish Quick Order pages”This is the core workflow where you define who sees the page, what products are on it, and how it looks.
2.1. Create and Configure Scopes
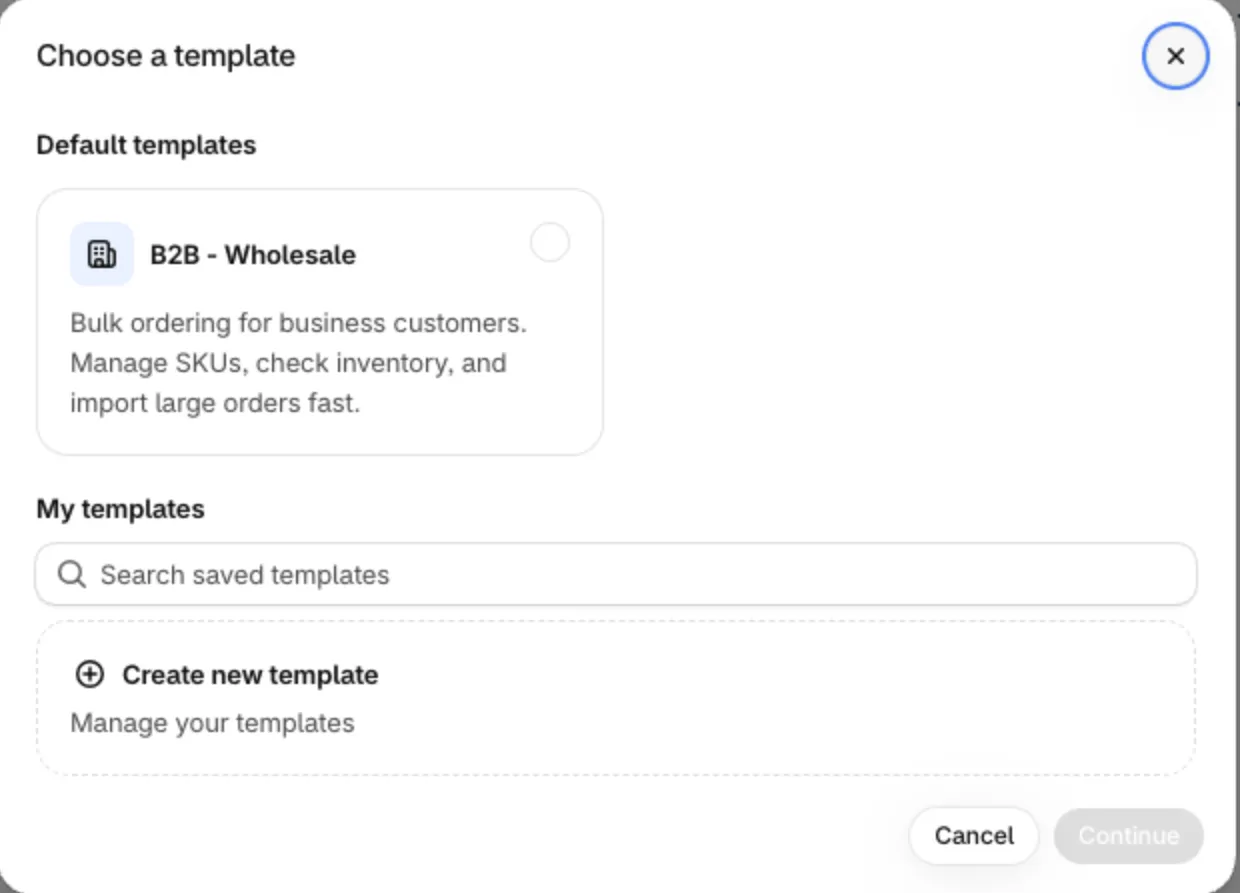
Section titled “2.1. Create and Configure Scopes”From the Quick Order page, click Create new page. A Choose a template modal opens: pick Start from scratch, the B2B - Wholesale default template, or one of your saved templates under My templates, then click Continue.
The Add new Quick Order Page editor opens on one setup screen, with a Storefront preview (sample data) on the right. You can click Save as soon as the setup is filled in; customizing the look is optional.
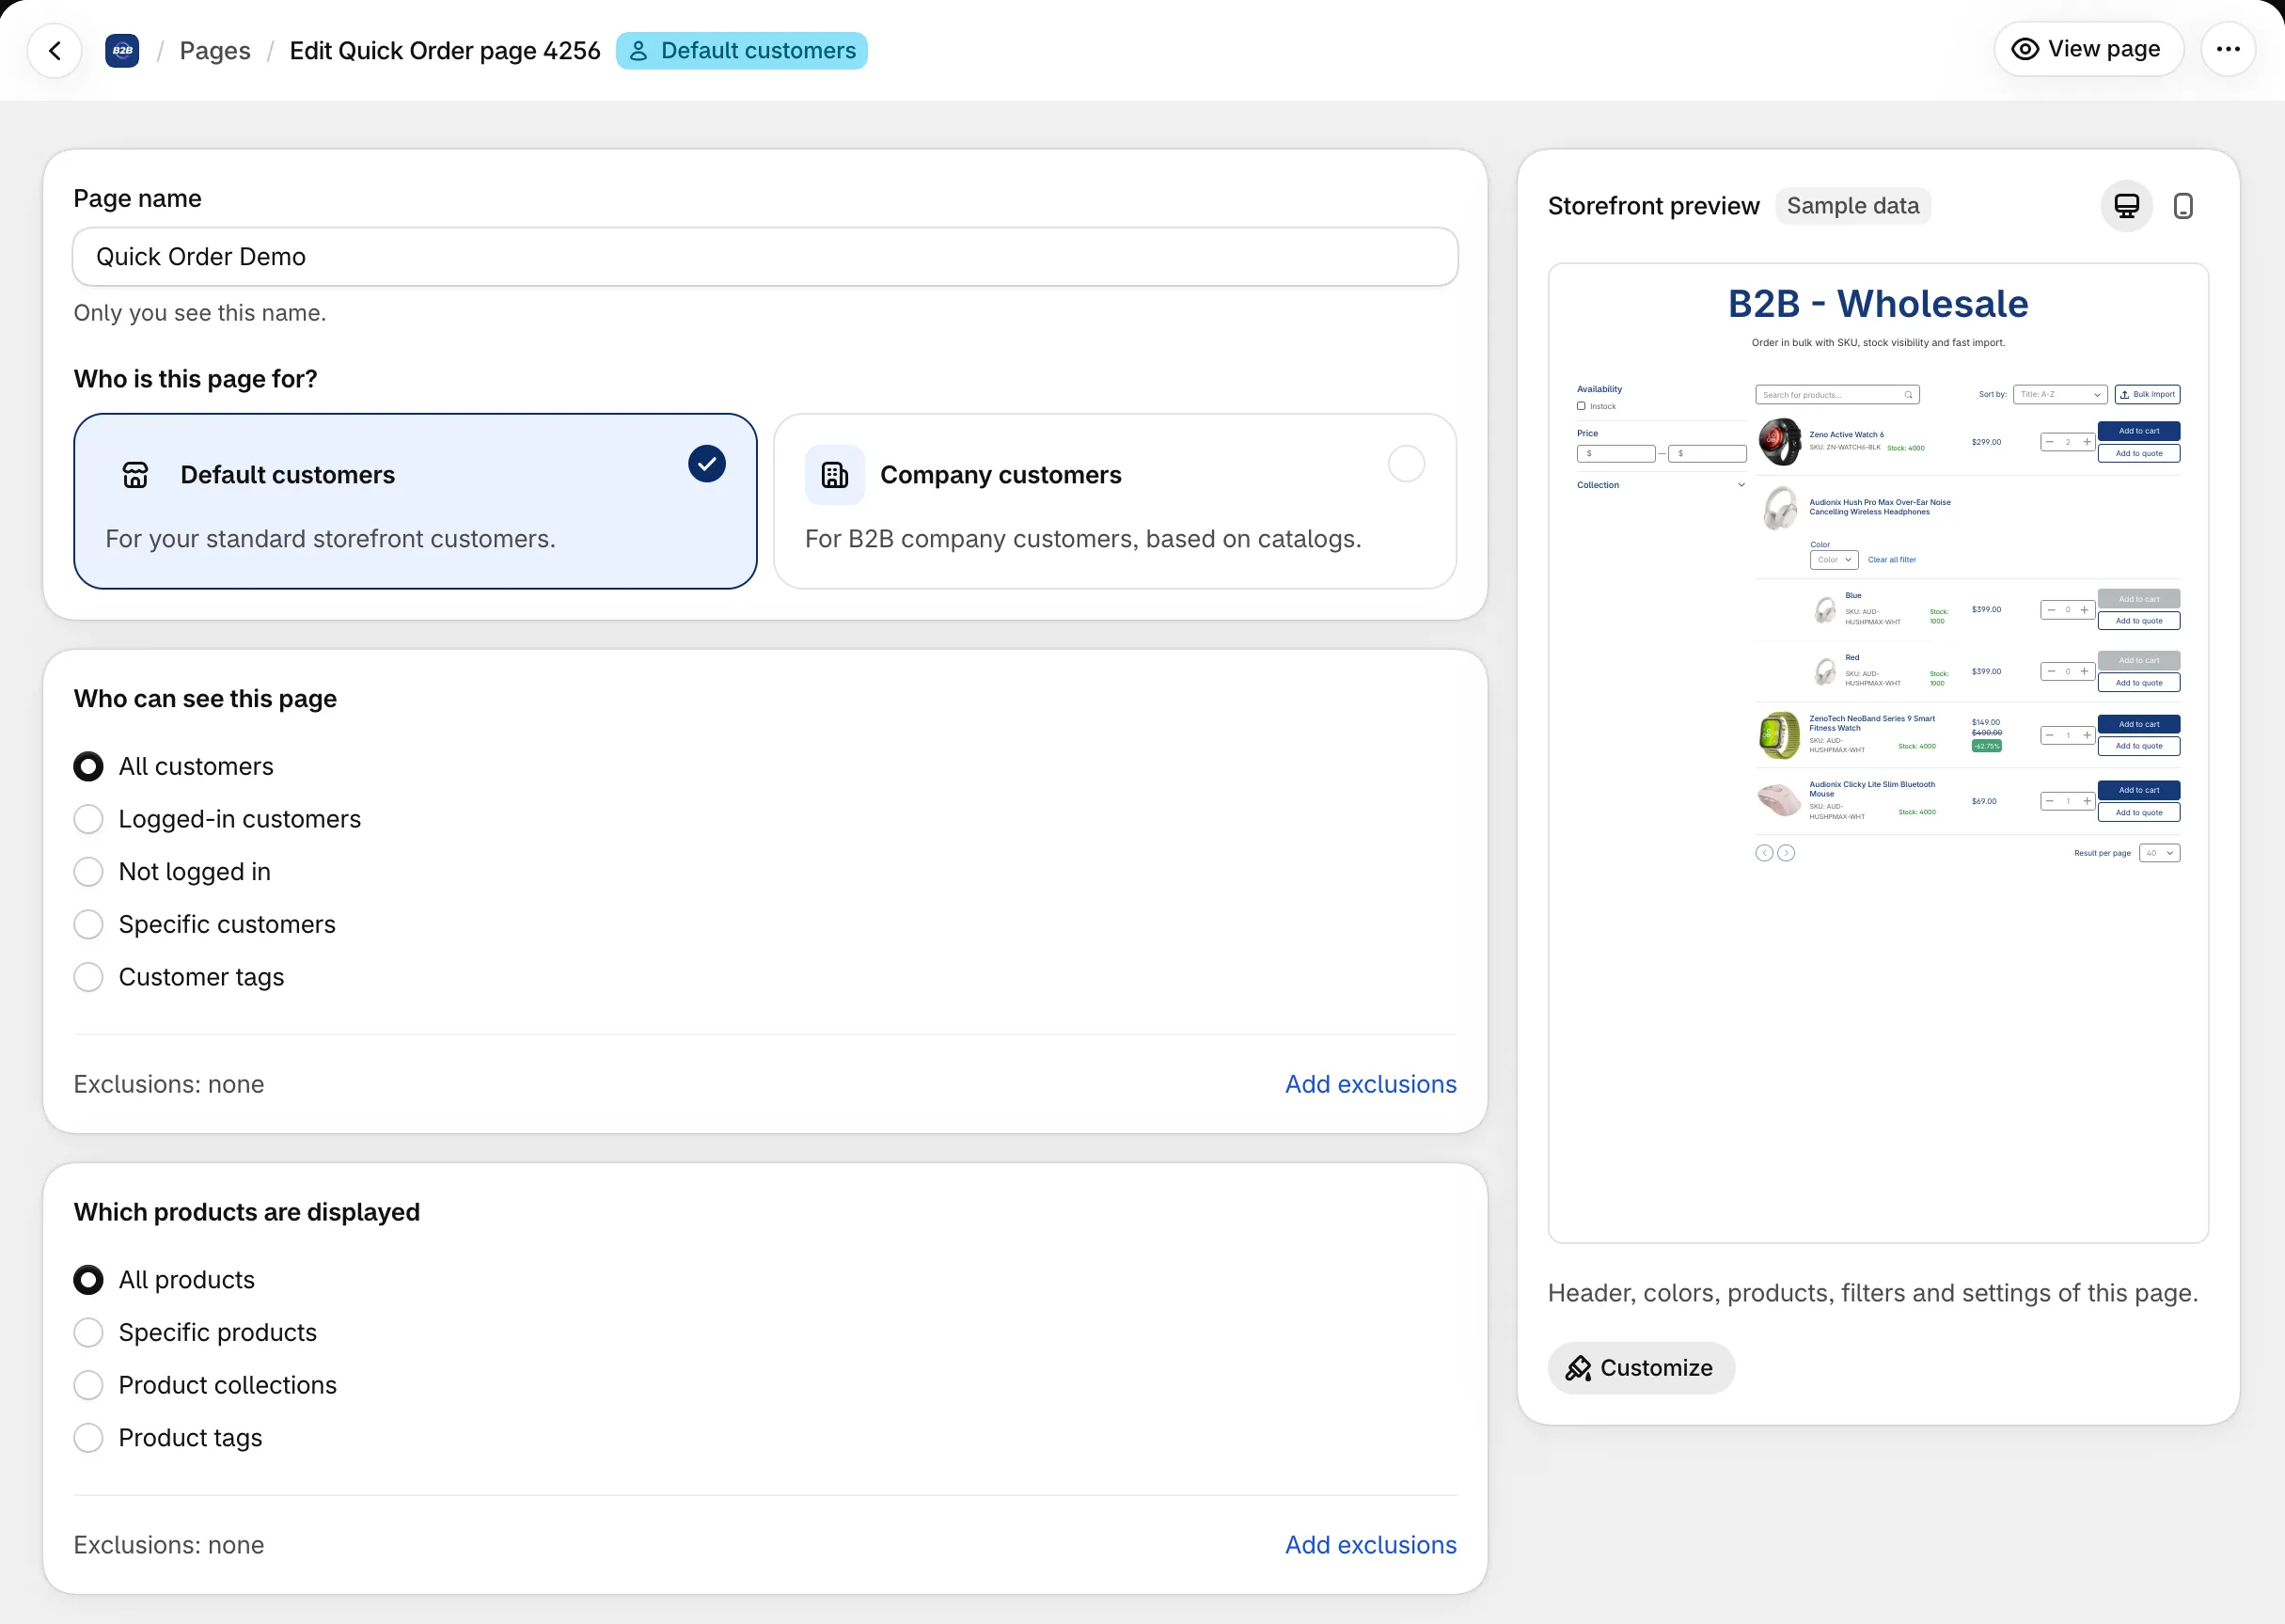
Page name and customer type
Enter a Page name (only you see it), then under Who is this page for? choose:
- Default Customers: Best for retail or standard wholesale (DTC).
- Company Customers: For buyers of Shopify B2B companies. Prices and availability follow the catalogs Shopify assigns to each company location. This option needs the Enterprise plan of BSS B2B Quote; on other plans it is greyed out with an upgrade link.
Visibility and products
Control visibility per page on the same screen:
- Who can see this page: Select All customers, Logged-in customers, Specific customers or Customer tags. Click Add exclusions to leave some customers out.
- Which products are displayed: Choose All products, Specific products, Product collections or Product tags. Click Add exclusions to leave some products out.
For a Company Customers page, Who can see this page is replaced by Where your customers come from: A B2B market (every company location in that market, including locations added later) or A company’s locations (selected locations of one company). Which products are displayed keeps the same options and exclusions, and Shopify still limits each buyer to the products and prices of their company location’s catalogs. See Create Quick Order Page.
Products and the B2B market catalog: When a Company Customers page uses A B2B market (under Where your customers come from), the page only shows products that belong to that market’s catalog.
- Products excluded from the catalog are not shown, even if Which products are displayed is set to All products.
- If the app cannot confirm that a product is in the catalog, it hides the product instead of showing it.
- After you save the page, the app prepares the product list. Buyers see a “preparing the list” message, and the list appears on its own when it is ready, with no page reload. If it takes unusually long, buyers see a Check again button.
- If preparing the list fails, the app retries automatically. If the list keeps failing to load, contact support.
If buyers see fewer products than you expect, check in Shopify admin that the products are included in the market’s catalog.
Product list and sort order:
If you select product collections or tags, a preview of the matching products appears with a Sort by option under Products display order.
- Sync products: For Specific products, Product collections and Product tags, the app saves the product list when you click Save or Sync products, so the page loads instantly for customers. The storefront shows this saved list, not your live catalog.
- Sort Order: Set a permanent sort order (e.g., A–Z, Price Low–High) so the list always looks organized.
- Best selling (storefront): Buyers can also sort the page by Best selling in the Sort by list. It follows the same order as Best selling in your Shopify admin. The rank is saved when products sync, so click Sync products to refresh it. For pages created before this option was added (4.24), click Sync products for all pages once.
- Important: Each time you create a collection, add products to a collection or tag the page uses, or publish new products in Shopify, click the Sync products button on the page’s row on the Quick Order page (or Sync products for all pages). Until you do, the new products do not appear on the Quick Order page. If you have just added the products, wait a few minutes before you sync. See New products or a new collection do not appear.
2.2. Customize Display Options
Section titled “2.2. Customize Display Options”Click Customize under the Storefront preview to open the Customize page modal. It has three sections: Content (header, subtitle, banner and links), Products & filters (toolbar, filters, product info, metafields) and Settings (variant display, Request for Quote). Changes show in the preview right away; click Done to close the modal, then Save the page to apply them to your store. Reset to default restores the default settings, and Apply template / Create template switch to or save a template.
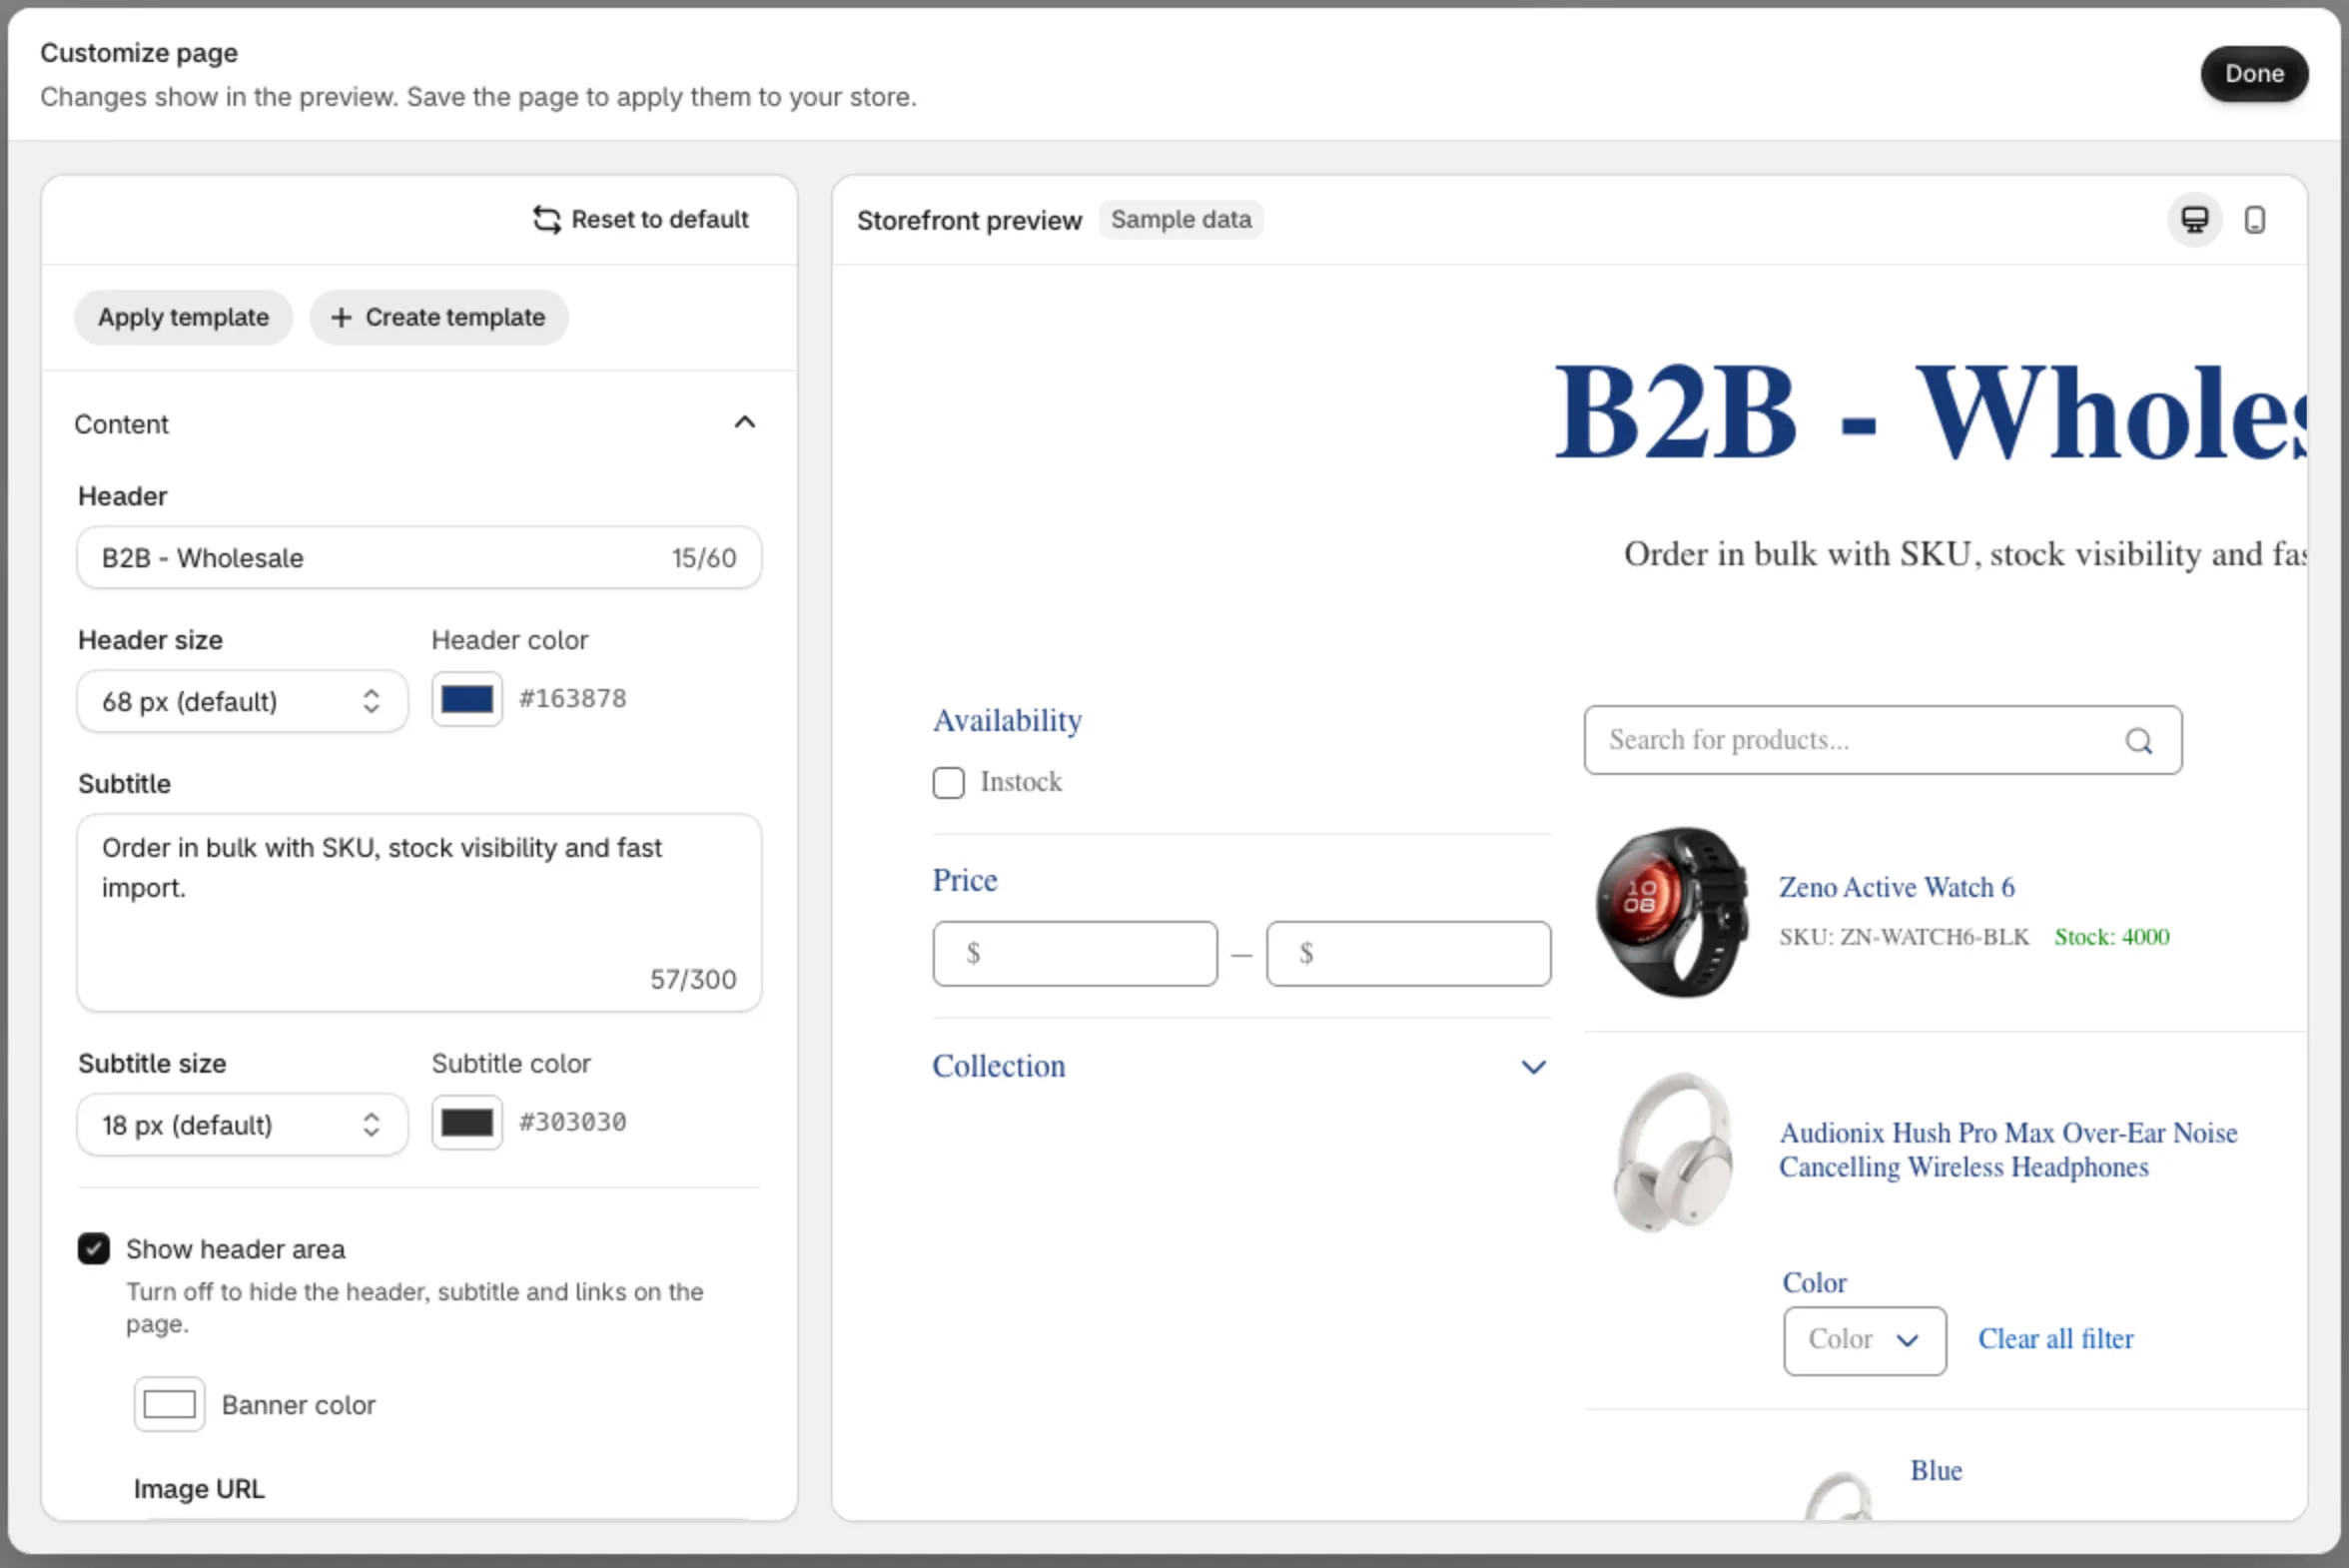
Layout & Information
The Quick Order page uses a high-density List View (Table layout) designed for bulk ordering. You can configure:
- Page Header: Add a custom title and description to guide your customers.
- Columns: Check the boxes to show or hide details like SKU, Vendor, Inventory stock levels, and Unit Price.
- Filters: Enable search bars and filters (Availability, Product Type, Vendor) to help customers find items faster.
Visual Styling
You can adjust the design to match your store’s branding without coding:
- Colors: Customize the background, text, and button colors.
- Shapes & Sizes: Adjust the corner radius (roundness) of buttons and cards, and fine-tune text sizes to make the page easy to read.
Request for Quote Integration
If you use our Request for Quote feature, under Integrations, tick Integrated with Request for Quote.
- Enabled: Products that match your Quote logics will show an “Add to Quote” button instead of “Add to Cart.”
- Disabled: The page will function as a standard ordering page.
2.3. Publish the Page
Section titled “2.3. Publish the Page”We have streamlined the go-live process.
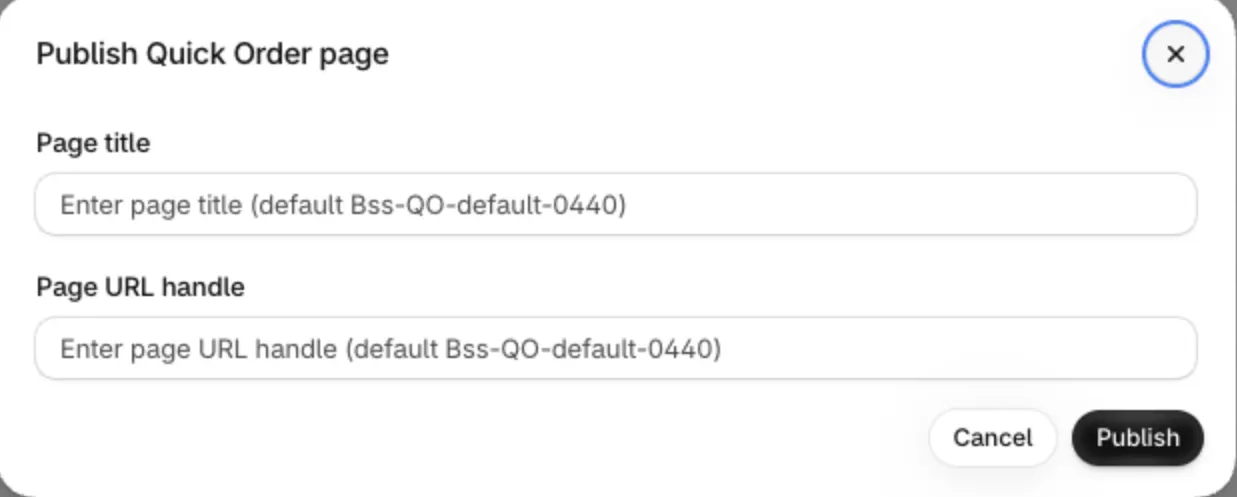
- Save your Quick Order page configuration.
- A Publish Quick Order Page modal will appear. To publish a page later, click the Publish icon (first icon under Action) on its row on the Quick Order page.
- Enter your Page Title (what customers see in the browser tab).
- Enter the URL handle (e.g., wholesale-order).
- Click Publish.
The app automatically creates the Shopify Page and assigns the correct template. You do not need to do this manually in Shopify Admin anymore.
2.4. Example selection logic
Section titled “2.4. Example selection logic”Use this logic to decide how to configure your page’s visibility, display columns, and integrations:
| Your Goal | Recommended Configuration |
|---|---|
Simple Bulk Order Page: You want a fast page where anyone (retail or wholesale) can quickly buy products. |
Type: Default / All Customers / All Products Display: Simple columns (Image, Title, Price, Qty) Request for Quote: Disabled (Direct to Cart) |
Wholesale Reordering: For existing dealers who know your catalog well and order by part number. |
Type: Default / Customers with tag ‘Dealer’ Display: Show SKU, Vendor, and Stock Level so they know what is available. Filters: Enable “Filter by Vendor” and “Availability” |
Custom Quote Catalog: High-ticket items that require price negotiation or custom specs. |
Type: Default / Specific Products Display: Show Image and Title Request for Quote: Enabled (Customers click “Add to Quote” instead of “Add to Cart”) |
Company Ordering: You use Shopify B2B and need specific catalogs/prices for different company locations (the app’s Company Customers features are on the Enterprise plan). |
Type: Company Customers / the collections or products the companies buy Display: Show SKU and Unit Price (displays B2B specific price) Request for Quote: Disabled (unless negotiating large drafts) |
3. Create Universal Page
Section titled “3. Create Universal Page”If you have multiple Quick Order pages (e.g., one for VIPs, one for Wholesale, one for Staff), managing page links can be difficult. The Universal Page solves this by giving you one single link for everyone.
3.1. Configure Universal Settings
Section titled “3.1. Configure Universal Settings”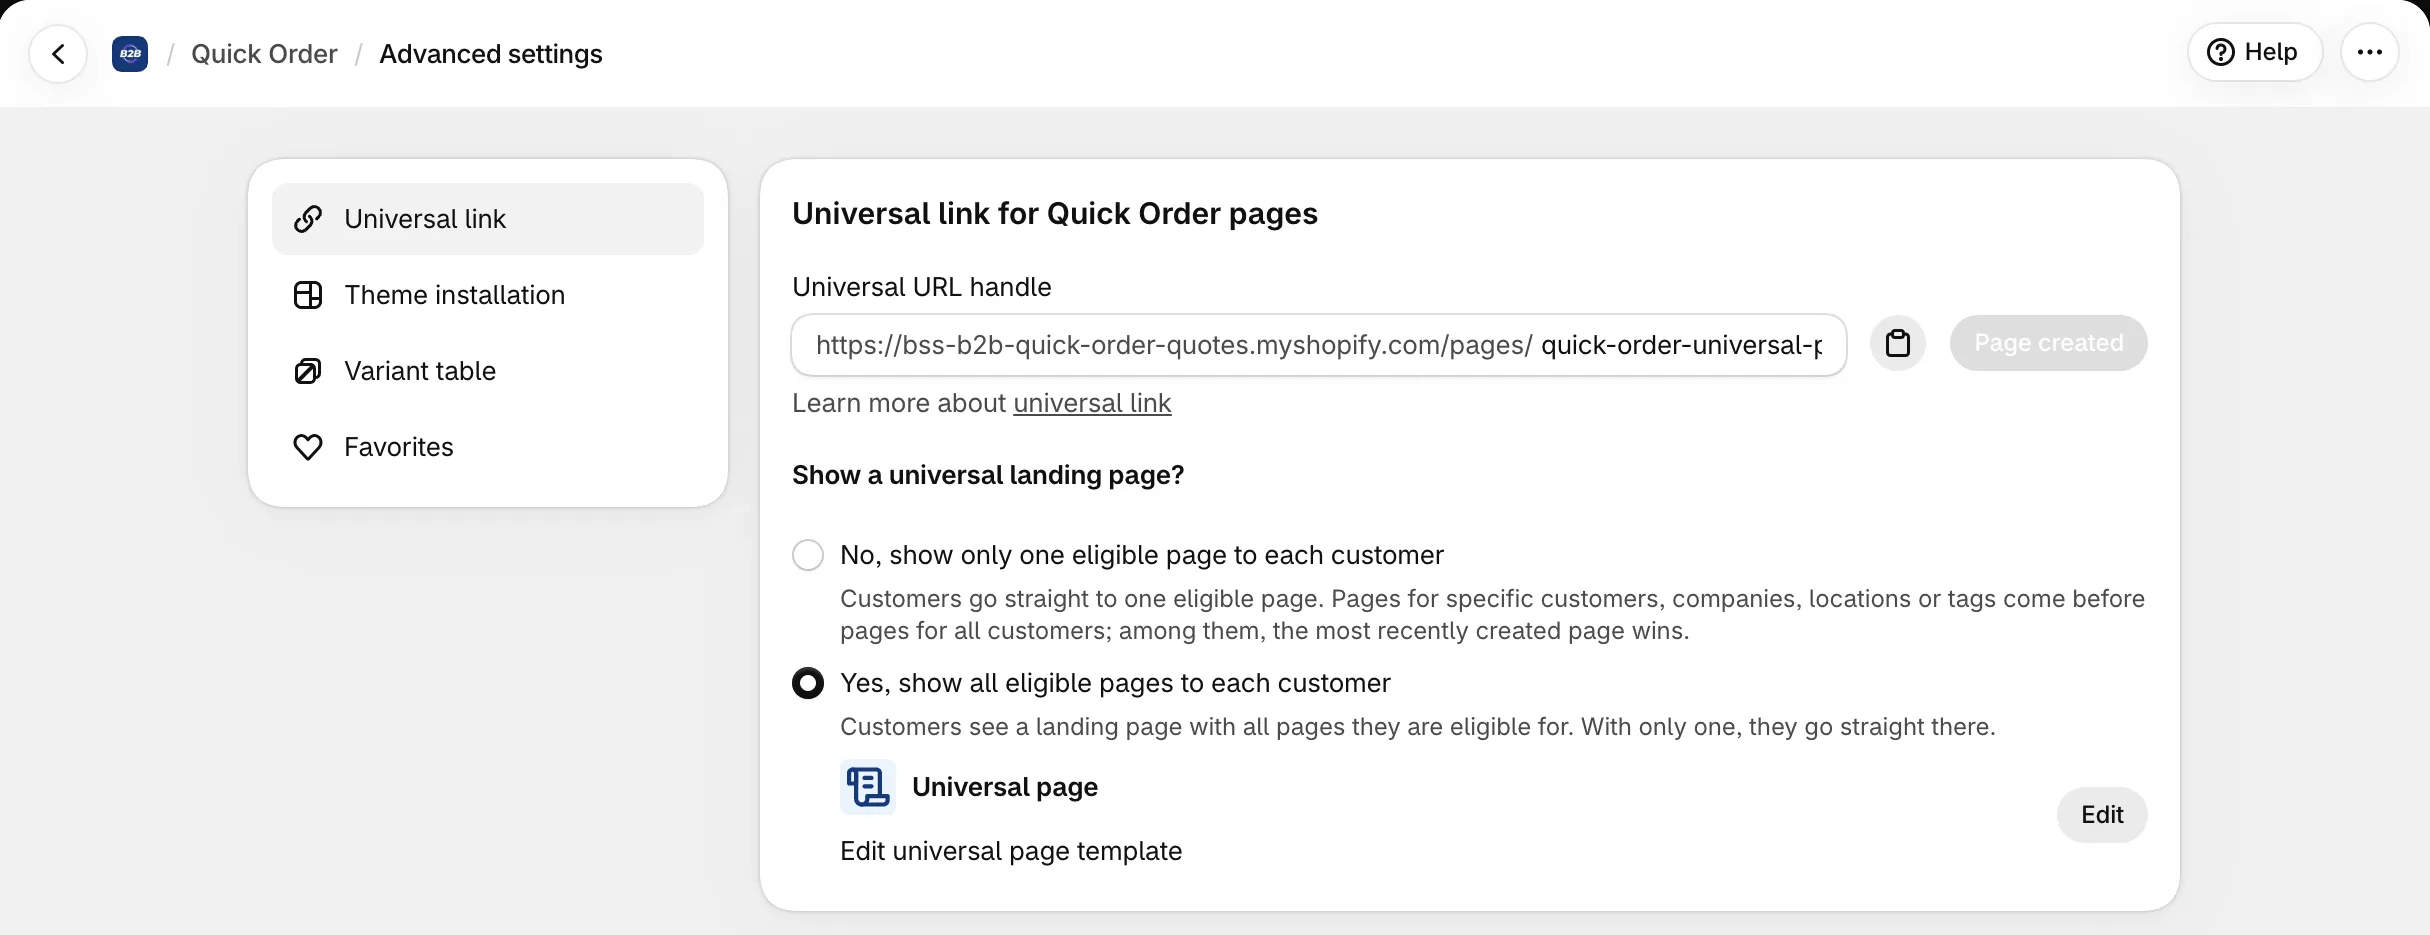
Go to Quick Order, open Quick Order settings in the More section, and click Universal link.
- Universal URL Handle: This is your master link (e.g., /pages/quick-order-portal).
- Show a universal landing page?
- No, show only one eligible page to each customer: the universal link opens the customer’s eligible Quick Order page right away, at the universal URL. If several pages fit, the oldest one is used.
- Yes, show all eligible pages to each customer: customers see a landing page with a card for each page they can use. With only one eligible page, they go straight to it.
- Save your settings first, then click Create page. When the button shows Page created, the universal page exists in your store. See Create Universal Page for details.
3.2. Customize the Landing Page
Section titled “3.2. Customize the Landing Page”With Yes, show all eligible pages to each customer, click Edit universal page template to style it to match your brand:
- Edit the Header and Subtitle instructions.
- Change colors for buttons and cards.
- This ensures a professional look when customers are choosing which order page to access.
4. Add Quick Order pages to your online store
Section titled “4. Add Quick Order pages to your online store”Once your pages are published and your Universal page is set, you need to put them in your site navigation so customers can find them.
4.1. Get your shareable links of Quick Order pages
Section titled “4.1. Get your shareable links of Quick Order pages”- For a specific page: Copy the URL from the Quick Order configuration page (or click “View Page” to get the link).
- For the Universal Page: Copy the URL handle from Quick Order settings > Universal link (e.g., /pages/quick-order-portal).
4.2. Update Navigation
Section titled “4.2. Update Navigation”- Go to Content → Menus in your store admin page.
- Choose the menu where you want the link (e.g., “Main menu” ).
- Add a new menu item:
- Label: Enter your preferred navigation label, such as “Wholesale Portal” or “Quick Order.”
- Link: Click the “Link” field to either select your created Quick Order page from the Pages list or paste the copied URL directly.
- Save the menu.
Pro Tip: Using the Universal Page in your Main Menu is the best practice. It ensures that no matter who clicks the link (VIP, B2B, or Retail), they are automatically sent to the correct order page for their account type.
Once you finish configuring display options, preview your Quick Order pages as a B2B customer would use them (desktop and mobile). Adjust columns and layout until the page shows just enough information to order quickly without feeling cluttered.