
Credit Limit Hold, Temporary Limit and Opening Balance Guide
Credit limit gives every customer a page with a hold, a temporary limit and an opening balance, plus balance adjustments and a statement email. Open a customer from Customer balances to see their limit, Pending, Owed and Available and to use these tools. Every change is recorded in History with who made it. For the rest of Credit limit, start at the Credit limit overview.
Key takeaways
Section titled “Key takeaways”- The Balance card shows
limit - pending - owed. The result is Available, and it can be negative. - Place on hold blocks Pay later for the customer in every mode, even with no credit rule, until you click Remove hold.
- A temporary limit only raises the limit, for up to 90 days. It is not used at Shopify checkout.
- An opening balance and manual adjustments change Owed. Each one is written to History.
- A statement lists unpaid orders and what is left to pay. It has no payment link.
What is on the customer page?
Section titled “What is on the customer page?”The customer page has five cards and one button: Pay later, Balance, Temporary limit, Orders in this balance and History, and Send statement at the top of the page. Open it by clicking a customer in the Customer balances list under B2B orders & discounts > Net Terms > Credit limit.
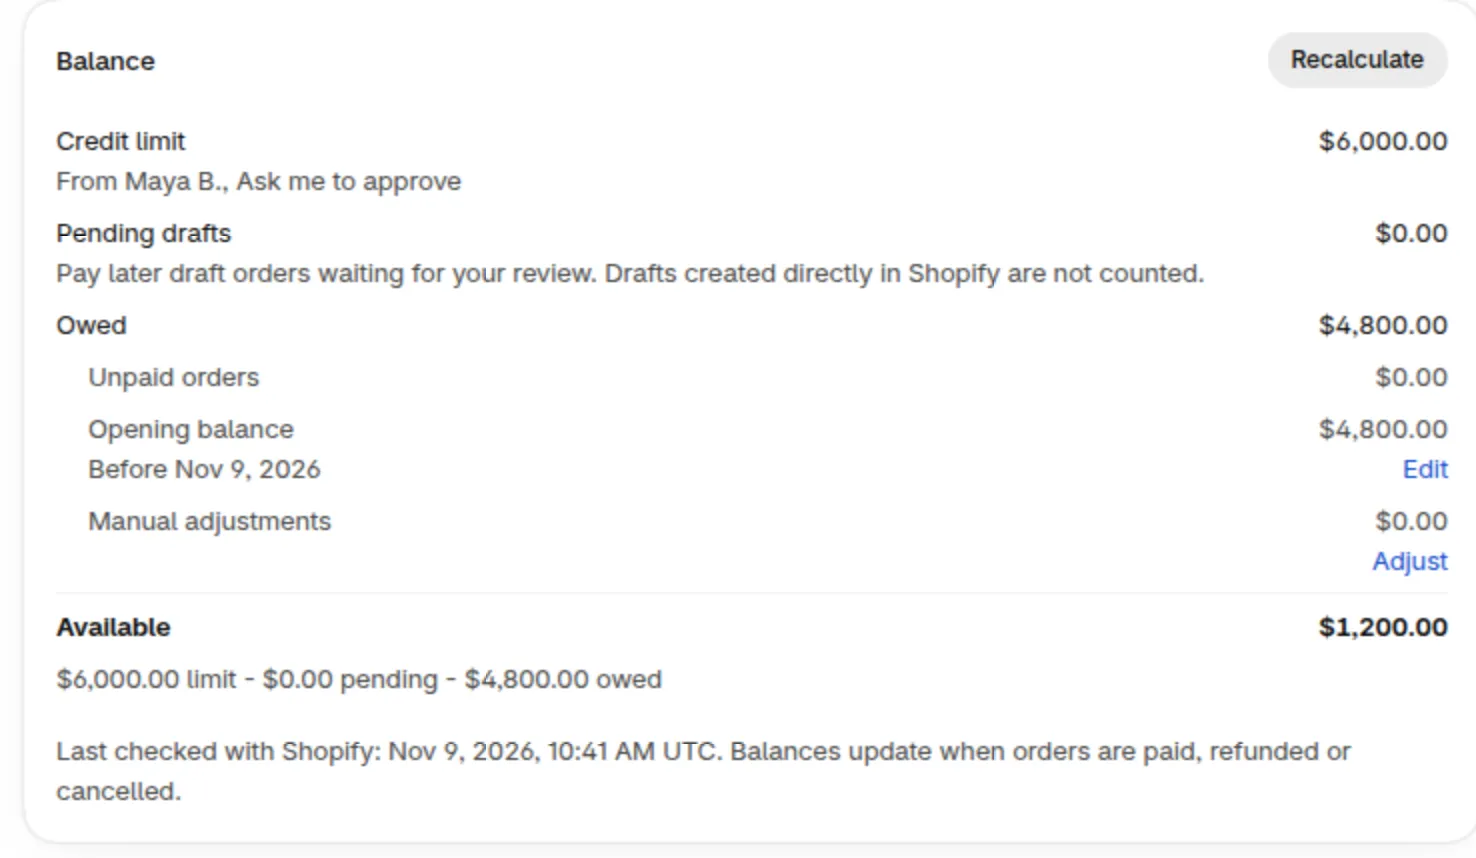
The customer page. The Balance card shows Limit, Pending drafts, Owed and Available.
| Card | What it shows | Actions |
|---|---|---|
| Pay later | Whether the customer can use Pay later: fine, on hold, overdue, or no rule. | Place on hold, Remove hold |
| Balance | Limit and the rule it comes from, Pending drafts, Owed and Available. The line limit - pending - owed shows the sum. |
Edit (opening balance), Adjust (manual adjustments), Recalculate |
| Temporary limit | The temporary limit in effect, with its end date. | Set temporary limit, Replace, Revoke |
| Orders in this balance | The open Pay later orders and drafts that make up the balance. | None |
| History | Every change to the balance, the limit and holds, newest first. | None |
| Send statement (button at the top) | Opens a preview and sends the statement email. | Send statement |
The Owed line breaks down into Unpaid orders, Opening balance (with its date) and Manual adjustments. Available shows Over the limit by an amount when the customer is over.
Recalculate on the Balance card refreshes this customer. When you use company or location limits, it also rebuilds the company and location totals this customer’s orders count toward. It takes about a minute.
When no credit rule applies to the customer, the Balance card says “No credit rule applies to this customer”. The Pay later card then says the customer can use Pay later with no limit. A hold, an opening balance and adjustments still work.
How does the Balance card change as an order moves?
Section titled “How does the Balance card change as an order moves?”The Balance card changes at each step of a Pay later order: the draft is reserved as Pending, then billed as Owed, then paid down.
| Step | Pending drafts | Owed | Available |
|---|---|---|---|
| Limit of $500. The buyer picks Pay later on a $285 order and a draft is created. | $285 | $0 | $215 |
| You open the draft in Shopify and click Create order (payment pending). | $0 | $285 | $215 |
| You record the payment with Collect payment > Manual payment > Record payment. | $0 | $0 | $500 |
Every figure in the table is an Example. Available is 500 - 285 - 0 = $215 after the first two steps, and 500 - 0 - 0 = $500 once the order is paid.
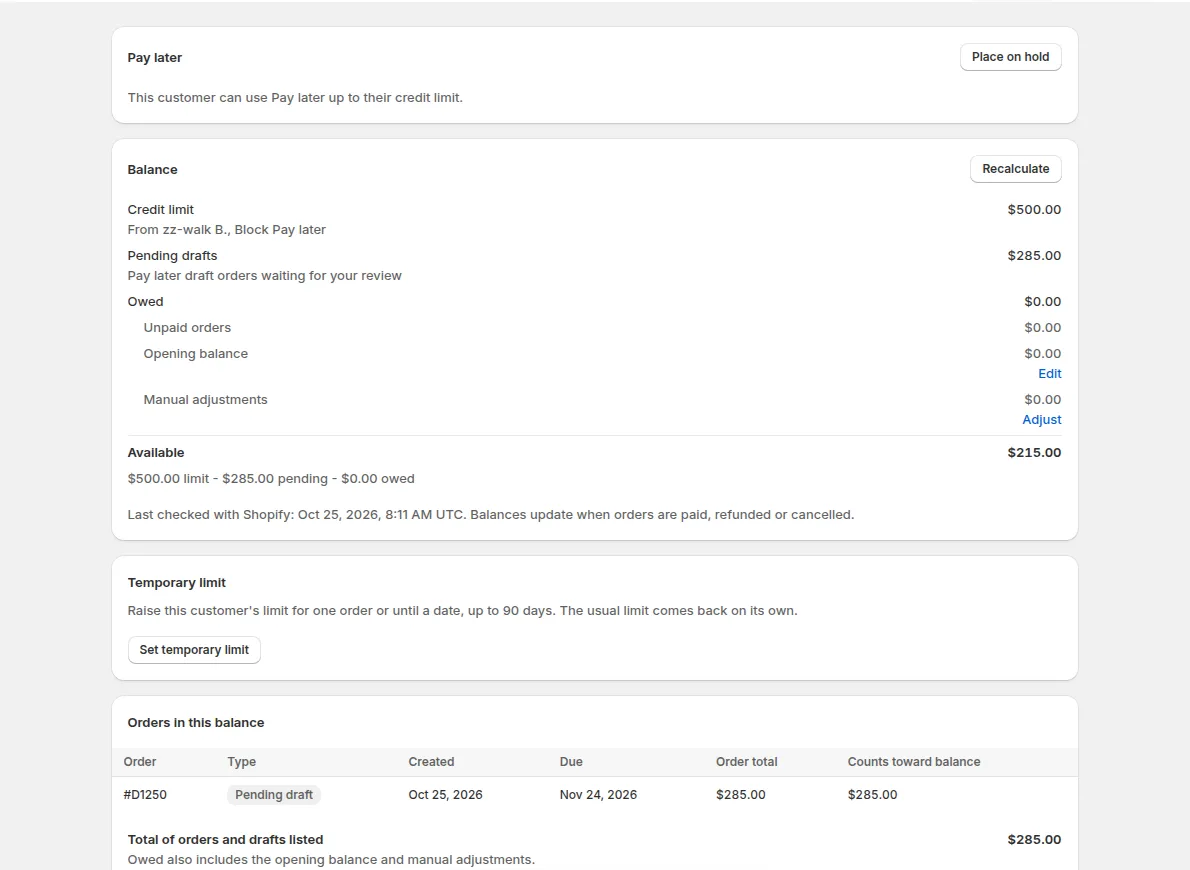
A customer with a Pay later draft counted as Pending.
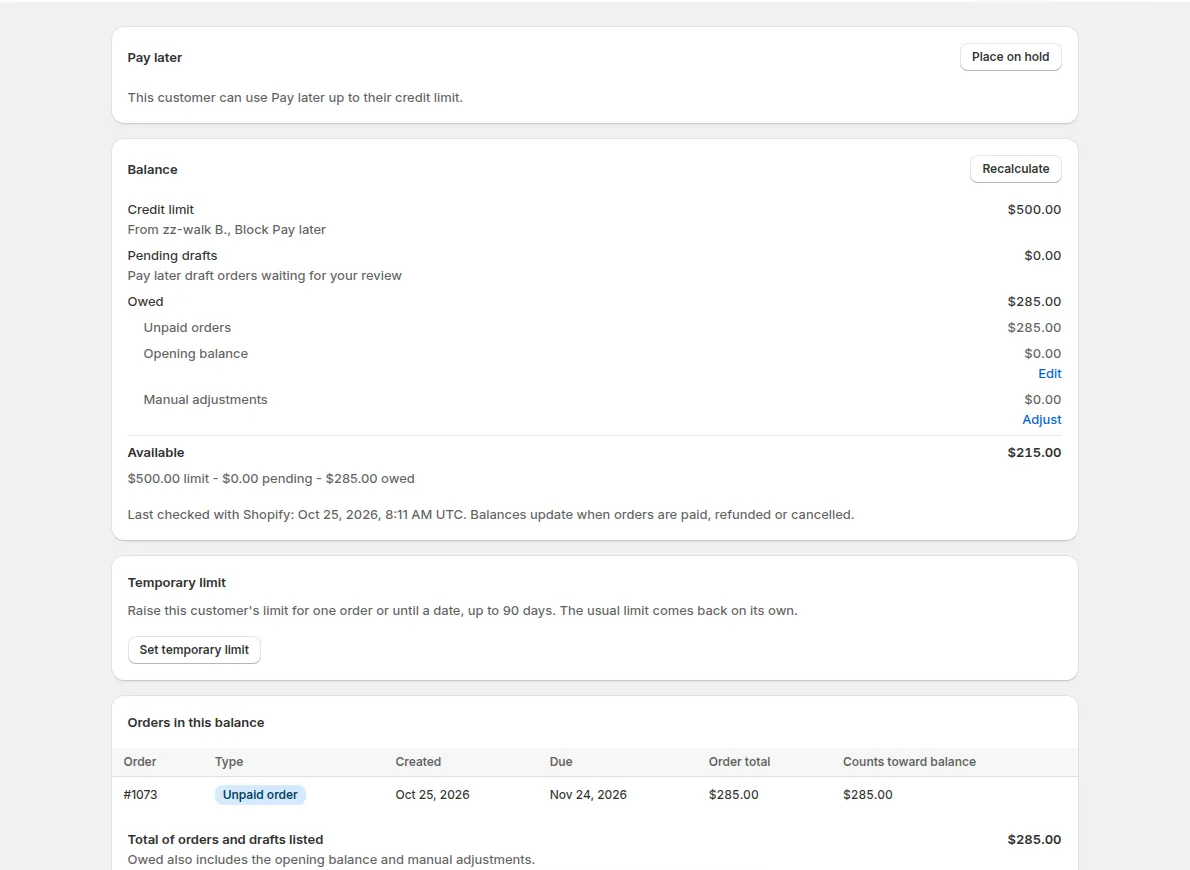
After Create order, the same amount moves from Pending to Owed.
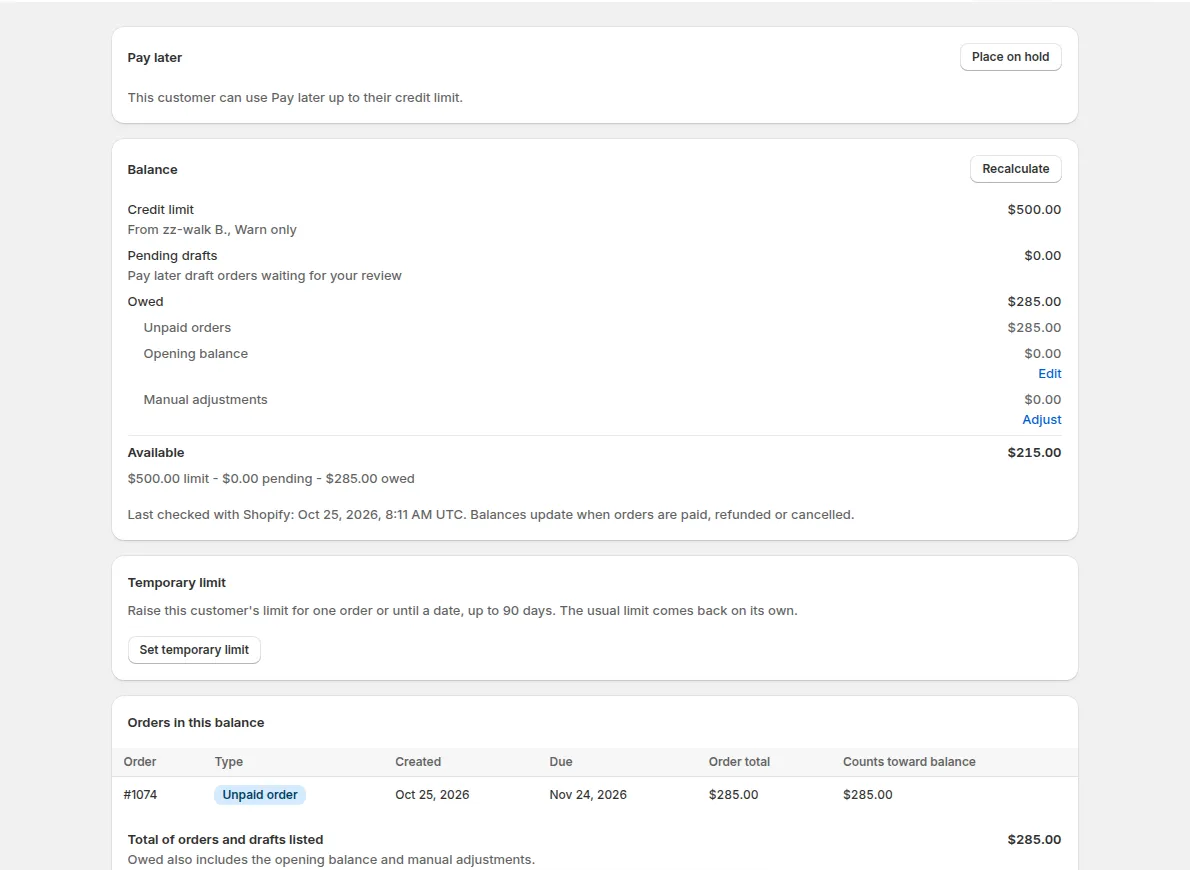
After the payment is recorded, Owed goes down.
How do I place a customer on hold?
Section titled “How do I place a customer on hold?”Click Place on hold on the Pay later card. The customer cannot use Pay later for any new order until you click Remove hold.
- Open the customer and find the Pay later card.
- Click Place on hold.
- Add a note if you like. The note is shown in History.
- Click Place on hold in the dialog.
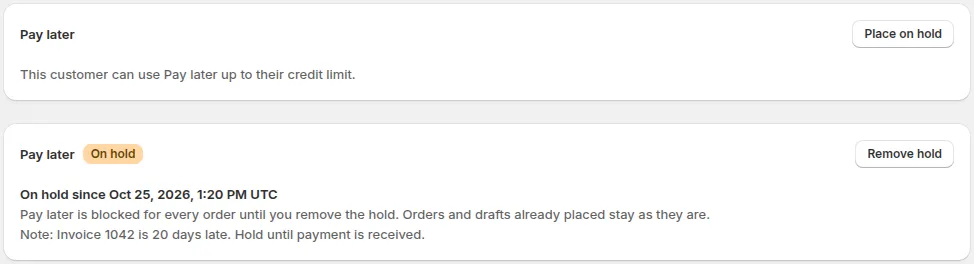
The Pay later card without a hold, and with a hold.
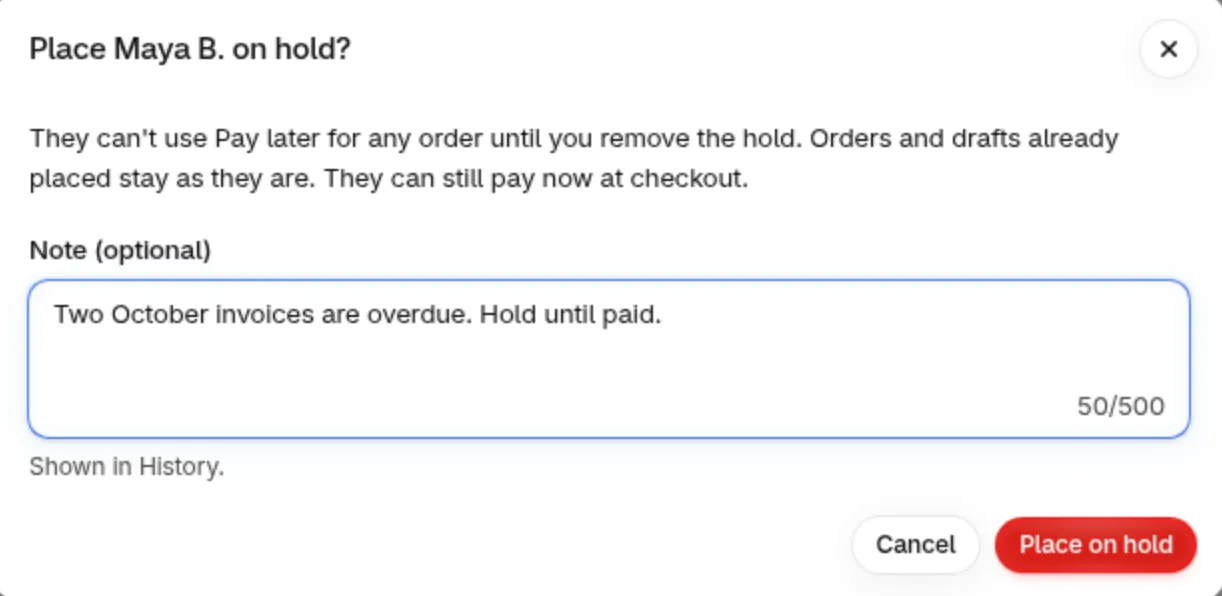
The dialog asks for an optional note.
What a hold does:
- Pay later is blocked in every mode (Warn only and Block Pay later), even when no credit rule applies.
- Orders and drafts already placed stay as they are.
- The customer can still pay now at checkout.
- The customer shows On hold in the Customer balances list. If you turned on Tag customers by credit status, the customer also gets the hold tag.
- The card shows On hold since with the date and your note.
To end it, click Remove hold. There is no confirmation step, and the customer goes back to the state they had before.
For companies and company locations, a hold is recorded in History and does not stop checkout. See company accounts.
How do I give a customer a temporary limit?
Section titled “How do I give a customer a temporary limit?”Click Set temporary limit on the Temporary limit card, enter a limit above the usual one, choose how long it lasts and add a note. Use it when a good customer needs more room for one order or for a short period.
You choose between two kinds under Applies to:
| Kind | How it works |
|---|---|
| Next Pay later order only | Ends after one order or on the end date, whichever comes first. The end date is filled in 7 days from today. The limit is used up only if the order needed the extra room. |
| Every order until the end date | Applies to every Pay later order until the end date. |
- Open the customer. The customer needs a credit rule. Without one, the card says “A temporary limit raises the limit of a credit rule” and offers Add credit rule.
- Click Set temporary limit.
- Choose Next Pay later order only or Every order until the end date under Applies to.
- Enter the Temporary limit. This is the new total limit, and it must be higher than the usual limit.
- Check the Ends on date, or change it. It ends at 11:59 PM UTC, up to 90 days from today.
- Write a note of 3 to 500 characters. It is shown in History.
- Check the preview of the new limit and Available, then click Set temporary limit.
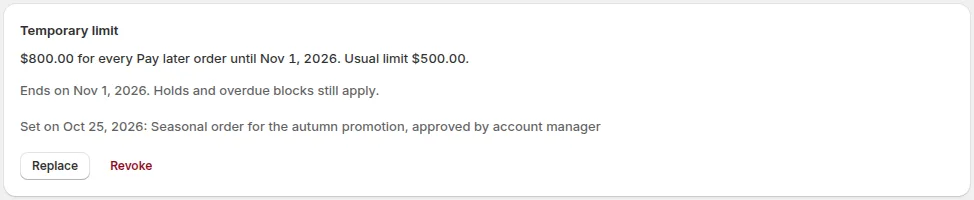
A temporary limit in effect, with its end date.
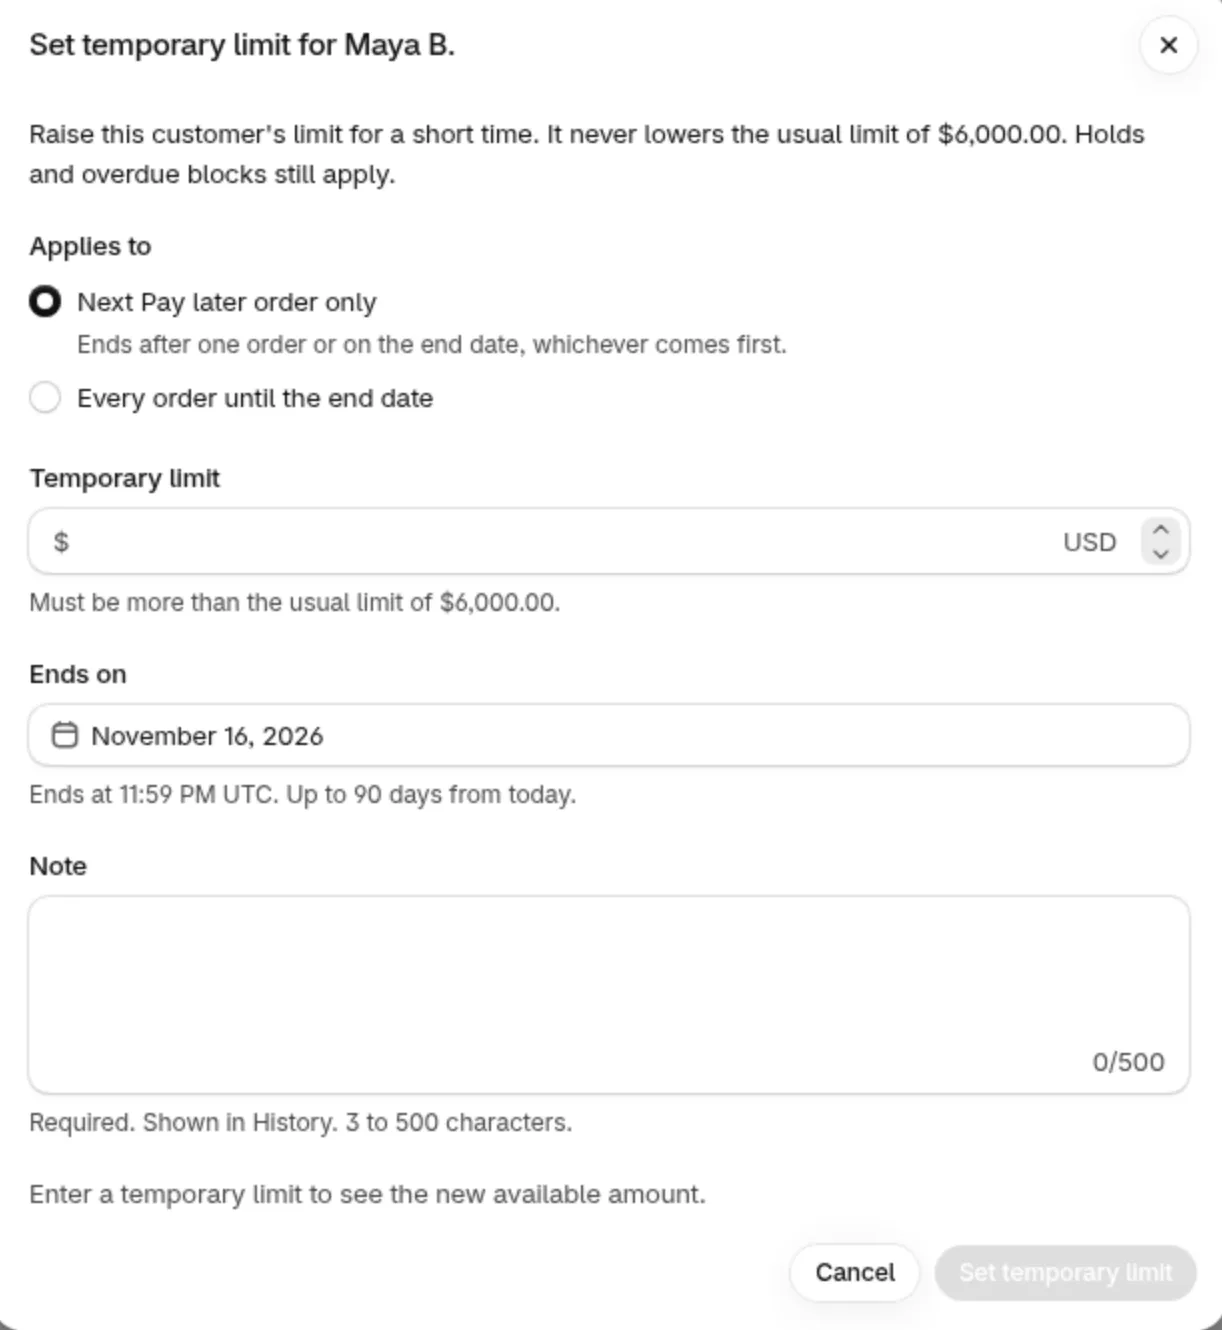
The dialog shows the new Available amount before you save.
The rules in one place:
- It must be higher than the usual limit, and it only raises. It never lowers a limit.
- It lasts up to 90 days. The end time is 11:59 PM UTC on the end date.
- A hold and an overdue block still apply.
- It is not used at Shopify checkout, and it never raises a company cap.
- Setting a new one replaces the current one. The dialog shows what it replaces.
- Revoke ends it now. The limit goes back to the usual amount.
Example: a customer has a usual limit of $500, owes $285 and has no pending drafts. The rule is Block Pay later. You set a temporary limit of $800 for the Next Pay later order only. Available becomes 800 - 285 = $515.
| Step | Limit | Pending + Owed | Available |
|---|---|---|---|
| Before the order, with the temporary limit | $800 | $285 | $515 |
| The buyer places a $400 order. It fits, so Pay later works. | $800 | $285 + $400 = $685 | $115 |
| The order needed the extra room, so the temporary limit is used up. | $500 | $685 | -$185 |
The $400 order needed the extra room because the usual limit left only 500 - 285 = $215. A $200 order would have fit the usual limit, so it would not use up the temporary limit.
After the $400 order is placed, Pending is $400 until you click Create order, and then Owed is $685. In both cases Available is 500 - 685 = -$185 at the usual limit, so the next Pay later order is blocked. History shows Temporary limit used.
How do I enter an opening balance?
Section titled “How do I enter an opening balance?”Click Edit next to Opening balance on the Balance card, enter Amount owed and Owed as of, then click Save. Use it for money the customer owed before you started Credit limit, such as invoices outside Shopify or Net Terms orders older than the 60 days Shopify shares.
- Open the customer and find Opening balance on the Balance card.
- Click Edit.
- Enter Amount owed. It is 0 or more.
- Choose the Owed as of date. Orders from this date on are counted from Shopify, so nothing is added twice.
- Click Save. The page confirms with Opening balance saved.
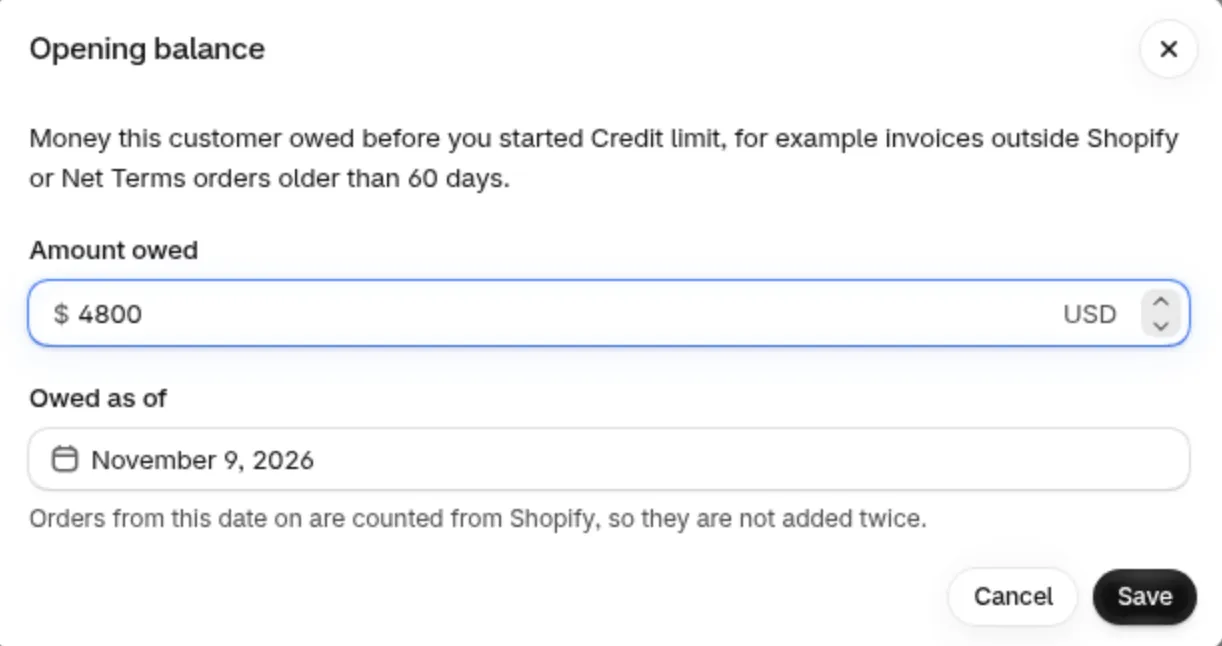
The Opening balance dialog.
Example: a customer owed $1,200 on invoices from before Oct 1. You set Amount owed to 1,200 and Owed as of to Oct 1. Since Oct 1 the customer has two unpaid Net Terms orders in Shopify, $300 and $450. Owed is 1,200 + 300 + 450 = $1,950. With a limit of $2,500, Available is 2,500 - 1,950 = $550.
How do I adjust a balance?
Section titled “How do I adjust a balance?”Click Adjust next to Manual adjustments on the Balance card, choose Add to balance or Subtract from balance, enter an amount and a note. Use it for money owed that BSS B2B Solution does not track, such as a credit note, a late fee, or an order or draft you created directly in Shopify.
- Open the customer and click Adjust on the Balance card.
- Under Change, choose Add to balance (the customer owes more) or Subtract from balance (the customer owes less).
- Enter the Amount. It must be more than 0.
- Write the Note. It is required, 3 to 500 characters, and shown in History.
- Check Owed and Available in the dialog, then click Save adjustment. The page confirms with Balance adjusted.
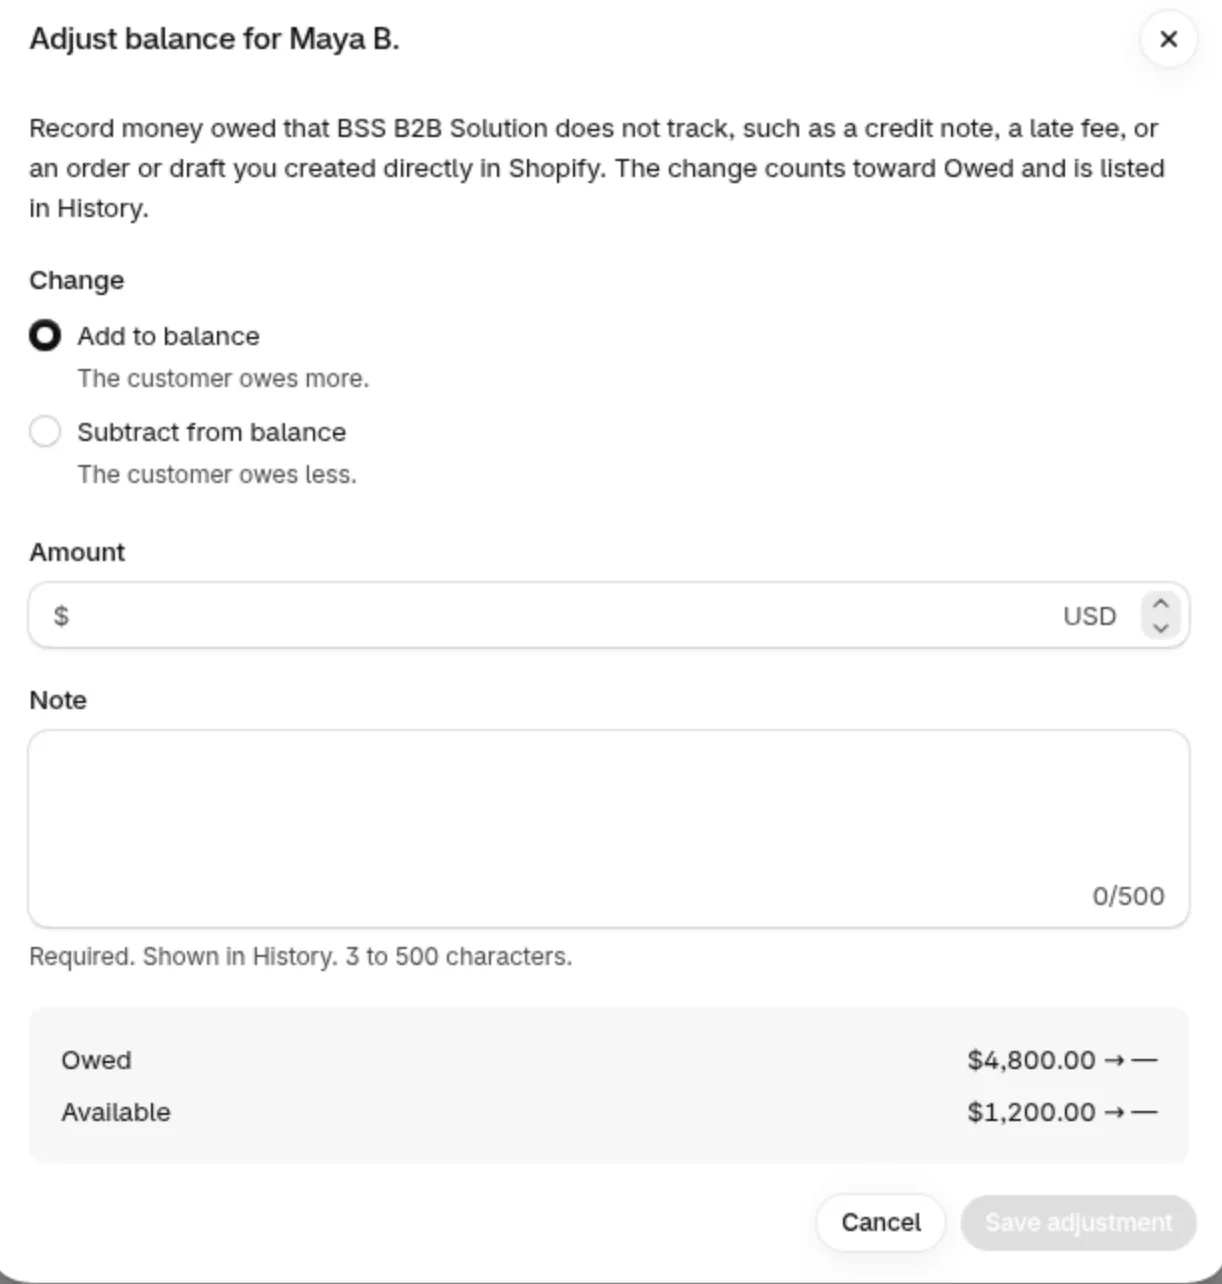
The Adjust dialog shows Owed and Available before you save.
Example: the customer from the opening balance example owes $1,950. You subtract $150 for a credit note: Owed is 1,950 - 150 = $1,800. Later you add $40 for a late fee: Owed is 1,800 + 40 = $1,840. Manual adjustments shows the net, -150 + 40 = -$110, and Available is 2,500 - 1,840 = $660.
Example: you created a $400 draft for this customer in Shopify admin with payment terms. It is not in Owed. Choose Add to balance, enter 400 and a note such as “Shopify admin order #1042”, then save. Owed goes up by $400. When the customer pays, choose Subtract from balance for the same amount, because Credit limit does not see that payment.
Owed never goes below 0. An adjustment that would take it below 0 is refused. The message names the largest amount you can subtract.
If someone else changed the balance while your dialog was open, you see The balance changed. Click Reload balance, check the latest balance and History, and open Adjust again. If you see Adjustment not confirmed, check the balance and History before you try again.
What are Orders in this balance and History?
Section titled “What are Orders in this balance and History?”Orders in this balance lists the open orders and drafts that make up the balance. History lists every change to the balance, the limit and holds. Both are on the customer page below the cards.
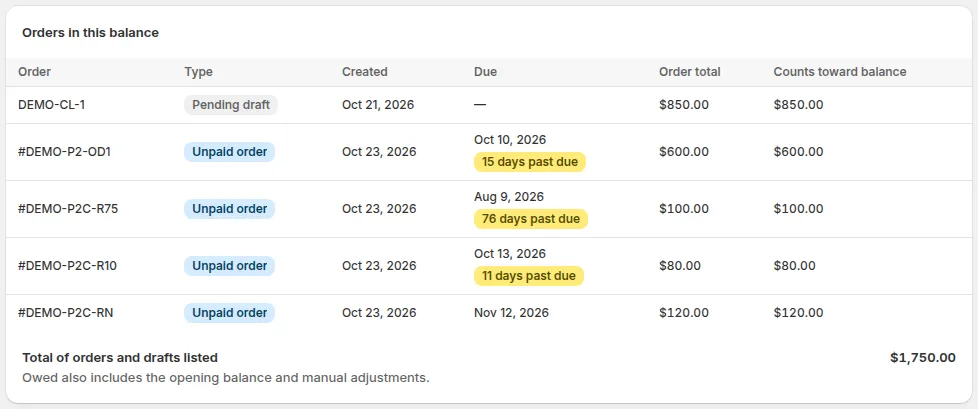
Orders in this balance. An overdue order shows a past due badge.
The orders table has these columns:
| Column | Meaning |
|---|---|
| Order | The order or draft name. |
| Type | Pending draft or Unpaid order. |
| Created | The creation date. |
| Due | The due date. A badge shows how long it is past due. |
| Order total | The full order amount. |
| Counts toward balance | What still counts. A partly paid order shows how much was paid. |
A line under the table shows the Total of orders and drafts listed. Owed also includes the opening balance and manual adjustments. Pay later and Manual Order orders due on receipt or on fulfillment have no due date, so they are never counted as overdue. Paid and cancelled orders do not count toward the balance.
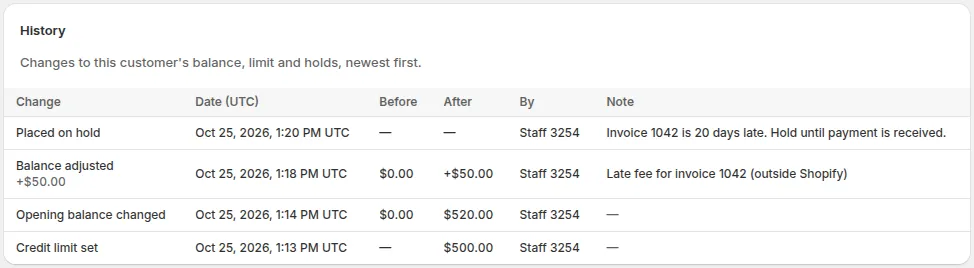
History lists who changed what, newest first.
History has the columns Change, Date (UTC), Before, After, By and Note. By shows Staff with an id, API with the key name, System for automatic changes, or Storefront.
| Kind of change | What History calls it |
|---|---|
| Balance | Balance adjusted, Opening balance changed |
| Temporary limit | Temporary limit set, Temporary limit revoked, Temporary limit used, Temporary limit ended |
| Hold | Placed on hold, Hold removed |
| Blocked orders | Pay later blocked: on hold, Pay later blocked: overdue, Pay later blocked: over limit |
| Rules | Credit limit set, Credit limit changed, Credit rule turned off, Credit rule deleted |
| Emails to this customer | Statement emailed, Statement not sent, Credit alert emailed, Credit alert not sent |
How do I send a customer a statement?
Section titled “How do I send a customer a statement?”Click Send statement at the top of the customer page. The email lists the customer’s unpaid orders and what is left to pay. It has no payment link.
- Open the customer and click Send statement.
- Check To, From, Replies go to, Language and Last sent. Click Preview statement to read the email.
- Click Send statement. The page confirms with “Statement sent to” the customer’s address.
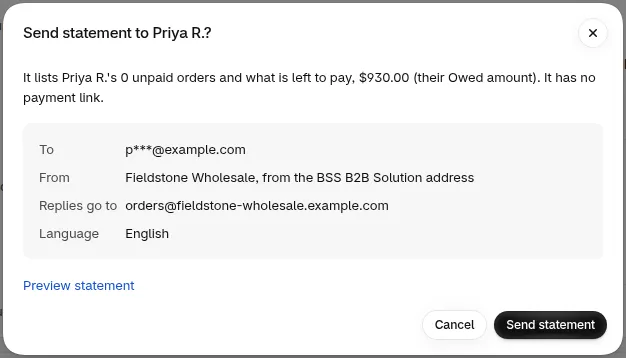
The Send statement dialog, with the recipient address masked.
You can send one statement to a customer every 60 seconds, and up to 200 per store in any 24 hours. If the customer has no email in Shopify, the dialog offers Edit customer in Shopify. Every attempt is listed in Sent credit emails. See emails and statements for the previews and the log.
What can I not do from this page?
Section titled “What can I not do from this page?”A hold or a temporary limit changes what a customer can do at Pay later checkout. It does not touch orders that already exist.
Related pages:
- If a number looks wrong, check Credit limit troubleshooting.
- To read the list this page opens from, see Net Terms customer balances.
- The overdue block and customer tags are set in Credit limit settings.
- Every term used here is defined in the Credit limit glossary.
- The limit a customer starts with comes from a credit rule.
Can I raise a limit for only one order?
Section titled “Can I raise a limit for only one order?”Yes. Set a temporary limit with Next Pay later order only. It ends after the order that needed the extra room, or on its end date.
Does a hold stop a customer who is already in checkout?
Section titled “Does a hold stop a customer who is already in checkout?”Yes. The hold is checked when the buyer chooses Pay later, so a buyer who is already in checkout is stopped at that point. Drafts and orders placed before the hold stay as they are, and the buyer can still pay now.
Can I delete an adjustment?
Section titled “Can I delete an adjustment?”No. Add an opposite adjustment, for example Subtract from balance for the same amount. Both are kept in History.
Does the customer see my note?
Section titled “Does the customer see my note?”No. A note shows in History in your admin. The buyer messages for a block, a hold or an overdue order are fixed texts without notes.
What if the customer has no email?
Section titled “What if the customer has no email?”You cannot send a statement. Click Edit customer in Shopify, add an email, then send it again.