
Automatically Tag Orders & Customers
Streamline your B2B workflows by letting tags assign themselves. The Auto Tag module labels customers or orders automatically when a Shopify event happens and your conditions match, so your pricing, access and marketing segments stay up to date without manual work.
How to Set Up Auto Tag Rules
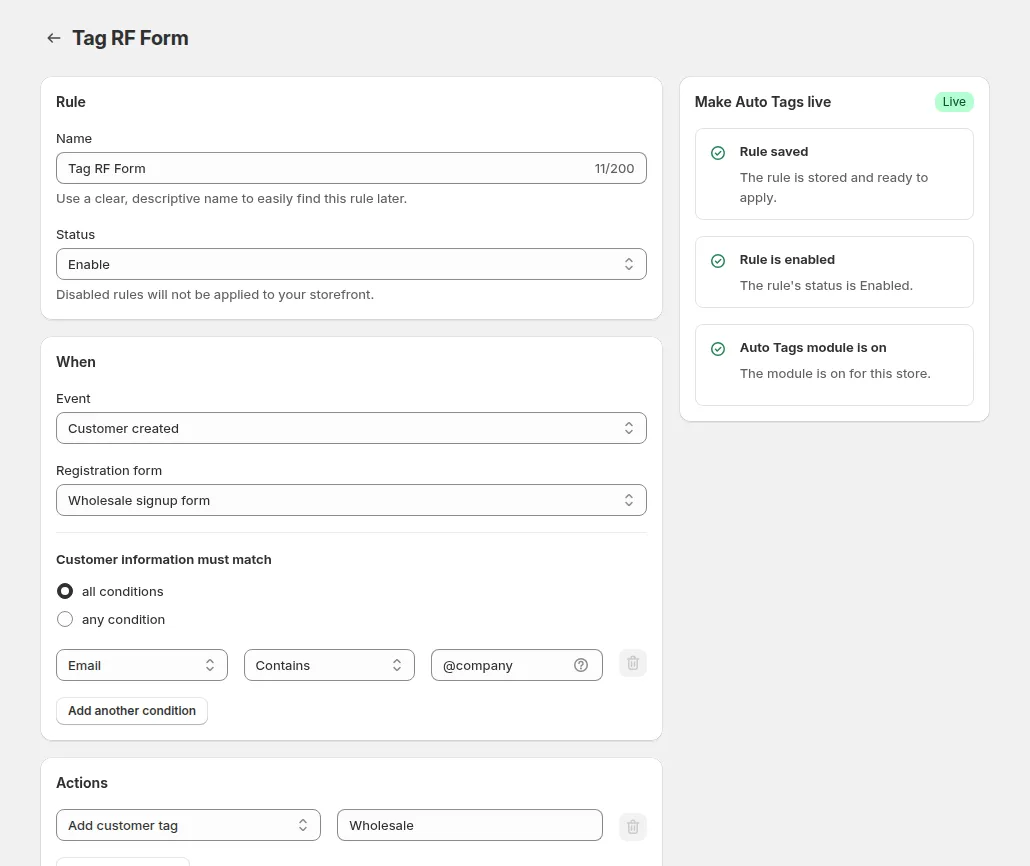
Section titled “How to Set Up Auto Tag Rules”The rule page has three cards: Rule, When (the event and the conditions) and Actions.
1. Enable & Begin Configuration
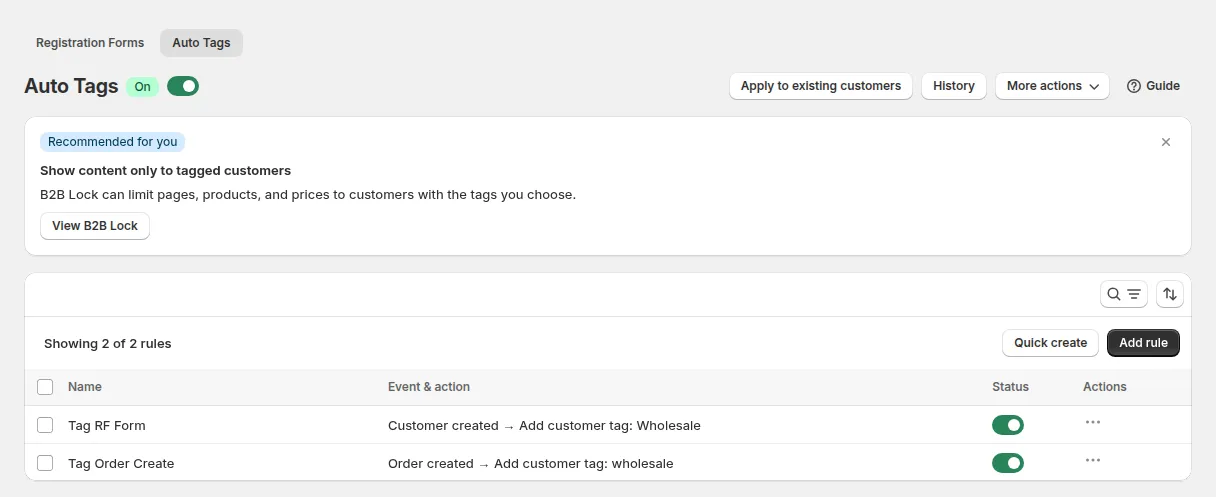
Section titled “1. Enable & Begin Configuration”- Go to B2B customers > Auto Tags and switch the module on.
- Click Add rule.
2. Basics
Section titled “2. Basics”- Give your rule a name (for example “Big Orders Tagger”).
- Set it to Enable or Disable (you can configure it now and turn it on later).
- Choose one Event that triggers the rule:
| Event | Fires when |
|---|---|
| Customer Created | A new customer account is created |
| Order Created | An order is placed |
| Order Paid | An order is paid |
| Order Fulfilled | An order is fulfilled |
| Order Canceled | An order is canceled |
With Customer Created, choose the form in Registration form so the fields of that form become available as conditions.
3. Conditions
Section titled “3. Conditions”Choose whether the record must match all conditions or any condition, then add condition rows (Field, operator, Value). Click Add another condition for more rows.
Customer Created rules can check:
- Default Field: Display Name, Email, First Name, Last Name. On a multi-step form only Email is offered.
- Custom Field: any field of the selected registration form (for example Company, Country, City or your own questions).
- Operators: Contains, Does not contain, Is equal to, Is not equal to. For Country you can type the name (
United States) or, with Is equal to / Is not equal to, the 2-letter code (US).
Order event rules can check:
| Group | Fields |
|---|---|
| Customer Account | Display Name, Email, Customer’s Tags, Order’s item, Total spent |
| Customer Shipping Address | City, Country, Province, Postcode |
| Customer Billing Address | City, Country, Province, Postcode |
| Product Info | Product Name, Sku |
| Order Info | Number of Products, Order Qty, Order Amount, Order Weight, Total Amount of Paid Orders, Total Number of Paid Orders |
- Text fields use Contains, Does not contain, Is equal to, Is not equal to; Sku also offers Start with, which matches if any line item’s SKU starts with your value.
- Number fields use Is equal to, Greater than and Less than.
- Total Amount of Paid Orders and Total Number of Paid Orders (Order Created and Order Paid rules only) use
>,<,>=,<=and a period: within 1, 7, 15, 30, 45 or 60 days.
Order Weight condition (order events only)
On Order Created, Order Paid, Order Fulfilled, and Order Cancelled rules, the Order info group includes Order Weight (the total weight of the order) next to Order Qty and Order Amount.
- Select Order Weight as the field.
- Select an operator: Is equal to, Greater than, or Less than.
- Enter the value, then pick its unit in the Weight unit dropdown next to it:
g,kg,lb, oroz(defaultg).
The app converts your value and the order’s total weight to the same unit before comparing, so a rule set in kg works for a store that records product weights in lb.
4. Actions
Section titled “4. Actions”Add one or more action rows; click Add another action for more. The actions depend on the event:
| Event | Available actions |
|---|---|
| Customer Created | Add customer’s tag, Add customer’s note, Mark customer as tax exempt |
| Order events | Add customer’s tag, Remove Customer’s Tag, Add customer’s note, Add Order’s Note, Add Order’s Tag, Remove Order’s Tag |
For tag actions, enter one or more tags separated by commas, for example wholesale,vip.
Click Save. The rule runs the next time its event happens.
Backfill Tags to Existing Data
Section titled “Backfill Tags to Existing Data”Apply a rule to your past customers and orders:
- On the Auto Tags page, click Apply to existing customers.
- Pick the tab you need:
- Apply to previous customers & orders: choose Previous customers or Previous orders, select the rule, then click Submit.
- Remove customer/order tags: choose customer tags or order tags, select the tags to remove, then click Submit. This removes the tags only; your rules are not changed.
- The job runs in the background with a progress banner, so you can keep using the app. When it finishes, the banner shows how many records were updated and lists any failures with the reason.
Auto Tag History
Section titled “Auto Tag History”Every tagging action is recorded, so you can check what was applied and when.
- On the Auto Tags page, click History.
- Switch between Customer with tag updates and Order with tag updates.
- Each row shows the customer or order, the Rule, Added Tags, Removed Tags, Updated Time and Updated by. Page through the list or sort it to find a record.
Use it to confirm a rule fired, to see which rule tagged a customer or order, and to spot rules that match more records than expected.
Export Rules
Section titled “Export Rules”On the Auto Tags page, open More actions > Export to download your rules as a CSV. Because a rule can have several conditions and actions, the file uses one row per condition/action pair, so one rule can span several rows. Export history lets you download recent exports again.
Use Cases & Examples
Section titled “Use Cases & Examples”- Tag high-value customers: Event Order Paid, condition Order Amount Greater than 500, action Add customer’s tag
high-value. - Classify partners at sign-up: Event Customer Created, condition Email Contains
@partner.com, action Add customer’s tagpartner. Your Custom Pricing or BSS B2B Lock rules for thepartnertag then apply right away. - Tag by country from the registration form: Event Customer Created, form Wholesale Registration Form, condition Country Is equal to
US, action Add customer’s tagus-wholesale. - Clean up on cancellation: Event Order Canceled, action Remove Order’s Tag
priority.