
Assign Customers to Sales Reps: Companies, Customers, CSV
A rep can order only for the company locations and customers you assign. You can assign company locations, customers who don’t belong to a company, or both. Assign them one rep at a time on the rep’s page, or in bulk with Import assignments. Other reps can be assigned to the same locations.
Key takeaways
Section titled “Key takeaways”- A rep sees and orders for assigned company locations and assigned customers only.
- A customer who is a contact of a company can’t be assigned as a customer. Assign the company location instead.
- A rep can’t be assigned to their own customer account. If the rep is the contact of a company location, the portal blocks ordering for that location.
- One rep can have up to 200 individual customers.
- A CSV import takes up to 500 rows, shows a preview first, and adds to the current assignments. It removes nothing.
How do I assign company locations?
Section titled “How do I assign company locations?”-
Open the rep
Section titled “Open the rep”Go to B2B orders & discounts > Sales Reps, then click the rep. To start a new rep, click Add rep.
-
Click Assign companies
Section titled “Click Assign companies”Under Assigned companies, click Assign companies. Search for companies or locations. Select the locations, or select a whole company.
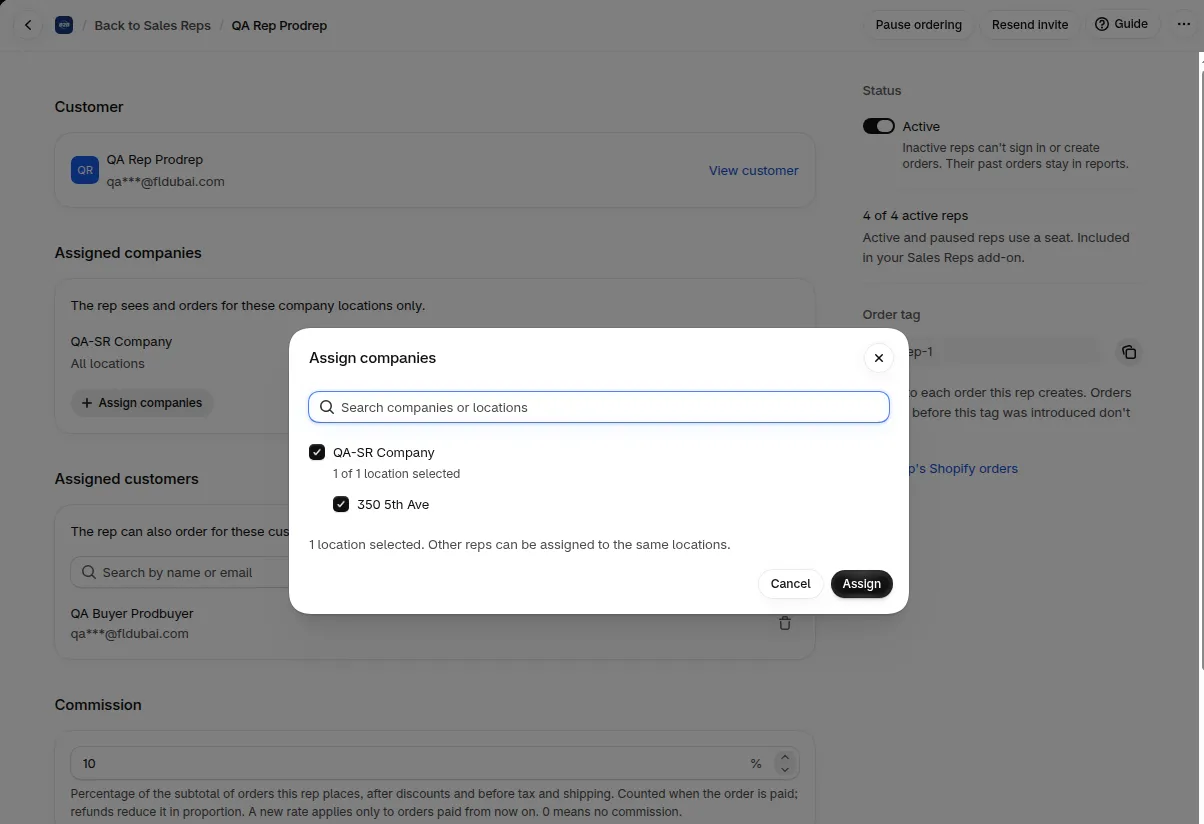
The Assign companies dialog lists each company with its locations.
-
Click Assign, then save
Section titled “Click Assign, then save”Click Assign, then save the rep. The footer shows how many locations are selected.
If you assign a whole company, the rep can order for every location of that company, including locations you add later. To limit a rep to some locations, select those locations one by one. To change the list later, click Edit next to the company, or Remove to take it off.
Prices and payment terms in the portal follow the location the rep chooses. A location without a contact has nobody to order for. Add a contact to the location in Shopify.
How do I assign customers who don’t belong to a company?
Section titled “How do I assign customers who don’t belong to a company?”Use this for buyers who are plain Shopify customers.
- On the rep’s page, find Assigned customers.
- In Search customers, type a name or email and select the customer.
- Save the rep.
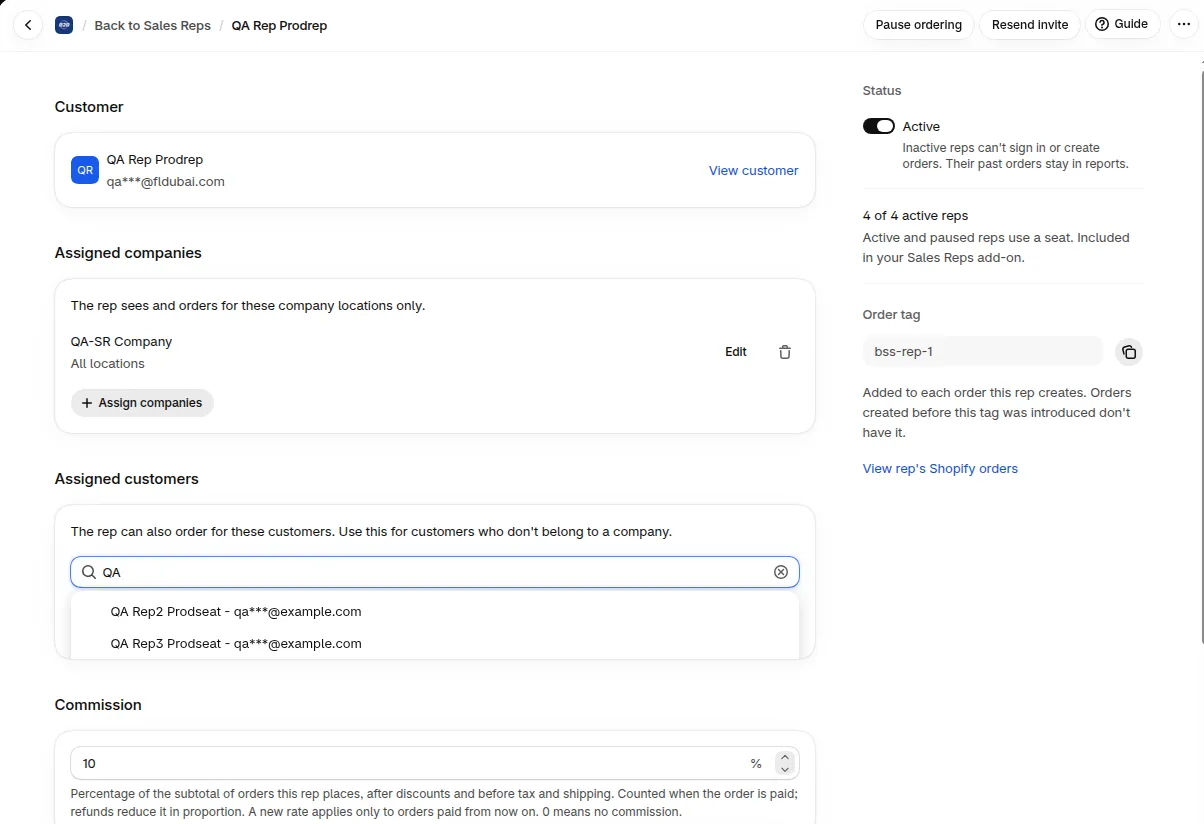
Type a name or email to find a customer to assign.
To remove a customer, click Remove next to the name. One rep can have up to 200 customers. At the limit, remove one to add another.
Assign customers one by one, or with the CSV import. A customer tag helps you find a customer in the search box, but it does not assign anyone.
Some customers can’t be assigned:
| Customer | Why | What to do |
|---|---|---|
| A contact of a company | Their prices and terms come from the company | Assign the company location instead |
| The rep’s own account | A rep can’t order for themselves | Remove it from the list |
| A customer deleted in Shopify | The customer no longer exists | Remove it from the list |
The same rules apply in the portal. If a customer becomes a company contact after you assigned them, the rep sees the message Order for [name] through their company and nothing is created.
How do I import assignments from a CSV file?
Section titled “How do I import assignments from a CSV file?”Use Import assignments to assign many customers at once. It sits next to Add rep on the Reps tab.
-
Download the template
Section titled “Download the template”Click Import assignments, then Download the CSV template. The file has the columns
rep_email,company_id,location_id,customer_email.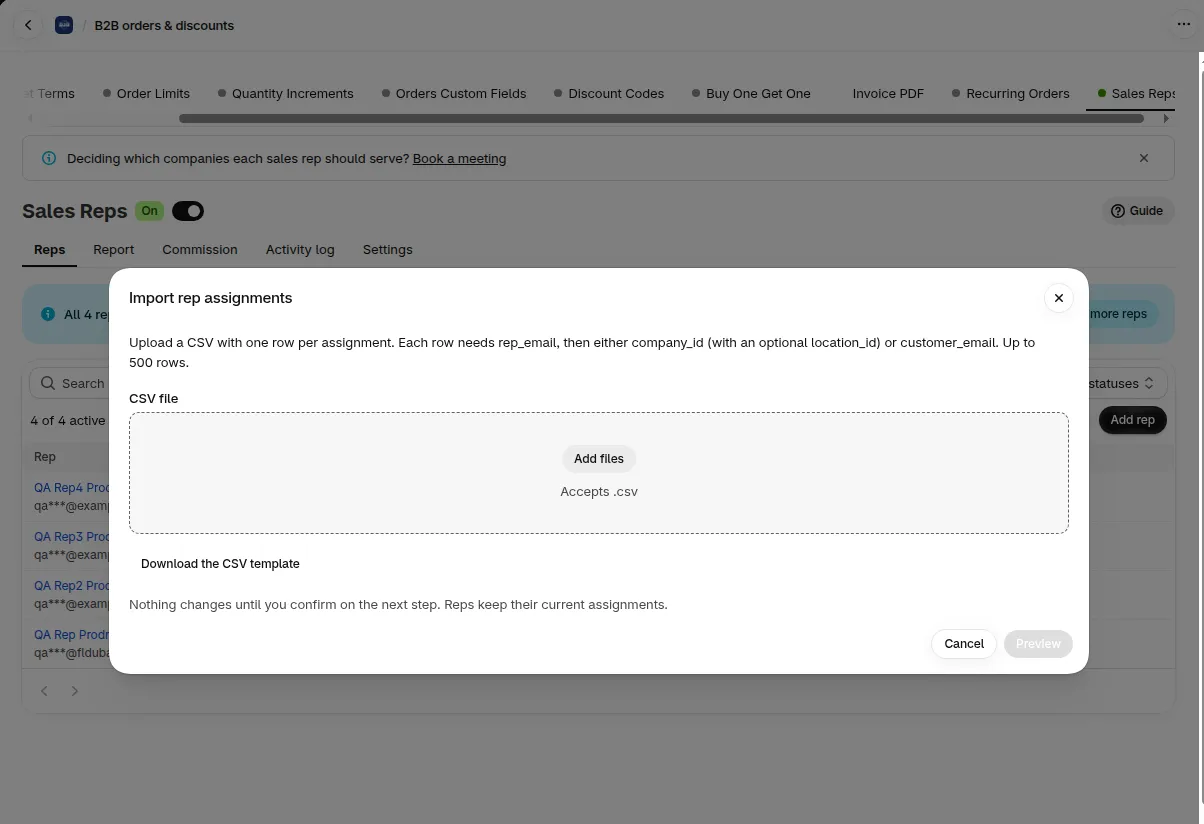
The Import assignments dialog.
-
Fill in the file
Section titled “Fill in the file”Each row needs
rep_email. Then add eithercompany_id(with an optionallocation_id) orcustomer_email, not both. Company and location IDs can be numbers or Shopify IDs. The rep must already exist and be active. -
Choose the file and click Preview
Section titled “Choose the file and click Preview”Choose your
.csvfile. It must be under 1 MB and have up to 500 data rows. Click Preview. Nothing is changed yet.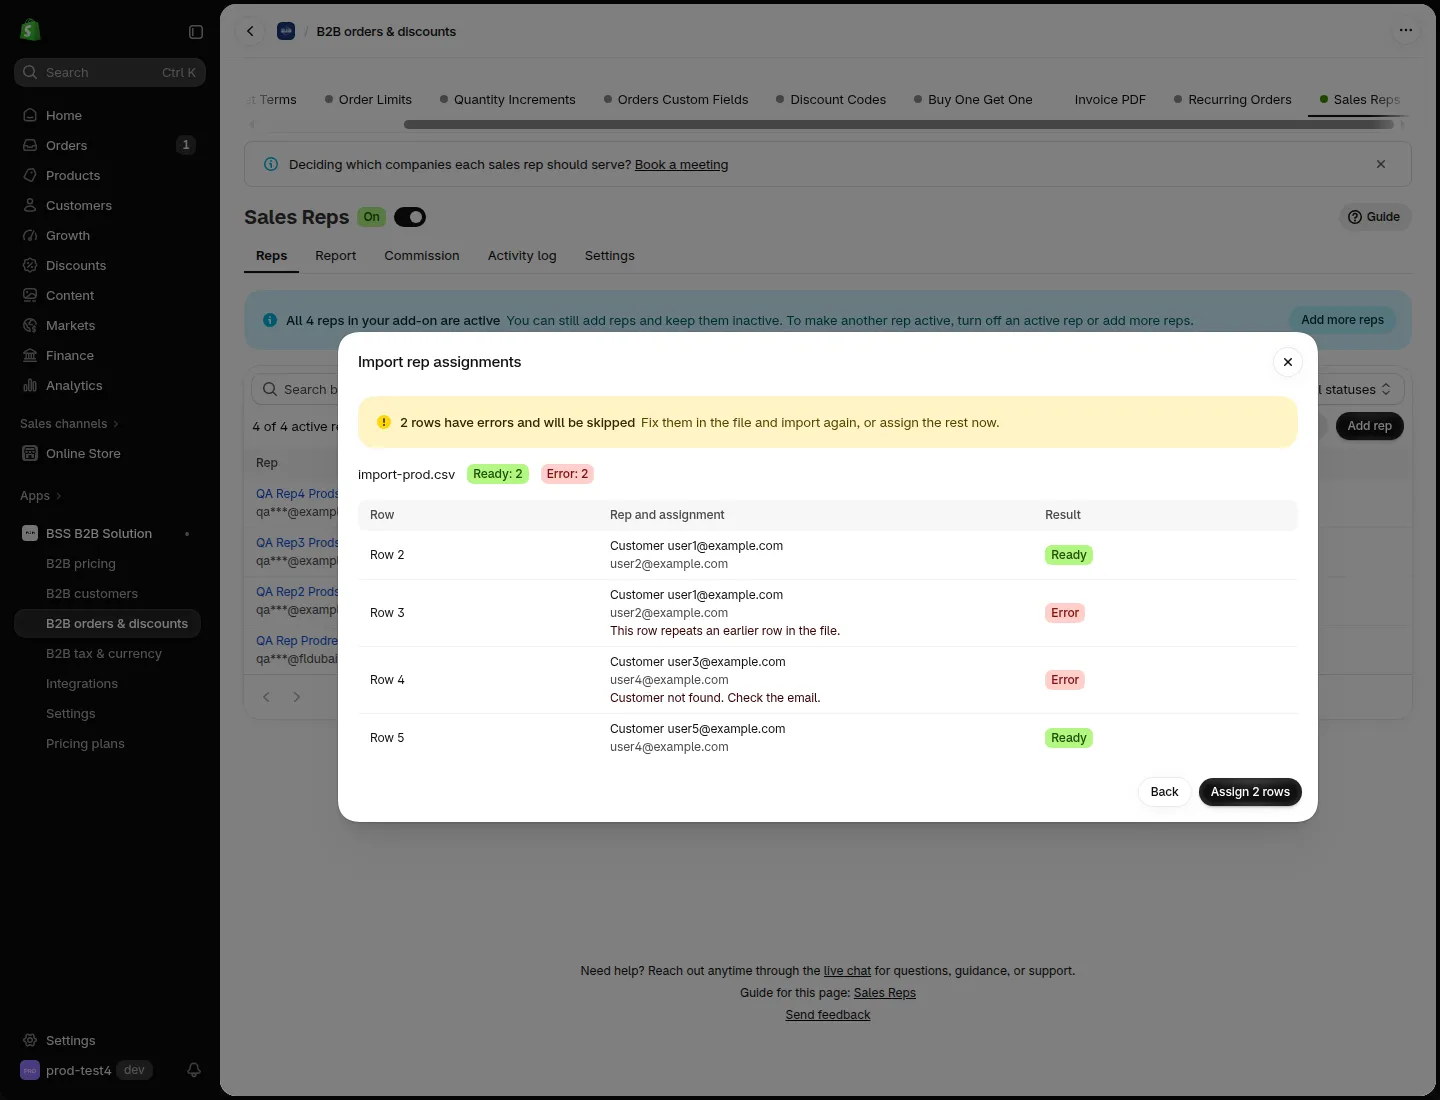
The preview shows each row before anything changes.
-
Check the result for each row
Section titled “Check the result for each row”The table lists each row with a Result: Ready, Skipped or Error, with the reason. Rows with errors are skipped. Fix them in the file and import again, or assign the rest now.
-
Click Assign
Section titled “Click Assign”Click Assign with the number of rows shown. The result shows how many were assigned, skipped or had errors.
Expected result: the new assignments appear on each rep’s page. They are added to what the rep already has. The import does not remove existing assignments and does not create reps.
What do the row errors mean?
Section titled “What do the row errors mean?”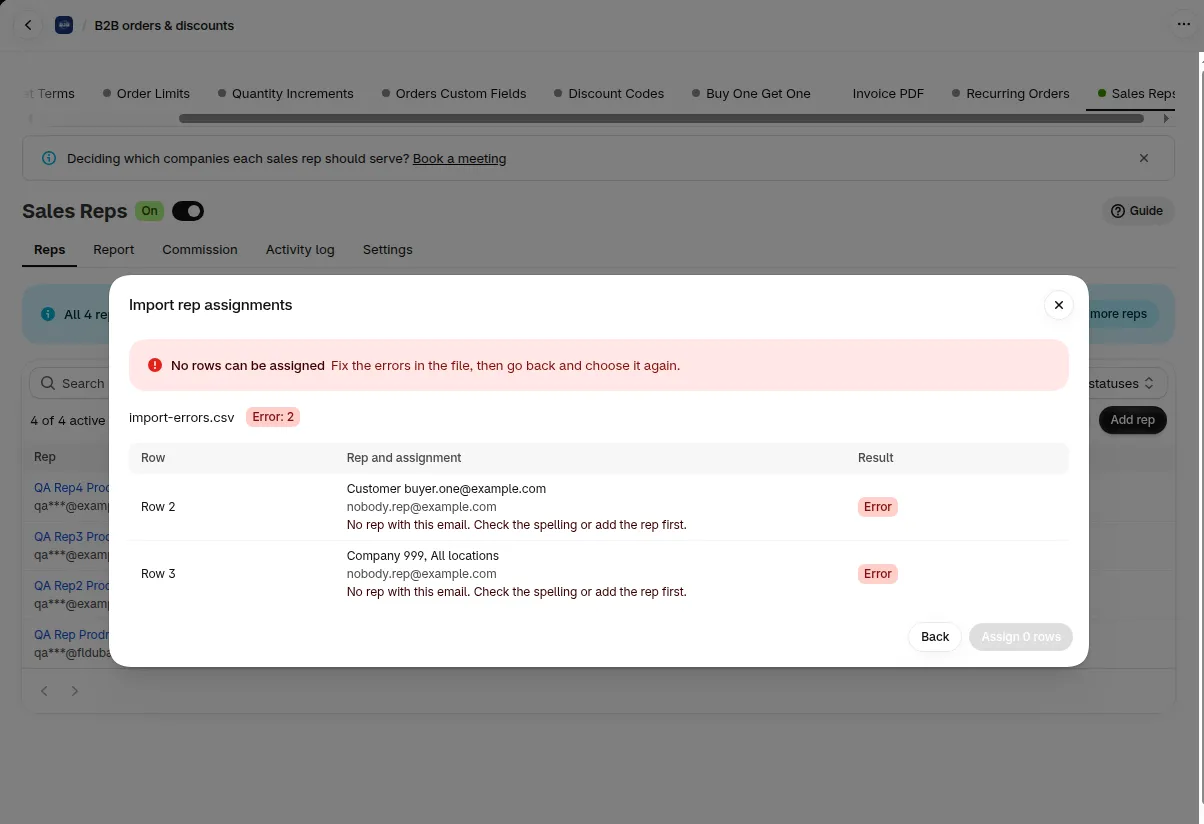
Rows with errors show the reason in the Result column and are skipped.
| Message | What to do |
|---|---|
| No rep with this email | Check the spelling or add the rep first |
| This rep is inactive | Make the rep active first |
| Company not found | Check the company ID |
| Location not found for this company | Check the location ID. It must belong to that company |
| Customer not found | Check the email |
| This customer is a contact of a company | Assign the company instead |
| A rep can’t be assigned to their own company or account | Remove the row. A rep’s own account can’t be assigned |
| This rep already has the maximum number of customers | Remove customers from the rep first |
| This row is incomplete or has a value we can’t read | Check the columns |
| This row repeats an earlier row in the file | Remove the duplicate |
| Already assigned. Skipped. | Nothing to do |
You can run 5 imports a minute. If you see Too many imports, nothing was changed. Wait a minute and try again. If you see Shopify is busy, nothing was changed. Try again in a moment.