
Verify Your Sender Domain With 3 CNAME Records
Add 3 CNAME records at your domain provider, and your app emails go out from your own address. Your domain signs the app emails sent from your address, so inboxes can check they come from your domain.
Before you start
Section titled “Before you start”- A mailbox address on a domain you own, for example
[email protected]. - Access to the DNS settings of that domain, at your domain provider.
- The address must be on your own domain. Free mailbox addresses such as Gmail cannot be verified. See Which addresses can I use?.
Step 1: Save your address and confirm it
Section titled “Step 1: Save your address and confirm it”- In the app menu, click Settings, then open Email settings.
- On the From address card, click Use your own email. The button says Change if a sender is already set.
- Enter the Email address and a Sender name, then click Save and send link.
- Open the email Confirm your email address and click Confirm email. The link works for 24 hours.
While you wait, the card shows the badge Waiting for confirmation. Emails keep going out from your current address, or from the default address if you have none.
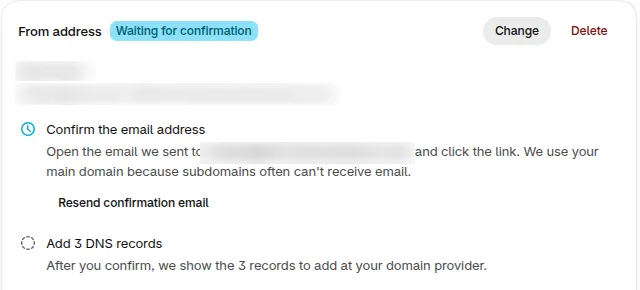
For a new domain, the 3 records appear right after you confirm. If this store has already verified your domain, we send no confirmation email, and the card shows Start verification. Click it to get your 3 records.
Step 2: Add the 3 records at your domain provider
Section titled “Step 2: Add the 3 records at your domain provider”Right after you confirm, the card shows the badge Not sending yet and a box with the heading Add 3 DNS records and the badge Waiting for DNS. Each record has a Host and a Value.
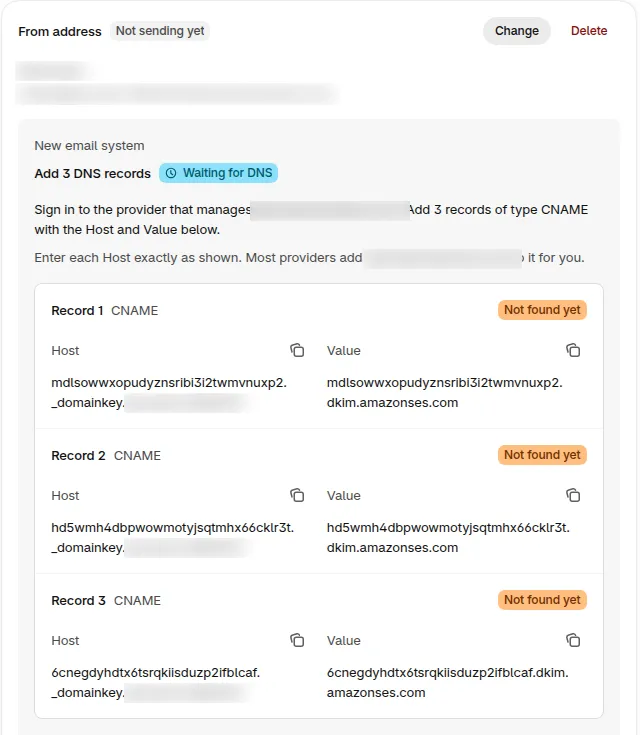
- Sign in to the provider that manages your domain, such as Cloudflare, GoDaddy or Shopify Domains.
- Open the DNS settings and add a new record of type CNAME.
- Click the copy icon next to Host and paste it as the record name. Enter it exactly as shown. Most providers add your domain to it for you.
- Click the copy icon next to Value and paste it as the record target.
- Repeat for Record 2 and Record 3.
If you use Cloudflare, set each record to DNS only, not proxied. For provider steps, see Cloudflare, GoDaddy and Shopify domain.
Step 3: Check the records
Section titled “Step 3: Check the records”We check your domain automatically for up to 72 hours. The 72 hours count from the first time you start verification, and Start again begins a new count. You can also click Check now any time. Each record shows Found or Not found yet, and the box counts them, for example 2 of 3 found.
DNS changes usually show within an hour. If you click Check now many times in a short time, you may see Checked just now. Try again in a minute. Wait a minute, then check again.
When all 3 records are found, you see Domain verified. Emails go out from your address. and the badge on the card changes to Verified.

What happens to my emails while I wait?
Section titled “What happens to my emails while I wait?”If your address is not sending yet, customers get app emails from the default address, with your sender name, until the card shows Verified. If your old email system is already sending from your address, emails keep going out from it while you verify.
Replies still come to you. They go to your Reply-to email. If you leave it empty, they go to your store’s contact email. While emails go out from the default address, they go to your sender email instead.
What if the check fails?
Section titled “What if the check fails?”| You see | What it means | What to do |
|---|---|---|
| We can’t confirm your DNS records right now | The check could not run. Emails still go out from your address if they did before. | Make sure the 3 records are still at your provider, then click Check now. |
| We didn’t find your DNS records | We did not find them in time. | Click Start again to get a new set of 3 records, add them, then click Check now. You can delete the 3 old records. If it keeps failing, click Contact support. |
| Couldn’t load your domain status | Nothing has changed. Emails keep going out as before. | Open Email settings again in a few minutes. |
If you already send from your own address
Section titled “If you already send from your own address”If your sender address is already working, the card shows Move your domain to our new email system with the badge Recommended. Click Start verification and add the 3 records. Emails keep going out from your address as they do today while you do this, and nothing changes for your customers. Gmail and Yahoo ask senders to authenticate their email, and your domain signs the app emails sent from your address.
The Home banner and notification bell
Section titled “The Home banner and notification bell”The Home page can show a banner: Move your sender domain to our new email system, or Send app emails from your own address if your address is not sending yet. Click Set up now or Verify domain to open Email settings. The notification bell shows the same message, and clicking it opens Email settings.

Frequently asked questions
Section titled “Frequently asked questions”What are the 3 CNAME records?
Section titled “What are the 3 CNAME records?”They are DKIM records. DKIM is a signature that lets inboxes check that an email really comes from your domain. The 3 records let your domain sign the app emails sent from your address.
How long does it take?
Section titled “How long does it take?”Usually within an hour. Step 3 explains the automatic checks and Check now. If we do not find your records in time, see What if the check fails?.
Which addresses can I use?
Section titled “Which addresses can I use?”Use an address on a domain you own and manage, for example [email protected]. Gmail, Yahoo, Outlook and other free mailbox addresses cannot be verified, and the card shows Can’t be verified. If you enter a BSS domain, the app refuses it when you save and says BSS domains can’t be used as a sender. Use an address on your own domain.
Can I change the address later?
Section titled “Can I change the address later?”Yes. Click Change on the From address card, enter the new address and follow the same steps. Click Delete, then Delete sender email, to go back to the default address.
Next: open Email branding on the same page to add your logo and button color, and click Send test email to see how an email looks. See Email Sender and Branding for the full page.